Showing posts with label Maybelline. Show all posts

Wednesday, 11 December 2013

Artsy Wednesday - Geometric Nail Art

Another Wednesday, another nailart! This weeks theme is geometric, and I'm keeping it simple.  I shopped like a BOSS last weekend and got all my Christmas shopping done, how cool is that?  Now I have to wrap it all and get it sent off, which is probably more effort than buying it.  I'm not complaining though, I'll pour myself a G&T and put some music on, and it'll be soon done and dusted.

I feel like I don't have five minutes to myself recently, so I just rustled these up in a jiffy.  The base is Maybelline Express Finish in Silver Speed, which is my go-to silver.  This is two coats and it really is nice and fast drying.

I had better show you a picture!  Here you go:
I created black triangles at my cuticles with my new Barry M Nailart Pen, which for some reason seemed to be in the mood to turn itself into a crackle effect polish.  Not liking that.  I don't know if it's because I hadn't waited for the base coat to fully dry, but it's something I'll have to watch to see if it does it alot.

Here's a pic in more natural light (that lifelong winter lighting problem):
Then I used my Color Club Artclub red striper to draw a line under the black block.  I have to say that the quality of the Color Club stripers are fab, I got mine in a set from TK Maxx (of course) but I've seen them on Amazon for around a fiver including delivery (link)

I was going to do more to it, but I actually like the simplicity of this.  It was fast and easy, and it reminds me of the 80's styles, which is all the more reason for me to like it. 

I have a split on the edge of the nail on my ring finger (bah) which means I'll have to go back down to shorties soon, but I've had a super-long run without any breakages at all so I can't complain.  Actually it's my own fault, as I had a week off the perfect formula strengthener, and now the split.  I got a bit too lax, oh well.

One more pic.  This one under the kitchen light.  It really shows that crackling I was telling you about earlier:
I've actually done my first Christmas nailart design of the year too, I'll pop the photos up for you soon to have a gander at.

But until then, why not take a look at the geometric designs that the other lovely Artsy Wednesday ladies have come up with?

Catrine at Unnaked Nails (link)
Michelle at Labmuffin (link)
Maria at Maria's Nail Polish Blog (link)
Melanie at Nail and Polish (link)
Ameerah at Valiantly Varnished (link)
Anna & Haylee at Makeup and Masala (link)
Rosemarie at Every Little Polish (link)
Anna at Makeup N More (link)

Thanks for reading, and I hope you liked it!

Until next time...

MASPOOASE x x x
~Wendy~

Friday, 19 April 2013

Spring Sunflower Nailart Tutorial

Hi everyone,

The sun is feeling warm, and it looks like spring is finally here, thank goodness.  It's made me feel all happy and full of the joys of spring, and I really wanted my nails to match my mood.

So off I went to YouTube, looking for inspiration.  Sure enough, I found a fab tutorial by simplyrins (link) which showed me how to do sunflowers, just what I was looking for!  It's been a while since I used my acrylic paints, and I've missed them.

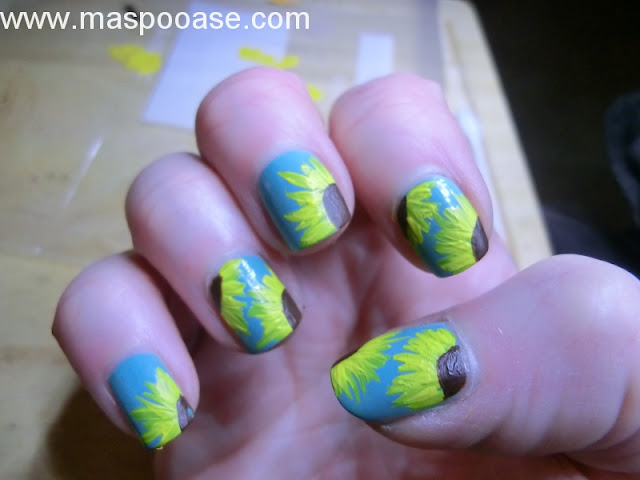
I changed the colour scheme and layout to hers, but I used exactly the same method.  Here's what I ended up with, in a spring-y pose:
Buds on the bushes!  Hooray!

So here's how I did it.  I'd already done my left hand, so this tutorial is 'wrong handed'.  Therefore it's safe to say that a beginner could definitely give it a go, as even my weaker hand came out looking pretty good.

1) Base colour.  Maybelline Express Finish in Turquoise Lagoon, 2 coats,  It did dry super fast too:
Sunflower Nailart Tutorial

2) Use yellow acrylic paint (or nail polish) and a small brush to mark out your first row of petals, using a single stroke per petal.  It doesn't matter if they're not perfect, nature's not:
Sunflower Nailart Tutorial

3) Carry on making petals in the same way until you're happy with the look:
Sunflower Nailart Tutorial

4) Do the same on all your fingers, in the layout of your choice.  If you're using acrylic paint you can erase any mistakes with a cotton bud/q-tip soaked with water:
Sunflower Nailart Tutorial

5) Use brown acrylic paint (or nail varnish) to fill in the flower centre:
Sunflower Nailart Tutorial

6) Continue with all your nails:
Sunflower Nailart Tutorial

7) Now you could stop there if you like and it would still look good, but for that extra special finishing touch you can make tiny yellow dots, using a small dotter, over the brown to give some dimension and detail to the  flower centres:
Sunflower Nailart Tutorial

8) Just add your topcoat, and you're done!
Sunflower Nailart Tutorial

So there we have it, jolly spring nails to be proud of. 
I like this design so much I've done both hands, and am going to keep it on, which is a big thumbs up from me.  Just right for this time of year. 
 
In case you're wondering, I got my acrylic paints nice and cheap from Amazon (link) 12 colours for £6.81, bargain, and they seem like pretty good quality.
 
So what do you think, could you give this a go?  Make sure you show me if you do!
 
Until next time...
 
MASPOOASE x x x
~Wendy~

Monday, 24 December 2012

Christmas Nail Art Challenge - Day 11 - Tinsel

Happy Christmas Eve!

I'm off work at last hooray!  This morning was my last shift until the New Year, so I'm very happy about that!

I dodged the elves challenge.  I was completely uninspired by it, and I didn't want to sell my blog short by just bodging something in order to have something to post, so I just didn't do it.  It's a shame to not have done them all, but there you go, that's life sometimes.  There are some manis from this challenge I've been really pleased with, and others I wouldn't have ordinarily put on my blog in a million years, but it's definitely been an experience, and I'm glad I've taken part.  After this one there's only Santas left for tomorrow.  Hopefully I can get that painted up and prepared today, because I'll be out most of the day tomorrow doing my own Santa duties. Ho Ho Ho!

Tinsel as a challenge can only really mean one thing - bar glitter.  Luckily for me that means not much decision making because I've only got one bar glitter, a £2.50 silver holo one from Claires Accessories.  I've found Claires polishes to be a bit hit and miss, so I thought I would double up this nail art post with a review of this polish.

Firstly I thought I would try it over a range of colours, so I used 2 coats of each:
White - OPI My Boyfriend Scales Walls reviewed here
Black - L'Oreal Color Riche in Black Swan
Red - Maybelline Express Finish Cherry Red shown here
Silver - Jessica Hologram Chic Disco Diva reviewed here

Here's how it looks in all its Christmassy glory:
This is two coats of the bar glitter with a color club top coat.  Dry time was medium.  I found that I only got a decent amount of glitter onto my nail if I put the brush back in the bottle and gave it a good shake for each nail.  Just dipping the brush back in the bottle without shaking it meant I just seemed to get clearcoat and not glitter.  I also moved it around a bit on my nail as just brushing it on made all the bars face one way and that made my nails look hairy, which is the bar glitter look I hate.

The holo isn't as wow in ordinary indoor light, but it is still there:
But outdoors in daylight it really comes into its own:
If you want a really smooth finish to this you will need at least two coats of top coat, or perhaps one thick coat of Seche.  With one coat of normal top coat I could still feel texture there.

I'm quite surprised because I thought I would like this best over black, but in fact it looks best over the most similar colour, the silver.  I think this is probably because I'm not that mad on the bar glitter look anyway, and to just get that bling of mad holo is much more 'me'.

I also liked it over the white, it was quite a futuristic look.  Am considering the silver for New Years Eve, I think it would be quite fitting and fun.

And there we have it, I hope it was tinselly enough for you!

Until next time...

MASPOOASE x x x
~Wendy~

Wednesday, 12 December 2012

Christmas Nail Art Challenge - Day 5 - Movie

Hi there again everyone

What a tough challenge this was!  The idea I've had in my head to do was already done by someone - and so much better than I could have done it, so I had to start planning again from scratch.  I've got a cold and had a pretty tough day at work - and wasn't feeling the inspiration.  It took a very nice tweet from Inky to put it all back into perspective, so I took a deep breath and thought, what Christmas movies do I actually like?

To be honest I'm not really a Christmas movies kind of girl, my first thought was Gremlins, but I didn't know how to get one onto my nails, so my next thought was The Shining (yes I'm a horror gal), and an iconic image in there is the carpet in the long corridor where Danny cycles along on his trike. 

That got me thinking if I had any stamping plates that might do, and I found one in my Cheeky Plate B which looked like it might do the trick.  I found this design quite hard to photograph, but it came out best with the flash:
Now, I know I missed a spot on my middle finger and my thumb, but to be honest it's after 10pm now, and if I want to get this post out at all on the right day I just have to go with what I have!

Here's a picture of the carpet I mean:

My base brown wasn't quite dark enough, I used Nails Inc Ganton Street.  For the orange stamping I used Essie Orange It's Obvious, which stamped really nicely.  Then I dotted the centres with the ruby colour Maybelline Salon Finish in Ruby Fire Creme, which I've had FOREVER.

Here's another pic:
And one final pic:
Actually, even though it's not perfectly executed, I'm quite glad I did this manicure.  For one, The Shining is actually one of my favourite Christmas films, and not just one I picked because I could do nail art for it.  For two, I haven't done stamping for ages.  And three, it does actually look a bit like the carpet!  Next time I'll use a darker base coat, because I will definitely be trying this out again!

So there we have it, I got a post done, even though it was touch and go there for a while.  I hope you liked it!  You've probably already checked out everyone else already as I'm so late, but if not, check out the links below.

Until next time...

MASPOOASE x x x
~Wendy~

Saturday, 24 November 2012

Millennium Nails Nail Striper Review and Comparison

Happy Weekend to you!
 
Typically, as winter is pretty much here now, and everyone is rocking their cool dark mani's, I've been digging pastels and neons!  Yes, it may just be the contrariness in me, but what the hey.  I've also been having a bit of a stripe frenzy.  These two things came together and demanded that I buy a pastel yellow striping polish.  Could I find one on the whole of the internet? NO!
 
I do own some striping brushes, and some pastel yellow polish, but for some reason I really can't enjoy striping like that.  It's alot of messing about, cleaning brushes with polish remover while wearing the polish and trying not to smudge anything.... too much hassle for me!  So striping polishes are ideal, all packaged up nicely, and when you're finished, just pop the lid back on and you're away!
 
So anyway, I couldn't find a pale yellow one.  Lots of pastels in green, blue, pink, but no yellow.  I decided what I would do is buy a white one and add some yellow polish to it, voila! A pale yellow one.  Now as this is obviously a bit experimental, I don't want to buy an expensive striper, but likewise, I don't want a rubbish one either, as some of the stripers I've bought in the past have been a bit pants.  So I found this cheap one on Amazon, only £2.39 plus £1.55 P&P, there weren't any reviews for it, and I couldn't find any on blogs anywhere (hence this review), but I took the plunge anyway. HERE'S the link
 
I thought I would show a comparison against my trusty Color Club white striper, which I love, to give you an idea of the quality, and actually I quite like how it came out, which surprised me, as I'm not a great fan of red nails on me.

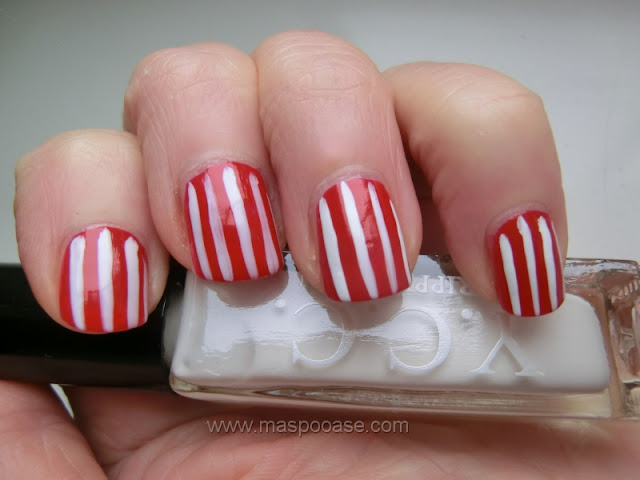
Without further ado, lets get on with the pics.  I used the Millennium Nails striper on my index and middle finger, and the Color Club striper on my ring finger and little (pinky) finger:
Millennium Nails snow white striper review
As you see, there is a TINY amount of difference.  The Color Club is slightly more opaque, and where the lines begin at my cuticle is a bit neater.  This is because the Millennium Nails brush wasn't completely even at the tip, am wondering if I can maybe give the brush a bit of a trim with my nail scissors to improve it.

But, actually, for the price, not bad.  Here's another pic:
Millennium Nails white snow striper review
The bottle is glass, and not the same one shown in the Amazon pic.  It made me giggle, because the writing on it says "YCC Stripping Pen".  Not a pen, and certainly not a stripper!

Anyhow, for anyone who's interested in seeing the undies for this mani, it's Maybelline Express Finish in Cherry, which is a nice bright red, a bit darker than it's showing in my pics, a bit of VNL in one coat (which is all I used), but for the purposes of this mani that didn't bother me:
Maybelline Express Finish in Cherry
And finally, here's a pic of the actual brushes, I couldn't find a pic like this anywhere before I bought the striper, so hopefully someone stumbles across this if they're looking to buy.  Apologies for the slightly scruffy background, it was the only black piece of card I could find:
Color Club White Striper Review
As you can see, the Millennium Nails one is slightly longer, but both brushes have a nice firm spring to them, and both were nice to hold and use.  Maybe I should have cleaned off the neck of my Color Club one before taking the photo haha.  Amazon says the Millennium has 8ml in it, whereas the Color Club has 7ml.

So, in summary:

If the Millennium Nails stripers came with free P&P, they would be a total bargain.  As it is, with the shipping they pretty much come alongside the better quality Color Club ones, which have free shipping.  So if you're looking at both, I would say get the Color Club one.  I haven't done my yellow experiment yet, but will let you know how it goes!

Until next time....

MASPOOASE x x x
~Wendy~

Monday, 10 September 2012

Blair Witch Nailart for Halloween

Hi everyone, hope you are well

I had a ping of inspiration today!  I've still been enjoying my Collection 2000 All That Jazz nails which I blogged about yesterday, and was looking at them (as you do) and I had a really good idea for my halloween nails this year.  I usually disappoint myself because I can never come up with an idea that either a) hasn't been done already, or b) is creepy enough.  It's an amazing thing because pretty much the only films I watch are horror or sci-fi so you'd think I'd have loads of ideas! 

So anyway, for some reason the silver grey of the polish reminded me of the Blair Witch project, and that's where I started.  I checked about on google to see if it's already been done and I couldn't see it anywhere so hopefully I'm safe on that score.  If not, and someone has already done them who didn't come up on my search, apologies.

Also I apologise in advance if these photos aren't the usual quality, but it's dark outside and I was DYING to show you.  Tomorrow when it's daylight I'll take some more pictures and maybe replace these ones.

*EDIT* I've put the new pictures in as it's daylight now! Hope you like them

This is what I came up with:
Blair Witch Nailart

Blair Witch Nailart
Heres a pic outside in the daylight (yes I got carried away with the pics):
Blair Witch Nail Art
Heres the other hand, the trees didn't fare so well being drawn with my 'not so skilled' hand lol:
Blair Witch Nailart
And heres what I used:
- For the base colour, Collection 2000 Hot Looks in All That Jazz
I sponged (yes sponged!) Maybelline Express finish in White Dream, both to represent moonlight coming through the trees, and to make my trees stand out better, it worked well I think
- White striping polish from Claires Accessories - it was NOT easy to draw a circle with it
- Black striping polish from Color Club that came in a collection
- Top coat of Seche Vite, I've thinned it down with some Seche Restore and it's less dentable now, which I'm glad about.

So there we have it, am really pleased with this, and I think I'll use the stick man as my avatar over halloween, he's super cool.

I hope you like it, let me know what you think! And oh, don't have nightmares :-)

Until next time.....

MASPOOASE x x x
~Wendy~