Monday, 1 December 2014

Artsy Wednesday - Pastels

Hi everyone, hope you're having a good week?

I'm on my holidays in Torquay, having a lovely time. The weather could be better, but that's the risk you take when holidaying in the UK. 

Silly me forgot to bring my laptop, so I'm going to attempt to make this post purely with my iphone 3gs. Don't expect too much! I won't be able to resize or colour correct, so sorry about that.  The theme this time is pastels, which is great for me, as they're my favourite!

Here's what i came up with:
I used M&S Limited Collection in Pale Lavender, then i masked off the top half and painted the end of my nail in OPI Mod About You.

I then used a Color Club striper to paint the white stripes, and then removed the tape.  A coat of Seche Vite, and voila, funky french!

I hope you like what I came up with, don't forget to check out what the other Artsy Wednesday girls did - 

Catrine - Unnaked Nails
www.unnakednails.com

Michelle - Lab Muffin
www.labmuffin.com

Alanna - Pretty Purple Polish
www.prettypurplepolish.com

Maria - Maria's Nail Polish Blog
http://mariasnailpolishblog.blogspot.co.uk/?m=1

Melanie - Nail and Polish
http://nailandpolish.blogspot.co.uk/?m=1

Jessica - Beauty Gnome
http://beautygnome.blogspot.co.uk/?m=1

Emily - An Accent Nail
http://anaccentnail.blogspot.co.uk/?m=1

Ameerah - Valiantly Varnished
http://www.valiantlyvarnished.com/?m=1

Until next time...

MASPOOASE x x x
~Wendy~

2True Fast Dry Polish Shade 11 Swatches

Hi again!

Hope you're well today.

Here we have a surprise buy for me, a super-cheap £1.99 nude polish!  Now I'm not a big fan of nude polishes, despite loving my pastels, but this one caught my eye because I'm looking for an antique cream for a nail art look I've got in my head. 

I thought this might be the one I'm looking for. Unfortunately it wasn't, (not cream coloured enough) but I like it all the same:
2True-Fast-Dry-Shade-11-Swatch
It was streaky in one coat, and opaque in two, which is what's shown here.  The formula was a tiny bit runny, but nothing too awkward, and perhaps half a shade darker once on and dry than in the bottle.  It reminded me very much of the 'camel coats' we all used to wear, way back when...

It also reminded me very much of a bottle of concealer, and once I'd got that in my head I felt weird painting it on my nails haha!  Here's another pic:
And finally, here's a pic of the brush, partly because there's a flash on the packaging that says 'new flat brush' so I thought you might like to see it, and partly because I always want to show brushes on my polish review posts.  I'll include front view & side view to show that it is, indeed, flat:

And actually, the brush was the only thing that slightly let this polish down, the shape was actually fine, I did my little finger in more or less one stroke and pressed flat it went into a more slightly rounded shape, but it was just that little bit too stiff bristled to be perfect.  However, bear in mind I'm comparing it with Nails Inc and Jessica polishes that cost more than a tenner each.  No complaints on glossiness or coverage though!


Also not only are they £1.99 each, they're 3 for £5 in Superdrug, which is where I got mine, so they really are a bargain!  Thoroughly recommended.

Until next time...

MASPOOASE   X X X
~Wendy~

Mid Browns - Nails Inc Ganton Street Vs Jessica Guilty Pleasures

I have decided that fate doesn't want me to blog about nail polish at the moment. 

Because of my pesky ongoing achilles tendon problems, I have to have physiotherapy on a Thursday afternoon. 

Because I don't have enough annual leave left for my hospital appointments, I'm having to work on Saturday morning instead to make my hours up.  This is so INCONVENIENT!  Guys and girls who regularly work at the weekends, you have my undying admiration.  I just feel like theres no time to do anything. 

Also, because I'm working on the Saturday, I can't have my usual swatch-a-thon on Friday night.... so all in all it's a right royal pain in the behind.

Well, here's two fingers up to fate, because I've managed to do it anyway!  You may know that I'm craving a dark brown nail polish right now, but with the aforementioned problems I've had to resort to just mooning over web swatches and wishing for things to get back to normal. 

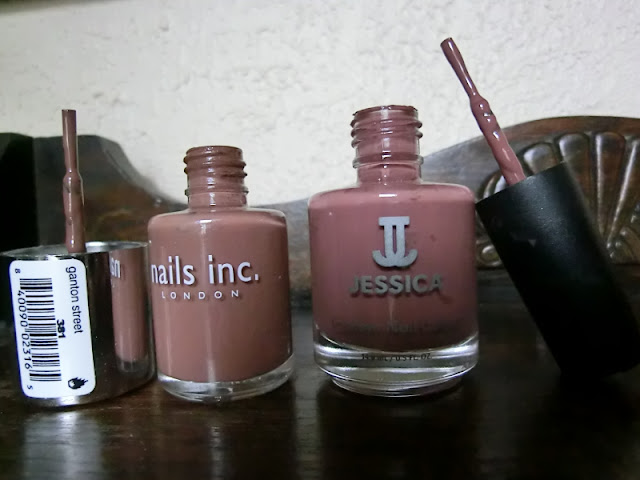
I decided to look through my polishes to check what browns I actually do have, in case I already had one (I didn't but you never know until you look!), but I did find two mid brown polishes which were virtually identical, and similarly priced, so I thought you might be interested in seeing a comparison.  They are, as the post title suggests, Nails Inc Ganton Street and Jessica's Guilty Pleasures.  For a change I will start with the brush & bottle shot:
Jessica Guilty Pleasures Vs Nails Inc Ganton Street Swatch
There you see, pretty similar, right?  The Jessica is a tad warmer, but very similar all the same.  Apologies about the dark corner on the picture, with Autumn setting in it's getting harder and harder to find bright places to put things...

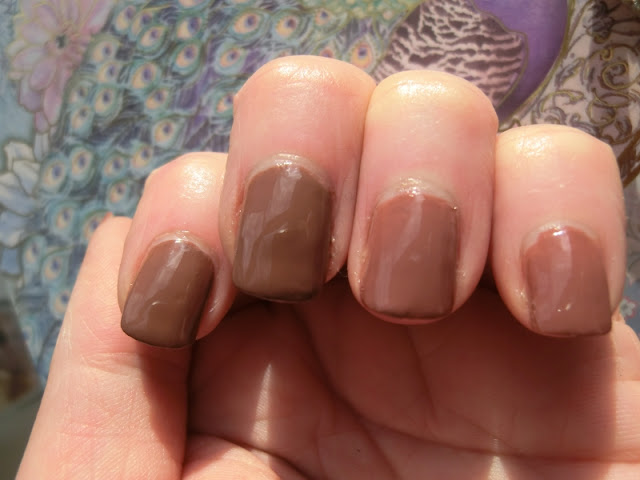
So onto the swatches, I found the best place to show the difference was under the trusty LED craft light.  All pics are two coats with no topcoat.  Nails Inc on left 2 fingers:
nails inc ganton st vs Jessica Guilty Pleasures
Then, amazingly, the sun came out for a moment:
Jessica Guilty Pleasures vs nails inc ganton street
Then it went back in.  So here's a pic in shaded light:
Jessica Guilty Pleasures vs nails inc ganton street
Application wise, there's hardly anything to pick between them either.  If you've used Nails Inc before, this is their usual creme formula, which I like as it's got good coverage and is pretty quick drying.  The Jessica was a teeny tiny bit more sheer on first coat, but by coat two they looked the same coverage-wise.  I preferred the Nails Inc brush, because the Jessica one was a tad softer so therefore not quite as easy to work with, but I really am splitting hairs (LOL) here.

Out of the two, it was the Nails Inc I chose to put on afterwards, it's a Malteser brown, and somehow for a darker colour it seems quite work appropriate, which is good.  Unless of course, you do what I did and put nail art all over it haha.  It didn't exactly work, but I liked the colour scheme:
nails inc ganton street with gold nailart
The Jessica has 14.8ml in and the Nails Inc has 10ml in.  Nails Inc polishes cost £11 and Jessica Polishes cost around a tenner, but I have seen both cheaper on Ebay.  So mil for mil the Jessica is probably better value, but if you're willing to spend more than £10 on a polish that doesn't really matter so much to you.

So there you go!  Formulation and application are both pretty much the same so it just comes down to the tint you like the best.  Hopefully this will prove helpful to someone!

Until next time.....

MASPOOASE x x x
~Wendy~

Sally Hansen Nail Art Pens Review

Hi again!

Hope you're having a great weekend

So, this story starts with me in my beloved TK Maxx.... just browsing around in the nail section, as you do, when I came across a Sally Hansen Nail Art Pen in gold.  It was only £2.99, so I thought I'd give it a go, and as it happened I really liked it! 

I had a look on Amazon UK to see if there were any more colours made, and there were, so I got a few more.  There were none with free shipping, so all in all I paid about a fiver each for the others.  Here's what I've ended up with:
Sally Hansen Nail Art Pens Review
As you see, as usual I went a bit mad haha!  Obviously at some point in Rite Aid in the USA these have been half price and in a gift pack.  Good job I wasn't buying them as a present.  I bought the silver one from a different seller and the packaging on that one was all neat and tidy and nice.  I didn't get a black or a white because they were alot more expensive or in 2-packs.  Who needs 2?

These are:
08 Gold
05 Blue
07 Silver
04 Hot Pink
10 Purple Violet
06 Red

I thought the best way to show you the coverage and finish was to paint two nails in a dark colour and two nails in a light colour, so I used my new OPI My Boyfriend Scales Walls (2 coats) for the light, and my Collection 2000 All That Jazz (one coat) for the dark.  I used the same colours on the other hand only the opposite fingers, and I really liked the look, I'm going to try it as a proper mani at some stage.  But for today, they are just canvasses:
OPI My Boyfriend Scales Walls and Collection 2000 All That Jazz
My Boyfriend Scales Walls was OK to apply, but because of the hype surrounding it I was expecting more - I know, never happy.  It was how I was expecting Alpine Snow to be, not bad application but took longer than I thought to dry. 

So first off I did some (very wiggly) stripes, thick and thin, with all the colours, on both the light and the dark.  The sheerest was the red, which reminded me very much of tomato soup, and the most opaque was either the pink or the blue:
Sally Hansen Nail Art Pens Review
The white polish canvas wasn't quite dry, if you look carefully in the thick silver stripe you can see where it dug in a bit.  As you can see, the gold is more of a copper really, but pretty anyway.

And heres some nail art to show you what you can do with them:
Sally Hansen Nail Art Pens Review
Once it was dry I topped it off with a coat of Seche Vite, and that's how it's shown here.  I wasn't very pleased with the cocktail glass on the index finger (yes, that's what it is!) but the rest came out ok.  My favourite is the stars and dots.

And in the best 'showing the brush' tradition, here's what the nibs look like:
Sally Hansen Nail Art Pens Nib
They feel a bit like a felt pen to use, and theres a ball bearing inside that rattles when you shake it up and down to mix up the lacquer inside.  You press the nibs in if you want to work more polish down onto the nib, but so far I haven't needed to do that, except for the first use. 

All in all, I like them.  They're definitely great for doing tiny dots with no fussing and worth owning just for that alone.  They didn't have very good reviews on Amazon, and if I'd read those before I got I the first one I wouldn't have bought them, so I'm glad it happened the way it did.  I just have to hope that a black and a white one are on special offer at some point!

I hope this helps someone who's been considering them, or just been interesting for you generally, am planning some cuticle and nail care product reviews soon, and will have some Essie swatching to do if I ever get a day when I'm off when there's some good light!  All to look forward to :-)

Until next time....

MASPOOASE  x x x
~Wendy~

Monday, 15 September 2014

Barry M Gelly Paprika Mustard and Cardamom swatch and review

Hey there!

I hope you're all doing well?  Here we are at the change of the seasons again, and we're now getting into my favourite!  The leaves are starting to turn, and whether you call it Autumn or Fall, I reckon it's the most beautiful season there is.

Having been completely underwhelmed by high street nail polishes of late, and unwilling to pay the higher prices of indies when I already have so much polish, it means I've actually bought very little lately, and that's why I haven't had very much to show you.  I haven't even done much nail art, and that which I have done has been simple dots or stripes and not really worth shouting about.

However, I was in Superdrug last weekend, and ka-pow! Some polish that made me do a double take.  In fact I might have even said "ooh!" out loud, for here were some polish colours I didn't already own, and in wonderful Autumn colours.  There were 5 or 6 in the range, but Superdrug had a 3 for 2 offer on, so I rationed myself to three.

These were the three polishes I got:
Barry M Fall Gelly polishes review
From L-R they are Cardamom, Mustard and Paprika. 

I may as well now show them to you in the same order as this picture, which is just the order I picked them up in my hand (professional to a fault hehe).

For each colour polish I've taken three pictures.  One in direct sun, one in the shade and one showing the bottle so you can see how the polish on the nail compares with the colour in the bottle.

So lets go with Barry M Cardamom.  First in the shade:
Barry-M-Gelly-Cardamom-swatch
The formula was lovely, if you've used Barry M Gellies before, it's pretty much their standard formula.  This is one coat with no top coat, and it had the lovely shine as they all do.  I find that this shine doesn't last long on me and if I manage to wear it for a couple of days without chipping (I'm tough on polish) I find I want to add a topcoat at that point just to get the shine back. 

Usually by a couple of days I've chipped any polish anyway, no matter what the make.  I think it's because I wash my hands alot, and am typing most of the day.

Here it is in direct sun:
Barry-M-Gelly-Cardamom-review
I have had to do a little bit of electronic dry skin gardening on these pics.  Not to make my cuticles look marvellous (as I'm sure you can tell) but just to make sure I don't put you off your breakfast.  They were most incredibly dry, despite me treating them better than most Egyptian princesses day and night. They're so ungrateful and insist on shedding all the expensive moisture I try to pamper them with.  Sigh.

Here's the bottle comparison:
Barry-M-Cardamom-review
I have to say I was a little bit disappointed in this colour when it dried.  As you can see, the colour in the bottle is a more greyed out green, which I prefer, and it dried to a kind of light British Racing Green, which is not what I was looking for.  But still, it's not unpleasant, and I do think I'll wear it.  Dry time was the usual Gelly medium-fast.

Next up we have Barry M Gelly in Mustard, firstly in the shade:
Barry-M-Gelly-Mustard-swatch
Again this is one coat with no top coat, and for a light colour it gave pretty good coverage.  The same nice formula with a medium-quick dry time.  I do find I have to be quite careful when applying Gellies to wipe the brush stalk or else there is  a high possibility of a big blob of polish making its way onto my nail (or leg, or carpet, etc, in a nail polish Russian Roulette stylee). 

Here it is in the sunshine:
Barry-M-Gelly-Mustard-review
You can see on this pic, very slight VNL on my index finger and the edge of my thumb, but in real life that wasn't noticeable.  Another coat would have sorted it out, but to be honest, I was too lazy.

Here it is with its bottle comparison:
Barry-M-Mustard-review
Again, a little bit darker than in the bottle.  When I first applied this colour I said, OMG this does absolutely nothing for my skin tone, but it was that fugly I actually fell a bit in love with it.  Of the three colours, this is my fave, and I think it will be my go-to Autumn colour this year.  Though not really office friendly in the conservative environment at mine so I'll have to reserve it for weekends.

And onto the third colour, Paprika:
Barry-M-Gelly-Paprika-review
A true russet red, this one really did need two coats.  However I didn't, because I'd only done one coat for the other two colours, I wanted to keep the same for this (see also, lazy).  Same formula and dry time as the others.  Reds are not really my thing, but this one is wearable as it's definitely more in the brown family.

Here it is in the sunshine:
Barry-M-Gelly-Paprika-swatch
This picture is actually pretty spot on colour wise, and is the most office friendly of the three I bought.

Here's its bottle comparison:
Barry-M-Paprika-swatch
Again a bit darker than in the bottle, a recurring theme.

The three look lovely side by side, so I thought I'd mix them up a bit:
Autumn-Nail-Art
I used striping tape to section off the end and middle of my nails and just using the brush from the bottle I painted between the tape.  Leaf for topical interest ;-)

It's not the neatest nailart I've ever done but I absolutely love the end result.  So much so, I took another pic haha.  This time in the sun:
Fall-Nail-Art
It was topped off with HK Girl Glisten and Glow top coat which is my current favourite.  It doesn't go gloopy and shrink like Seche can after a while.

So there we have it, the three I bought, and I'm very pleased with them.  I would definitely recommend them.  I paid £3.99 per bottle, but as I said I got them on a 3 for 2 offer which means I ended up paying just over £2.50 per bottle.

You can see the full range of the Barry M Gelly colours by following this (link) and the list of ingredients are also there.  Barry M are cruelty free, so guilt free polishing.

The next polish on my want list will be a thermal, I've only got a couple of those and the formula of the ones I have is not great.  Do you have a favourite I should be looking at?

Is Autumn your favourite like mine, or do you prefer another season?

Until next time....

MASPOOASE x x x
~Wendy~

Sunday, 11 May 2014

Barry M Gelly Nail Polish in Olive review plus freehand lace nailart

Woot!  I found some mojo! It's been a long time people, and good to be back.  What an up and down few months I've had. It's certainly true what they say about not fully appreciating your good health until you don't have it.  However, things are looking up now and so I've got room in my brain for the fun stuff.  So OBVS I've gone straight to my finger ends :-)

I've hardly bought any polish these last few months (I knowwwww), and have spent most of my time with just strengthener on them.  My cuticles are awful due to a dermatitis attack, despite constant moisturing I'm pretty sure I'll have to photoshop at least a couple of fingers to prevent my post looking like an episode of Casualty haha.

On a happier note I reached 100,000 pageviews yay!  Actually it's a bit past that, but for some reason I can't fathom, one of my Feelgood Friday posts is getting ALOT of love.  It must be linked somewhere in somebody populars' blog, but because I can't work Google Analytics properly I'll never know.  So I'm not counting the pageviews from that one post, because it makes me look much more popular than I actually am.

So, I went out shopping today and some new Barry M Gellys caught my eye.  I'm always on the lookout for pale green polishes and GNP23 Olive fits that bill perfectly.  A washed out khaki that reminds me very much of Essies Navigate Her, which I loved the colour of, but hated the formula.  I would do a comparison post for you, but am pretty sure I gave Navigate Her away.

So how was it I hear you ask?  Well, here's how the colour looks:
As you can see, a pale grey/green.

Here's the full hand swatch.  It has a coat of HK Girl Glisten & Glow topcoat on it as I forgot to take a picture before I applied it, doh!  It was the usual Gelly shiny finish though.
It's looking slightly more greyed out here than it looks in real life, and it is flattering to my skin tone.  I used two coats, but you could definitely get away with one thickish one if you're using a fast dry topcoat over it.  Dry time was pretty fast, and I didn't have any problem with the formula.  Nice and smooth, and no bubbles, lovely.

But of course, due to the aforementioned return of the mojo, I couldn't just leave them all blank and sensible.  So I went to YouTube to look for some inspiration.  I found some in the form of this video http://youtu.be/yC3P3pIrR3o by LNETSA for some lovely lace nails.  Keeping with the Barry M theme, I used their nail art pen, which I reviewed in full (here)

And this is what I came up with:
I'm really pleased with how they came out, considering they didn't take much time at all, and I'm considering doing a step by step tutorial for them, if anyone would be interested?

As you can see in the background, the bluebells are back out in the garden and I couldn't resist giving them a part in the show:
How gorgeous are they?  And they smell divine.  They really do make something simple like walking up the garden path a pleasure.  Yes, I do stop to smell the flowers, I think we all should whenever we can.  How are your gardens going, do you have flowers out yet?

And finally, back to the polish, here's the brush shot:
This is probably the most accurate picture colour wise, and I would say it has dried to half a shade richer on my nails.  As I said, I had no problems with application and I'm very pleased with it.  I can see it becoming a regular for me.

I paid £3.99 in Superdrug, and because they had a 3 for 2 offer on, I got it a little bit cheaper than that.  In fact I didn't realise about the offer until I already had two things in my hand, so I felt like I got a bonus freebie.

So what do you think, is it a colour or design you'd go for? 

Until next time...

MASPOOASE x x x
~Wendy~

Friday, 28 February 2014

Liquid Sky Lacquer Holo Top Coat Review and Swatch

Well hi there, long time no blog!  Life is just too annoying getting in the way of my nail polish fun.  Today not only has the sun finally come out, but I also have a day off work, yay! I am, of course, using the time wisely to finally show you my new nail polish.

You must know by now that I love holos.  LOVE them.  Somewhere along the way, I saw someone talking about a holo top coat, and was instantly intrigued.  I went onto Google (as you do) to have a look for reviews.  I found alot of swatches but nothing easily findable in the way of reviews, so I thought I'd buy it anyway and do my own review.  So here I am.

Firstly, lets see it:
Pretty rainbows hooray!  In real life it looks mega holo in the bottle, I could look at it all day.  I like the simplicity of the label too, I don't think it needs any more than that.

So lets have a look at some swatches.  The thing I was looking online for the most, and couldn't find, was a swatch of it by itself.  Well, I did one for you.  Here it is:
Just a linear holo sheen which is eminently safe for work.  I really enjoyed having the polish on my nails this way.  It was like my own secret portable rainbow.

But of course, that's not what it's designed for.  I got a nail wheel out and experimented:
It really pops over black!  I think you can click the picture to zoom in.  The two I was most pleased with were the yellow and the white.  All too often yellow holos are actually gold.  A yellow holo makes me happy.  And I don't think I've ever seen a white holo, it does work.

So how about on my nails?  I thought I would go double whammy and swatch over a thermal polish.  I chose In the Mood polish in a shade called Devious.  Here is is "naked":
It is pretty by itself, despite having tricky application, I still use it because I love the end result.  It dries semi-matte though, so I'm thinking a holo top coat might be just the thing.

Here's how it looked:
Application was easy, with no clumping or dragging, and the polish itself was fast drying.  No hassle at all.  This is without top coat, but I did apply a coat of HK Girl Glisten & Glow Topcoat after I took this picture, for longevity.  It didn't dull the holo, so that's another plus.  I got lots of compliments on this mani, and quite a few people asked me where I'd had them done *smug face*.

So what do I think?  I love it!  I don't know how I'm going to resist using it over everything.  I highly recommend.  I bought mine from Mei Mei's Signatures who ship internationally (link) for 17SGD which equates to roughly £8, plus shipping.  It probably worked out around £10 overall as I bought other polishes while I was there so combined shipping.  You can pay by PayPal so don't have to worry about exchange rates and currencies too much.  Considering how much it will save me from buying other coloured holo polishes, I think it's well worth it!  This is my first Liquid Sky Lacquer, and I'm sure it won't be my last.  Any recommendations?

So what do you think?  Are you mad on holos like me?

Until next time...

MASPOOASE x x x
~Wendy~