Sunday, 10 November 2013

M&S Limited Collection Textured Polish Pink Mix Swatch and Review

I love a bargain, me. LOVE. So, while having a browse in Marks & Spencer last weekend, this lil pretty caught my eye. I've stayed away from textured polishes this far. The only ones that have caught my eye have been the Liquid Sand ones, but they cost too much really to justify as a 'novelty' polish purchase, so I haven't bothered. And all the swatches of the Barry M ones I've seen have been a bit meh.
 
But at £4, this one called to me from the shelf... "Buy me, buy me, you know you want to.... I don't cost much and look at how prettyyyyy I am" then somehow jumped into my hand, and magically towed me to the cash desk. That's my story and I'm sticking to it.
 
But sadly then all week the weather has been rainy and grey, and no good for showing the new addition to my polish family off to her full potential. Saturday I was rough as anything due to slight over indulgence on Friday night, so no polishing happening there. But today, the swatching gods got their act together, I felt OK, the sun came out, and I was able to take some pics to show to you. Slightly too many if truth be told, but I couldn't pick, so you get the lot.
 
So without further ado here's the first pic. Now in winter jumpers, yay! M&S-Limited-Collection-Textured-polish-swatch
Sparklicious!  This fuschia-y shade is one of my favourites, which is lucky because as far as I could see, it seemed to be the only colour it came in haha.  It's called Pink Mix and it's a jellyish watery berry base with fuschia and electric blue micro glitter mixed in.  There's also something holo-y in there, but I couldn't figure out what.  One coat was passable, but I got full coverage in two coats.  This is obviously shown with no top coat, and dry time was initially fast, but stayed denty for about 7 or 8 minutes.  I found that once you can't smell them any more, they're dry.
 
Here's a pic I took earlier in the day when the sunlight was a bit whiter:
Marks-and-Spencer-textured-polish-swatch
This is a truer representation of the colour, and the blue has come out to play.  It dries ever so slightly lighter on the nail than it shows in the the bottle, but not much.  If you like it in the bottle, I think you'll be pretty pleased with it on your nails.  I know this sounds weird, but it can't be said of all polishes.
 
Application was ok.  I didn't need to do any clean up, and I didn't have the 'not going to the edges' problem you sometimes get when applying glittery polishes.  The brush dropped the polish pretty much where I wanted it to without flooding or blobbing.
 
Speaking of the brush, here's a pic of it:
It looks a bit stubby there, but actually the lid's quite long and it was good to use.  Sometimes the lid of a polish can be a distraction while you're using it, but not the case here.  You can see the brush itself is slightly splayed, and that made it work well with the glittery formula.
 
Here's the Extreme Close Up.  Matchy matchy with my phone cover:
M&S-polish-Pink-Mix-review
Bright enough for you?  It comes into its own much more in real life.  I wouldn't call it a full on blingy sparkle, but a more grown up twinkle. 
 
As its selling point is as a textured polish, I guess I should talk about that a bit.  I think that pic shows the texture well.  It's not gritty to the touch, just slightly bumpy, so it won't pick up hairs or accidentally scratch you.  Think teeny tiny fairy woodchip wallpaper.
 
Packaging wise, it wins points also:
M&S-textured-pink-mix-textured-polish-review
Yep, holographic deers.  I don't care what's in the box, I'm having it!  I think it looks like it cost more than it did, and the packaging also makes it easier to wrap.  A definite win/win gift-wise.
 
Let's have one more swatch, just because I took the pic and we may as well:
Marks-textured-polish-review
You can see on my middle finger, I have a little bit of wear.  I'd put the polish on in the morning, and this is mid afternoon.  Although admittedly I didn't wait very long before I starting doing things, wear time is going to be interesting with not having a top coat.  Actually in real life you can't see that wear at all, but it is there (obvs).
 
Surprisingly, removal wasn't too bad.  I use Cutex Ultra Cleansing remover which contains acetone, and gets rid of regular polish in one or two sweeps.  This one required a little bit of rubbing, but I wouldn't put it in the 'painful' category along with my other glitters.  Also I wasn't covered in glitter after I removed it, like some polishes.  It put me more in mind of removing a foil finish polish.
 
So, I think you can tell, I like this one.  I think I'll get a fair few uses out of it, and it's not too seasonal to have to just stick to wearing it in the winter.  So far I haven't found a polish from the M&S Limited Collection colours that I haven't liked, and I've got 6 or more now, so thumbs up M&S!  If you want to buy online, here's the (link) which shows me it also comes in a blue version, which they didn't have in my store.
 
Do you own this one?  What do you think?
 
Until next time...
 
MASPOOASE x x x
~Wendy~

Wednesday, 30 October 2013

Artsy Wednesday - Halloween - Graveyard Nailart

Boo!

Yay for Halloween!  My absolute favourite celebration.  I love all this spookiness, and the fun that comes with it.  It's impossible to think of it without having a bit of a smile to yourself.  And so many nailart ideas to play with of course.  These days it's hard to come up with anything that hasn't been done before, and last year I stressed myself out trying to do so.  I did come up with my favourite nailart ever last year though, and will post a picture further down this post.  If you can't wait, the link is (here)

So anyway, as I was saying, this year I decided I'd pick a tutorial and give it a try.  I'm terrible when it comes to looking at other peoples stuff, and only usually look at things that pop up in my Twitter feed or YouTube subscriptions, so it was nice to make an effort to go out and see what everyone's got on their nails this season.

Alot of it was too cutesy for me, because as far as I'm concerned, it should at least be a bit spooky!  So I decided after looking at hours of tutorials, to give this VIDEO a try by Gorgeous Nails. 

And here's the result:
Halloween-nailart
Now, typically for me, there are some elements of this that I'm not 100% happy with.  I wish I hadn't made the two crosses on the middle nails lean the same way, and I would have been a bit happier with the bat on my index finger if I'd worked on it a bit more.  However, the tree on my little finger is only there because I made a massive blob on my nail accidentally, and that came out alot better than I would have thought, so a good save there for me.

I did this look by painting all my fingers with OPI's My Boyfriend Scales Walls, then using black acrylic paint and my spotter brush to draw in the details.

Here's another pic:
Graveyard-Nailart
In real life this actually looks pretty good, and I'm thinking some kind of gradient behind it might make it really special.  Very tempted to give it another go for the big day.  Everything of course was topped off with a coat of Seche.

I've booked November 1st off as a holiday from work this year (yay!) so I can have a drink, a bit of a one-girl celebration with a bottle of red wine and some spooky movies.  And lots of popcorn of course!  My favourite is Metcalfes Skinny Sweet & Salt (link) which seems to be relatively guilt free and oh so yummy.  Looking forward to it already!  Not sure which films to watch yet though.

Here's one last pic of this years halloween manicure, in close-up:
Spooky-Nailart
And, as promised, here's a pic of last years nailart, inspired by the Blair Witch Project:
Blair-Witch-Project-Nail-Art
Interestingly and co-incidentally, my nails look to be almost exactly the same shape and length as they were last year!  That's pretty weird considering they've been all sorts of lengths and shapes this year.  This is probably my favourite nailart ever.  Spooky-wooky. 

Anyway, make sure you mosey on over and check out the scaaarrrryyyyyy offerings from the rest of the crew:

Catrine at Unnaked Nails (link)
Michelle at Labmuffin (link)
Maria at Maria's Nail Polish Blog (link)
Melanie at Nail and Polish (link)
Emily at An Accent Nail (link)
Ameerah at Valiantly Varnished (link)
Anna & Haylee at Makeup and Masala (link)
Rosemarie at Every Little Polish (link)
Anna at Makeup N More (link)

I'd love to know what your favourite halloween nail look is! 

Until next time...

MASPOOASE x x x
~Wendy~

Monday, 21 October 2013

Alice in Wonderland freehand Nailart

I've got some mojo back, yay!  This is the manicure I wanted to do for the Artsy Wednesday Disney week, but I just couldn't make it work.  I absolutely love the book Alice in Wonderland, and I've wanted to put a representation of it on my nails for a long time.

My favourite character in the book is the Cheshire Cat, so he's the centrepiece of my creation.  One of my favourite quotes from the book is:

Alice "Would you tell me, please, which way I ought to go from here?"
"That depends a good deal on where you want to get to," said the Cat.
"I don't much care where –" said Alice.
"Then it doesn't matter which way you go," said the Cat.
"– so long as I get somewhere," Alice added as an explanation.
"Oh, you're sure to do that," said the Cat, "if you only walk long enough."

Simple yet clever.  A sign of great writing, and the book's like that all the way through.

So without further ado, here's what I came up with:
I painted the Cheshire Cat mid-disappear.  I'm not completely heartless though, so gave him a nice branch to sit on.

The playing card characters are actually stickers, which I got from Amazon, here's the (link), and here's what you get:
Some of these are a bit too cutesy for me, and I probably won't use them, but for £3.25 with free shipping, I don't mind that too much.  They are quite thick, and as you can see I had a little bit of wrinkling, but in real life you can hardly tell.

So here's another pic, and then I'll go through what I did:
So, I started off with kitty cat.  I painted my nail with Nails Inc Albert Place, which is one of my go-to light blues.  I then put a coat of Seche on it to dry it quickly. Then I used a silver Sally Hansen nailart pen to sketch out the design.  I like this because it doesn't matter too much if it's not exactly perfect, as you hardly see it at the end. 

Then I drew in the branch with a brown Precision striper, and the leaves with a Color Club green striper.

Then I used my spotter brush and black acrylic paint to place out the mouth and eyes.  Once that was dry I filled in the eyes with green acrylic paint, and made the teeth with white acrylic paint.  Then I filled in his pupils and nmade a little highlight in his eyes, again with acrylic paint.  I then went over the whole thing with a coat of Seche, being VERY careful not to drag the design after all that painting!

The green nails (representing the Queen of Hearts croquet lawn) are one thick coat of Barry M Gelly in Key Lime, and the white nail (as a nod to the White Rabbit) is OPI's My Boyfriend Scales Walls.

A coat of Seche then went over everything to dry it in a reasonable time, and smooth out the stickers.

Here's a close up of my Cheshire Cat nail:
You can just about see the silver pen I used to sketch out the design under his right eye.  In real life it kind of makes it look 3-D, which is pretty cool.

And here's the tools of the trade:
If you haven't read the book, I wholeheartedly recommend that you give it a go, it's a real delight.  And if you do, please let me know what you think of it!

Until next time...

MASPOOASE x x x
~Wendy~

Wednesday, 16 October 2013

Artsy Wednesday Nailart - Crystals

Hi All!

Here I am again with this weeks Artsy Wednesday.  The last Artsy Wednesday was Disney, and I had quite a good idea for it, but every way I tried to do it, it just came out in a mess.  Eventually I got that stressed out with it that I decided not to put anything at all up.  I think sometimes you have to know when you're beat haha.

This week is quite a straightforward theme of crystals.  I am a total magpie, so I have plenty of pretty shiny things to put on my nails.  The challenge for me was to try to come up with something a little bit original, and hopefully I've managed that.

Here's what I came up with:
The base polish is the lovely A-England Tristam.  Here it looks like it has a silver sparkle in it, but in real life that's a very subtle holo.  This is one coat, and it had enough coverage.  If I intended this mani to last I would still do two coats though, just for the extra wear.

I then stuck some crystal stars straight onto the wet polish.  I got these ones from ebay, in a wheel with different sizes and shapes in it.

Here's another picture:
My nails are far too long at the moment.  I keep waiting for one to break so I've got a reason to cut them down, but they seem to want to stay long right now!  I will have to cut them soon though, because once they get to a certain length typing gets uncomfortable.

I'm sure now that the weather's turned cold they'll start to dry out a bit.  I love this autumny weather, my woolly jumpers are already out, and I've broken out the hot chocolate too, yum!  Hopefully I'll get a lovely crisp day soon to take a walk and get some lovely photos to share with you.

I hope you like my blingy offering!  Don't forget to check out what the other lovelies came up with:

Catrine at Unnaked Nails (link)
Michelle at Labmuffin (link)
Maria at Maria's Nail Polish Blog (link)
Melanie at Nail and Polish (link)
Emily at An Accent Nail (link)
Ameerah at Valiantly Varnished (link)
Anna & Haylee at Makeup and Masala (link)
Rosemarie at Every Little Polish (link)
Anna at Makeup N More (link)

Until next time...

MASPOOASE x x x
~Wendy~

Saturday, 21 September 2013

She Really Does Sell Seashells!

I love it when my friends do cool stuff.  Sarah from Swishienails has just opened an online shop, and she very kindly sent me some items to review.  Her shop is called She Sells Seashells (link) and she does sell seashells! 

So in keeping with this, I decided to do some seaside inspired nails.  It's a sad fact that not only do I own enough nail polishes to have one that's the same colour as sand when I need it, I actually knew that I had it without searching.

So, without further ado, here's what I came up with:
Sorry about the dry cuticles!  I created this look by using one coat of 2true Shade 11, which was perfect for my sand, reviewed in full (here) and then I went over that with the blue, which was a present from my friend when she came back from Poland.  It says on the label Coral Prosilk 106, so I hope that means it's shade 106.  I like that it's not completely opaque, it makes it look more like water.

Between the two colours I used my spotter brush and OPI Alpine Snow to make some surf lapping on the shore.  Then, after that had dried, I went over it all with a coat of Maybelline Express Finish topcoat, and stuck my shells on the top.  I went over that again with another coat of topcoat to make sure they stayed on.  They feel nice and secure once they're on.  I don't know what they're made out of, but they are metal, and kind of hollow, which made me wonder how well they'd stay on, but I haven't had any problems at all.

It was all delivered in a pretty organza bag:
You can see there, she also sent me some lovely cabouchons and studs, which I have ideas for, so stay tuned for those.

One more pic of the nails:
You can buy 10 shells for £1.50 (link) and I think they make a pretty addition to anyones nail art collection.

A big thanks and good luck to Sarah with her store - go and check it out!

Until next time...

MASPOOASE x x x
~Wendy~

Wednesday, 18 September 2013

Artsy Wednesday: Green Nailart

Disorganised, me?  Well, ok yes this time I admit it, I was not at all ready for this weeks AW.  Hence, it's half ten on Tuesday night, and all I have is some hurriedly taken photos.  Lots on my mind at the mo, and life seems to be escaping me a bit.  I'm sure it'll all come together in the end, these things usually do!  My cuticles are misbehaving again too, despite getting more care and attention than the queen, ungrateful devils!

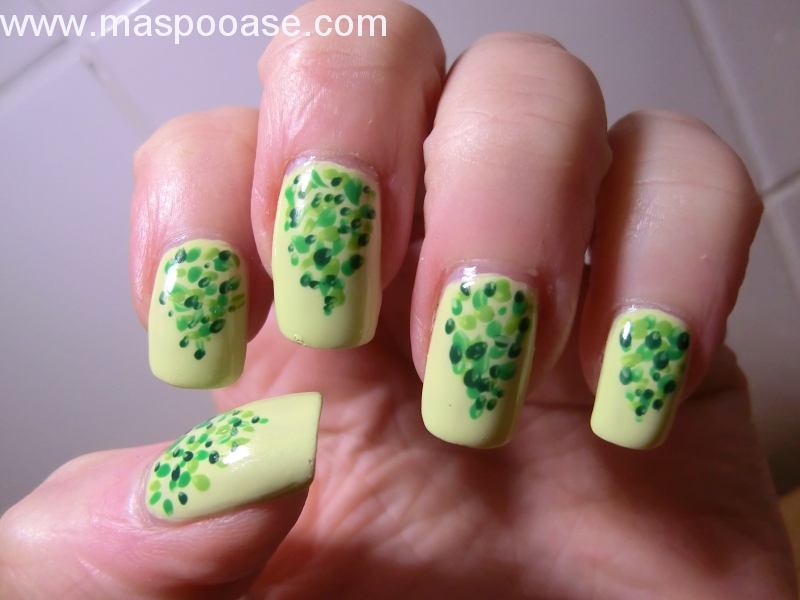
The idea for todays mani, I'm calling a blobicure.  I didn't want to do dots or stripes again, and I did try, and fail, at some stamping at the weekend.  So I thought I'd keep this one easy.  I painted my nails with Nails Inc's Wimbledon, reviewed in full (here) and then just used my spotter nailart brush reviewed (here) to blob on various green polishes.  Here's how it came out:
I quite like the abstract look of this.  It reminds me a bit of the wreath nailart I did at Christmas, which I loved, (link) and I'd definitely like to try this same design in different colours using acrylic paints, I really think it has potential.  Plus it's easy to do, which is always a bonus!

Here's the greens I used:
L-R: Barry M Gelly Key Lime, Gosh in Forest Floor, Nails Inc Wimbledon, and Barry M Spring Green

Here's one last pic:
I hope you like it!  Thanks for reading, and check out what the other girls have to offer:

Catrine at Unnaked Nails (link)
Michelle at Labmuffin (link)
Maria at Maria's Nail Polish Blog (link)
Melanie at Nail and Polish (link)
Jessica at Beauty Gnome (link)
Emily at An Accent Nail (link)
Ameerah at Valiantly Varnished (link)
Anna & Haylee at Makeup and Masala (link)
Rosemarie at Every Little Polish (link)
Anna at Makeup N More (link)

Until next time (probably in two weeks haha)

MASPOOASE x x x
~Wendy~
Wednesday, 4 September 2013

Artsy Wednesday - Three Colour Nail Art

These Wednesdays come around quick!  This weeks theme is three colours.  I've had these pics ready for a few days, then nearly forgot to write my post, silly me!

I won't bend your ears too much this week, a cold is hovering about, and it's doing it's best to get me.  Early night and cosy jim jams for me tonight.  Oh, the high life...

Without further ado, here's the nails:
Fall-nail-art
I'm quite pleased with how these turned out, considering they didn't take me very long to do.  I started off with a base of Nails Inc's You're a Peach, which came free with Glamour Magazine quite a while back.  Then I drew a stripe down the middle of my nails with Layla's holo polish Coffee Love.  I'm not in love with the full nail application of the Layla holographic polishes, they're too prone to bald spots, but for this purpose it worked just fine.

I then made a border down the sides of that with my Precis brown striper polish, and there we have it!  A coat of Seche topped it off.

No sun today, but of course I can still find a place to show you that full holo goodness:
Three-Color-Nail-Art
There we go, much better! I enjoyed wearing this very much, it felt just right for this late summer/early autumn time.

Here's one last pic, close up:
Stripy-nail-art
Don't forget to check out what the other talented ladies have to offer.  It's always amazing how different our designs are with the same brief!

Catrine at Unnaked Nails (link)
Michelle at Labmuffin (link)
Maria at Maria's Nail Polish Blog (link)
Melanie at Nail and Polish (link)
Jessica at Beauty Gnome (link)
Emily at An Accent Nail (link)
Ameerah at Valiantly Varnished (link)
Anna & Haylee at Makeup and Masala (link)
Rosemarie at Every Little Polish (link)
Anna at Makeup N More (link)

Until next time...

MASPOOASE x x x
~Wendy~