Showing posts with label glitter. Show all posts

Tuesday, 4 February 2014

Fairy Dust vs Electric Lane Comparison

Hey there people, now here's a question.  Who doesn't want sparkly rainbows on their nails?  I know I do!  Nails Inc Electric Lane is the nail polish that made number one on my all time top ten polish list. If you want to look at that, here's the (link) which also includes a couple of Electric Lane swatches.

But I've seen manicures online using China Glaze Fairy Dust.  The difference between these two polishes is something I've been wondering for ages.  Finally, I couldn't wonder any longer so I bought some Fairy Dust so I can compare the two. 

I bought my China Glaze Fairy Dust from Amazon, and when it arrived, I couldn't see much difference at first glance:
The glitter pieces seem to be exactly the same size and colour to me.  So I made up some nail wheels with lots of different colours to try over:
Black: Deborah Lippmann - Fade to Black
White: Poundland Jess (link to full review)
Grey : Leighton Denny - Zero Gravity
Green: Barry M Gelly - Key Lime
Blue: Bourjois One Seconde - Bleu Water
Red: OPI- Big Hair...Big Nails
 
I decided to do one coat of each and no topcoat so you can fully tell the difference (if any).  Here's what I got:
I think you'll be able to guess, but the N's are the Nails Inc Electric Lane, and the C's are the China Glaze Fairy Dust.  As you can tell, more noticeably on the red and black is that the Electric Lane has a denser consistency.  However, in this light you can't really tell so well.  I have a couple of close ups which show it better:
 
Firstly the black:
I think this shows the difference in density much better, although in this lighting my photo seemed to come out a bit blurry, strange.  I think it might be the holo freaking my camera out.
 
Here's the red:
Again, a heavier glitter presence from the Nails Inc.  However, in my opinion, for a glitter topper, that's not necessarily a good thing.  The heavier covering of glitter is hiding the base polish somewhat, rather than enhancing it.
 
Also, Electric Lane dries to quite a sandy matte finish, which I like, but is another difference from Fairy Dust, which dries to more of a gloss as you can see.
 
Here's a picture I took in a rare sunny moment:
Definitely on the black you're starting to see the holo.
 
Here's how the brushes differ:
They both performed admirably, no problems with blobbing during application, and both glitters went on pretty evenly.
 
Here's a full nail swatch of Electric Lane over Nails Inc Devonshire Row:
So how much do they cost?
Nails Inc Electric Lane costs £12 for 10ml
China Glaze Fairy Dust costs £6.49 for 14ml
 
However, there isn't anywhere on the high street I can buy China Glaze, and Amazon have stopped free Super Saver Delivery unless you spend £10, so there will be extra to pay for shipping.  There is a Nails Inc stand in larger branches of Boots, so you can get them with no P&P to pay.
 
However, even with this taken into account, Fairy Dust is cheaper, and you get more.
 
I have managed to get full coverage on my nails with Electric Lane with four coats, I doubt you'd ever manage that with Fairy Dust.
 
So, which do I recommend?  Amazingly, I actually recommend Fairy Dust!  Electric Lane definitely has more bling, but I prefer the glossier and less overwhelming finish of the China Glaze.  Plus of course it's cheaper.
 
No one could be more surprised about this outcome than me, but that's the conclusion I came to.  I still like them both though in different ways, so you could certainly justify owning both.
 
Do you own either of these polishes? Or do you have a different favourite holo glitter topcoat?  Would love to hear about it if you do.
 
Until next time...
 
MASPOOASE x x x
~Wendy~

Monday, 30 December 2013

Christmas Nailart - Artsy Wednesday

Finally!  Better late than never, here I am with my Artsy Wednesday post, which should have gone up on Christmas Day.  I actually did have these nails done on the big day, but I feel like I haven't had a moment to myself to put them on the blog.  I kind of lost my nail mojo for a while there, but thankfully it's coming back now. 

I've had a lovely Christmas, FAR too much indulgence, but will be back on the wagon in the new year (that's the plan anyway).  I actually didn't get much in the way of nail presents, just four No.7's in a gift box, and some manicure items from my mum, but that just gives me all the more reason to buy my own hee hee.

I've been nursing a split on my middle finger.  It went above the nail line and I've been babying it along until it grew out enough to cut off without including my actual finger in the operation, so you will see a lump there where I've been gluing it.  It's come off now, and that nail is super short, so it'll be a left hander for the new years nails.  Which means stamping probably.

The best glue I've found so far for nail splits is Loctite Superglue Power Flex Control. Here's the Amazon LINK to the one I have.  The lid doesn't get stuck on, polish remover doesn't take it off too easily, and it's lasted a good 3 or four days on me before I have to reglue.  Plus, as I keep it in my handbag, it's a hard tube so it doesn't get squished.  You have to squeeze the grey handles at the side to get the glue out, and it comes out nice and slowly.  I like alot.

So, for my Christmas nails, I fancied something glittery.  I own quite a few glitter polishes, but hardly wear them as I hate the removal.  But for Christmas, I don't mind a bit of extra work.  I eventually decided on a cloud manicure of festive red, gold and green.  As chance would have it, I own all three colours in China Glaze glitter polishes.  So I went with those.  Here's what I made:
I started with a base of the green glitter Running In Circles.  Just one coat needed, but I did touch up a few slightly bare areas at the end, so I should probably have done two coats.

Then I did the cloud detail in red, which is of course, Ruby Pumps.  This is a really easy technique, just three swipes of the brush, straight out of the bottle at different heights.  Being over the green darkened it a bit, bit it was still bright enough to look like red, so that was okay.

Then, over that, I used I'm not Lion, which is a holographic gold, which I love.  Same technique, three swipes.

Here's the bottle shot:
On top of that, I used Glisten & Glow HK Girl topcoat, which has had some brilliant reviews, but I haven't used enough yet to form my own opinion on.  It certainly get marks for wear though, because after three days I had almost no chipping, which is a first for me.  It could be just because it was on top of glitters?  More on that as I find out myself.

I took a few more pics of the mani, so I may as well show them to you.  Here's the first.  Bauble-tastic:
And here's the other.  Traditional close up bottle shot.  You can see the lump on the left of my middle nail quite clearly there, down by the red section:
And that's my lot!  Christmas nails, done.  Have a ganders (goose pun intended) at what the other beauties in the Artsy Wednesday Club have come up with:

Catrine at Unnaked Nails (link)
Michelle at Labmuffin (link)
Maria at Maria's Nail Polish Blog (link)
Melanie at Nail and Polish (link)
Ameerah at Valiantly Varnished (link)
Anna & Haylee at Makeup and Masala (link)
Rosemarie at Every Little Polish (link)
Anna at Makeup N More (link)

So what did you have on your nails this year? 

Until next time...

MASPOOASE x x x
~Wendy~

Sunday, 10 November 2013

M&S Limited Collection Textured Polish Pink Mix Swatch and Review

I love a bargain, me. LOVE. So, while having a browse in Marks & Spencer last weekend, this lil pretty caught my eye. I've stayed away from textured polishes this far. The only ones that have caught my eye have been the Liquid Sand ones, but they cost too much really to justify as a 'novelty' polish purchase, so I haven't bothered. And all the swatches of the Barry M ones I've seen have been a bit meh.
 
But at £4, this one called to me from the shelf... "Buy me, buy me, you know you want to.... I don't cost much and look at how prettyyyyy I am" then somehow jumped into my hand, and magically towed me to the cash desk. That's my story and I'm sticking to it.
 
But sadly then all week the weather has been rainy and grey, and no good for showing the new addition to my polish family off to her full potential. Saturday I was rough as anything due to slight over indulgence on Friday night, so no polishing happening there. But today, the swatching gods got their act together, I felt OK, the sun came out, and I was able to take some pics to show to you. Slightly too many if truth be told, but I couldn't pick, so you get the lot.
 
So without further ado here's the first pic. Now in winter jumpers, yay! M&S-Limited-Collection-Textured-polish-swatch
Sparklicious!  This fuschia-y shade is one of my favourites, which is lucky because as far as I could see, it seemed to be the only colour it came in haha.  It's called Pink Mix and it's a jellyish watery berry base with fuschia and electric blue micro glitter mixed in.  There's also something holo-y in there, but I couldn't figure out what.  One coat was passable, but I got full coverage in two coats.  This is obviously shown with no top coat, and dry time was initially fast, but stayed denty for about 7 or 8 minutes.  I found that once you can't smell them any more, they're dry.
 
Here's a pic I took earlier in the day when the sunlight was a bit whiter:
Marks-and-Spencer-textured-polish-swatch
This is a truer representation of the colour, and the blue has come out to play.  It dries ever so slightly lighter on the nail than it shows in the the bottle, but not much.  If you like it in the bottle, I think you'll be pretty pleased with it on your nails.  I know this sounds weird, but it can't be said of all polishes.
 
Application was ok.  I didn't need to do any clean up, and I didn't have the 'not going to the edges' problem you sometimes get when applying glittery polishes.  The brush dropped the polish pretty much where I wanted it to without flooding or blobbing.
 
Speaking of the brush, here's a pic of it:
It looks a bit stubby there, but actually the lid's quite long and it was good to use.  Sometimes the lid of a polish can be a distraction while you're using it, but not the case here.  You can see the brush itself is slightly splayed, and that made it work well with the glittery formula.
 
Here's the Extreme Close Up.  Matchy matchy with my phone cover:
M&S-polish-Pink-Mix-review
Bright enough for you?  It comes into its own much more in real life.  I wouldn't call it a full on blingy sparkle, but a more grown up twinkle. 
 
As its selling point is as a textured polish, I guess I should talk about that a bit.  I think that pic shows the texture well.  It's not gritty to the touch, just slightly bumpy, so it won't pick up hairs or accidentally scratch you.  Think teeny tiny fairy woodchip wallpaper.
 
Packaging wise, it wins points also:
M&S-textured-pink-mix-textured-polish-review
Yep, holographic deers.  I don't care what's in the box, I'm having it!  I think it looks like it cost more than it did, and the packaging also makes it easier to wrap.  A definite win/win gift-wise.
 
Let's have one more swatch, just because I took the pic and we may as well:
Marks-textured-polish-review
You can see on my middle finger, I have a little bit of wear.  I'd put the polish on in the morning, and this is mid afternoon.  Although admittedly I didn't wait very long before I starting doing things, wear time is going to be interesting with not having a top coat.  Actually in real life you can't see that wear at all, but it is there (obvs).
 
Surprisingly, removal wasn't too bad.  I use Cutex Ultra Cleansing remover which contains acetone, and gets rid of regular polish in one or two sweeps.  This one required a little bit of rubbing, but I wouldn't put it in the 'painful' category along with my other glitters.  Also I wasn't covered in glitter after I removed it, like some polishes.  It put me more in mind of removing a foil finish polish.
 
So, I think you can tell, I like this one.  I think I'll get a fair few uses out of it, and it's not too seasonal to have to just stick to wearing it in the winter.  So far I haven't found a polish from the M&S Limited Collection colours that I haven't liked, and I've got 6 or more now, so thumbs up M&S!  If you want to buy online, here's the (link) which shows me it also comes in a blue version, which they didn't have in my store.
 
Do you own this one?  What do you think?
 
Until next time...
 
MASPOOASE x x x
~Wendy~

Monday, 1 July 2013

My Glitter Polish Collection

Hi there,

Hope you're all well today, Monday's over with for another week at least.  My weekend went pretty well, despite not actually having achieved much, I chilled out, and that's always a good thing.

Now, as you know, my hands are all dermatitis-y and ugly, and I have a broken nail which I've got patched up, so I was having a think about some posts I could do which didn't involve you all seeing my ugly fingers.  Then I remembered I've been meaning to do a post on my glitter polishes ever since I saw Maybelater's post (link) on her glitter collection.

Well, you don't need to see my fingers for that!  So I got my glitters out, and despite saying I don't like glitters due to the awful removal process, I found I own 50 glitter polishes.

I have tried the PVA glue basecoat thing, but I found it just as hard to remove with or without it, so I don't really wear my glitters much, apart from on special occasions.  I also bought the Andrea Fulerton peel off polish, as I thought that might be a way to do it, but it didn't peel off, so another fail there.

Am so disappointed it's not sunny today, to show these off to their full potential, but I've taken one picture in natural light, and one picture in artificial light for each group of six, so there's alot of pictures!  I hope it doesn't take too long to load up because of this.  Only one way to find out.

Each polish is one coat with no topcoat.  If I've swatched it properly elsewhere in my blog, or used it in a design, I will attach the link at the side.

So here we have our first group:

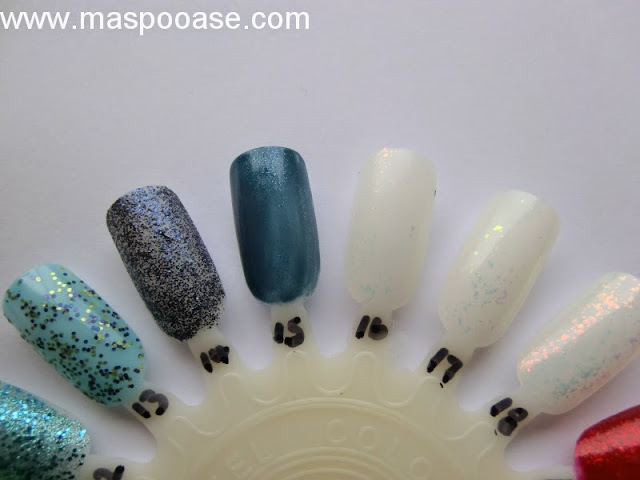
1) Ruby Pumps by China Glaze (used here)
2) Red Glitter by Barry M (who are as imaginative about names as me haha)
3) #104 by Glitz/Tuesdays Girl
4) Ruby Glitter by Barry M
5) Spangle by Active Cosmetics
6) Amethyst Glitter by Barry M

Daylight:
Glitter Polish Collection
Artificial light:
Glitter Polish Collection
7) Confetti by L'Oreal
8) Glitz Gal Gem Crush by Sally Hansen
9) Thunder & Lightening by Models Own
10) Black Polka Dot by Nubar (I was disappointed that this was hex & not circle glitter)
11) Running in Circles by China Glaze (the green version of Ruby Slippers)
12) Fitzroy Square by Nails Inc (Swatched here)

Daylight:
Glitter Polish Collection
Artificial Light:
Glitter Polish Collection
13) Pudding Lane Sprinkle by Nails Inc (the blue glitter on mine has started to bleed)
14) Sloane Gardens by Nails Inc
15) Navy Glint by Seventeen
16) Fairy Dust by Elf (doesn't show well, better shot of the flakies later on)
17) Sequin Effect by Nail Pop
18) Hidden Treasure by Sally Hansen

Daylight:
Glitter Polish Collection
Artificial light:
Glitter Polish Collection
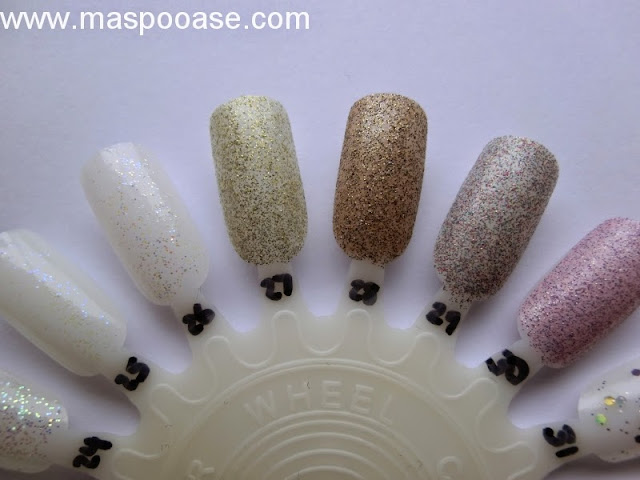
19) Shepherds Market by Nails Inc (Swatched here)
20) Holo Bar Glitter by Claire's (Swatched here)
21) Silver Plated by Avon Colortrend
22) White Polka Dot by Nubar (again hexes) (Swatched here)
23) Electric Lane by Nails Inc (my fave!) (Swatched here)
24) Pastel Glitter by Claire's (I wish Claire's named their polishes)

Daylight:
Glitter Polish Collection
Artificial light:
Glitter Polish Collection
25) Blue Glitter by Claire's
26) Grammercy Glitz by NYC
27) Kingham Street by Nails Inc (Fine Sprinkles collection)
28) Devonshire Place by Nails Inc (Fine Sprinkles collection)
29) Warwick Street by Nails Inc (another one I love) (Swatched here)
30) Market Place by Nails Inc (Fine Sprinkles collection)

Daylight:
Glitter Polish Collection
Artificial light (bit blurred, sorry):
Glitter Polish Collection
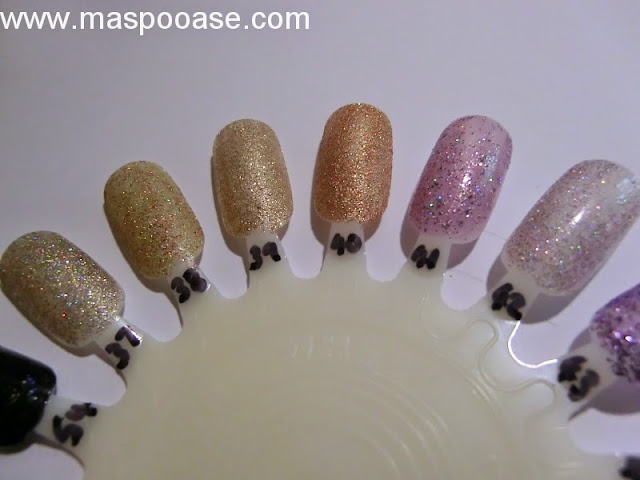
31) Antique Chic by Posh Polish (love this holo glitter)
32) Golden Goddess by Elf
33) Gold Flecked by Avon Colortrend
34) Yellow Topaz Glitter by Barry M
35) Peach & Green pastel by Claire's (this is curling up in the bottle)
36) North Row by Nails Inc (Swatched here)

Daylight:
Glitter Polish Collection
Artificial light:
Glitter Polish Collection


37) I'm Not Lion by China Glaze (Swatched here)
38) Bedford Square by Nails Inc (Swatched here)
39) Shelton Street by Nails Inc
40) I Herd That by China Glaze
41) Rainbow Apparition by Bourjois 1 Seconde
42) Purple Glitter by Claire's

Daylight:
Glitter Polish Collection
Artificial light:
Glitter Polish Collection
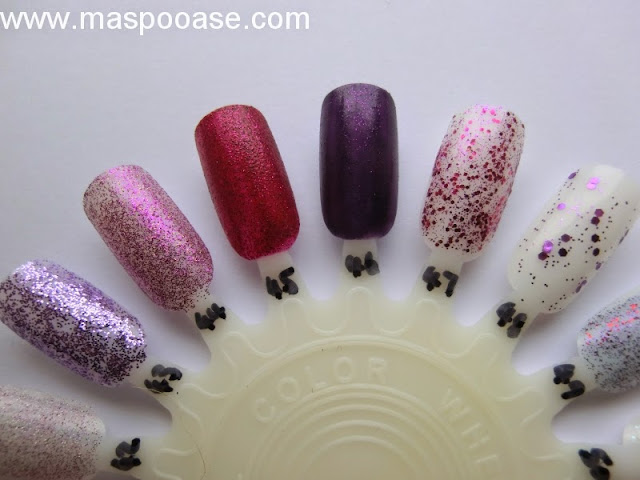
43) Park Lane by Nails Inc (Swatched here)
44) Buckingham Street by Nails Inc (Swatched here)
45) Fiddlesticks by Butter London (used here)
46) Bow Street by Nails Inc
47) Princes Arcade by Nails Inc
48) Fuchsia Dazzle by Avon Colortrend

Daylight:
Glitter Polish Collection
Artificial light:
Glitter Polish Collection
49) Razmatazz by Leighton Denny
50) Cascade by Leighton Denny
51) Fairy Dust by Elf over black (the flakies return!)
52) Sequin Effect by Nail Pop over black
53) Hidden Treasure by Sally Hansen Over black (swoon-tastic but takes forever to dry)
54) Cascade by Leighton Denny over black

Daylight:
Glitter Polish Collection
Artificial light:
Glitter Polish Collection
And here they are all together:
Glitter Polish Collection
So there we have it, all my glitters.  Some I love, and some I'm a bit 'meh' about.  I'm surprised I don't like the fine sprinkles more than I do, considering I love Warwick Street so much.  And pretty much all of the China Glazes have been full of win.

I have to be honest, I thought this blog post would be a breeze, but it's actually been a bit of a pain to do.  I hope you think it was worthwhile!

Until next time...

MASPOOASE x x x
~Wendy~

Friday, 15 March 2013

Pretty Jelly Fairy Ring Review and St Patricks Day Nailart

Hi there everyone,
 
It's the weekend at last.  Here I am again with a polish review and some nail art for you.  Today I'm going to show you Pretty Jelly's Fairy Ring.
 
I've already reviewed some of the other Pretty Jelly holo polishes in the past, Diamond S-teal-er , Grape Escape and Bullet Rouge and I've enjoyed them.  When I saw this mossy green, I couldn't resist!
 
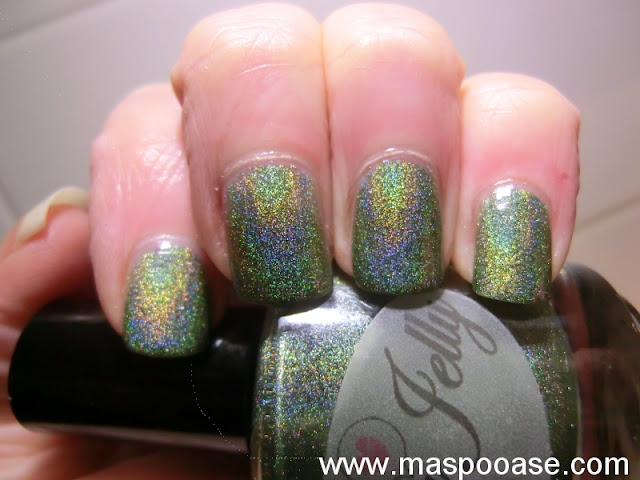
Pictured below is two coats, using Sally Hansen Miracle Cure as basecoat, and no topcoat.  Application was well behaved and lovely, and as a result I didn't require any clean up before taking these pictures.
 
In the shade, it's a pretty and soft mossy green:
Pretty-Jelly-Fairy-Ring-Swatch
There are some greens that don't do my skintone any favours, even though I still wear them of course!  This is not one of those, I found it very flattering.
 
BUT... it's only in the light that this polish comes into it's own, check out this baby:
Pretty-Jelly-Fairy-Ring-Review
And because I can, here's another picture:
Pretty Jelly Fairy Ring Review
Check out that holo!  Awesome!  You can see the holo quite nicely in lower light in real life, I just couldn't get my camera to pick it up.
 
As you probably know, it's St Patricks day this weekend, and as I'm already wearing green on my nails I thought I'd spice things up with a bit of Ireland-inspired nail art:
Saint Patricks Day Nail Art
That fab green glitter I used to do the dots with is China Glaze Running in Circles. It's pretty much Ruby Pumps, only green.
 
I used Barry M Spring green to draw a line down the left hand side of my nail, I didn't bother with striping tape.  Then I used this Color Club gold glitter striper to draw a line next to that.
St Patricks Day Nail Art
Then I added the dots with a dotting tool and my fingers were done

I wanted to do an accent nail on my thumb, so I decided to paint the Irish flag.  Again I didn't use striping tape, but for this one I kind of wish I had as my lines weren't perfect:
The green is Barry M's Spring Green again, and the orange is Max Factor's Bright Orange.  Despite saying I don't like this orange, I do find I go back to it alot for nail art, so it can't be all bad.

Everything got a coat of Seche Vite at the end.  As a little extra positive, the holo wasn't completely killed by top coat, which made me happy.

You can buy these polishes by going to the Liquid Jelly Etsy shop HERE the full size bottles like the one I got are $10.

The polishes are 3-free and cruelty free, so you can shop with a clear conscience.
 
So what do you think?  Do you own any of these polishes?  Would be interested to hear what you think!
 
Until next time...
 
MASPOOASE x x x
~Wendy~

Sunday, 2 December 2012

Christmas Nail Art Challenge - Day 1 - Christmas Tree

Hi there again!

It's a late one today, has been lots to do this weekend.  Christmas trees are up, and I feel like I've hoovered up about 10 times in two days.  Christmas is so messy!  But hopefully all nice and jolly too, so a happy trade off.

I don't usually enter into these nail art challenges, because I feel like I HAVE to do them, and then my creative juices totally dry up, but this one sounded like fun.  Here's what I have to do:

As you see, today is Christmas Tree day.  I was thinking of all sorts of 'outside the box' ideas, but in the end I decided to just paint on some Christmas trees haha.

I started with a base of Revlon Matte Suede polish in 863 Ruby Ribbon.  It's a very thin polish, and I've been exasperated with it before, but today it seemed to co-operate a bit more readily than usual.  It could even be because it's colder?  Not sure, but not complaining!  I used two coats, but forgot to take a picture, very remiss of me.

Then I used a small nail art brush and some green acrylic paint to draw in the Christmas trees, and used some glitter stripers to dot on some Christmassy bling!  I took alot of photos, but I'll try and pare them down (not sure if I can haha):
As you can see, I didn't top coat because I liked the texture, but if I wanted to keep this on I would have to topcoat it, because I doubt the acrylic paint would last long!  Possibly you could just topcoat the trees.  Also if you do topcoat Ruby Ribbon, it gets a nice shimmery sparkle to it.  I hate the way my index finger seems to want to go off in a different direction to all my other fingers, it's so contrary!

The picture above shows the design best, but then I got a bit arty with my photos:
12 days of christmas nail art challenge
and here's another pic:
This nail art was pretty simple to do, and only took half an hour from start to finish.  Acrylic paint is actually cheaper than alot of nail polishes, and if you mess up you can wash it off with water if it's not completely dry.  It also doesn't dry as quickly as polish so you can work with one blob of it on a plate and not worry about having to work too fast.  Although, as you can see, it doesn't dry flat like nail polish does, but that's not too noticeable with topcoat on.

So there we go, one challenge down!  I've enjoyed it for my first time, it's a bit daunting thinking about all the others, but will give it a good old go!  Next one is on the 5th, a holiday song? hmmmm....

See the links below for other people taking part, have you got your tree up yet?

Until next time....

MASPOOASE x x x
~Wendy~

Saturday, 20 October 2012

Black Forest Gateaux Nail Art

Happy Saturday everyone!

Last Saturday of freedom for a while boooo!  And my car didn't get mended haha!  Oh well, the ongoing saga will have to remain ongoing. 

Today's nail art didn't end up anything like I was intending it to, and when I'd finished it, I wasn't sure if I really liked it or not, but I still ended up taking a bazillion photos of it anyway.

My original intention was to paint my nails in an autumny colour, then use some striping tape halway down my nails in a pale colour, then mask off again, add some vertical stripes, then pull the striping tape off, so it all looked clean and nice.  Didn't end up at all like that. 

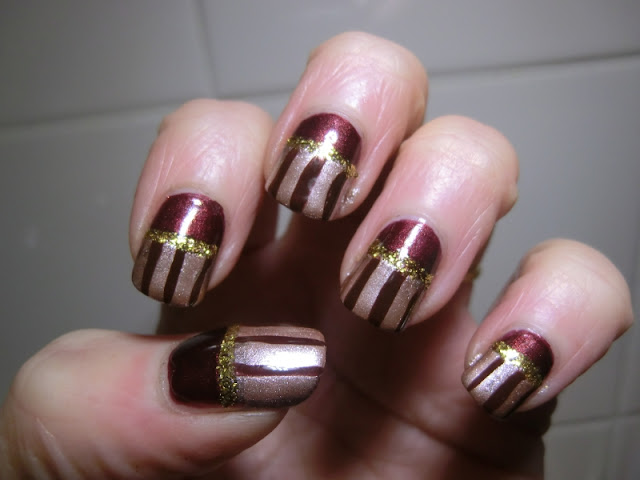
My first attempt to peel off my striping tape took off my base polish (yes I swore), so I decided to freehand the line.  Then when I came to stripe over it, they came out more bold than I intended, and weren't neat at the top.  So I delineated with a gold glitter striper, and this is what I ended up with:

Black Forest Gateaux Nailart
This is in shaded light, so here we go on our usual tour round the house for my other pics.

This is in the shade in the front garden (I love that licheny wall as a backdrop for nail pics):
Black Forest Gateaux Nailart
This is down at the bottom of the garden where I finally found some sun (the neighbours are probably saying, theres that loony out again taking pictures of her hands, come and look!) especially as I tripped up the step coming back in:
Black Forest Gateaux Nailart
This is me leaning out the front bedroom window (thats the porch roof in the background):
Black Forest Gateaux Nailart
You can really see in this picture why it reminds me of black forest gateaux, the black cherry of the base coat, and the chocolate stripes, makes me hungry just thinking about it!

And last but not least I took a pic under the kitchen lights:
Black Forest Gateaux Nailart
The bit I like most about this is that it's made me realise that this gold glitter striper (that I haven't used before) reminds me very much of tinsel, and I think I'll be able to use this exact same technique, only using different colours, for a really effective Christmas nail art look, exciting!

Here's the polishes I used:
Black Forest Gateaux Nailart
Color Club Gold glitter striper (came in a set from TK Maxx)
Precision Nail Art Striping Brush in brown (bought from Amazon UK)
NYC polish in Canal Street (Bought online at Superdrug and reviewed HERE )
Color Club Perfect Mol-Ten bought at TK Maxx and reviewed HERE )

And there we have it, thats todays nails!

I hope you enjoyed looking at them, and until next time.....

MASPOOASE x x x
~Wendy~