Showing posts with label dots. Show all posts

Saturday, 31 August 2013

A-England Lady of the Lake swatch and Autumnal nailart

Autumn is coming! Yay!  And with that comes the darker colours, which I don't wear haha...

However having said that, I do go slightly darker, and incorporate those vampy colours in my nailart rather than painting them as full nails.

So for my first "less than summery" mani of the season, I decided to use A-Englands Lady of the Lake.  It is from their Mythicals Collection, and of course because I live in the lovely Lake District, how could I resist?  I'm surprised I haven't reviewed this before now, as I've had it quite some time, and I have worn it a few times too, strange...

Well never mind, here it is now.  No sunshine, and I did struggle with shadows in my photos today, but that can't be helped.  Here it is outside:
Aengland-lady-of-the-lake-swatch
The formula was ok, a bit thicker than I'm used to, but it lay down to a nice smooth finish.  Because of this, the coats I used were quite thick, so dry time was just medium.  It felt like it would be quite a fast drying polish if I thinned it a bit, but I wasn't in any rush, so I just waited for it to dry.  The brush was co-operative, quite soft, but just right for the formula of the polish.  I didn't need to clean up round my cuticles and as you can see the cuticle line is quite nice and even.

The silver sparkles you see here in the daylight are actually small holographic particles, but out of direct sun they're quite hard to see.  I find this with alot of scattered holos, and it's the reason I usually prefer linear holos for that 'bam' of holo goodness.  However, scattered holos do have their place, and are much more appropriate for places like work, where you can still angle your nails and enjoy them without them being too much in peoples faces.  Also they can be seen as a bit more grown up, but hey, you're as young as you feel that's what I say.  There shouldn't be age restrictions on what polish you can wear no-sirree!

So here it is under the kitchen lights, captured as best I could:
A-england lady of the lake swatch
So then I had to decide what nailart to put over this lovely purple.  There was only one colour that came to mind, which I have used it before in THIS post, and that was Estee Lauders Pure Colour polish in Smashed.

So now I had my combo, what design to do?  Well, I was at a bit of a loss.  So I had a google about and I found one that was perfect on Polish You Pretty and I had to give it a try.  Here's the LINK to their tutorial, totally different colours than mine, but I followed the tut pretty much brush for brush.

I used the polish straight from the brush in the bottle to apply half moons of Smashed on my nails:
two-colour-nail-art
And then on their tutorial, they use a contrasting colour to make dots.  Well, I wasn't sure what colour to use, and while I was deciding, my lovely childhood bestie got in touch.  Her favourite colour is turquoise, and that also goes well with purple, so there we go, decision made!

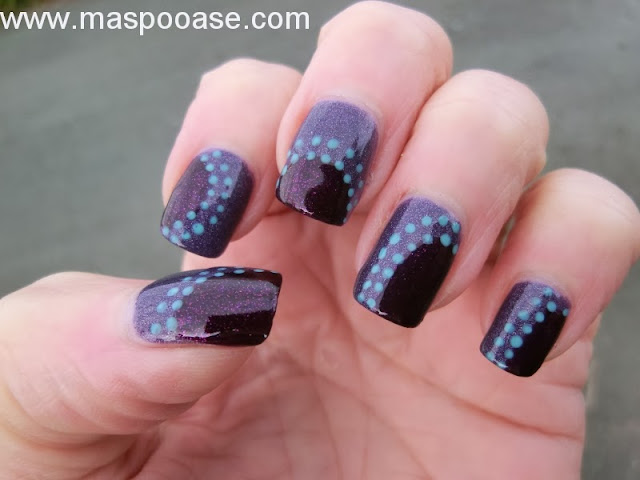
So, as per the tutorial, I dotted around where the two colours meet, and this is what I got:
purple-and-turquoise-nail-art
The turquoise I used is Maybelline Express Finish in Turquoise Lagoon.  I've used it in the past on my sunflower nailart tutorial HERE as a base, but not as an accent until now.  I topped it all off with a coat of Seche.

Here's another pic:
purple-and-green-nailart
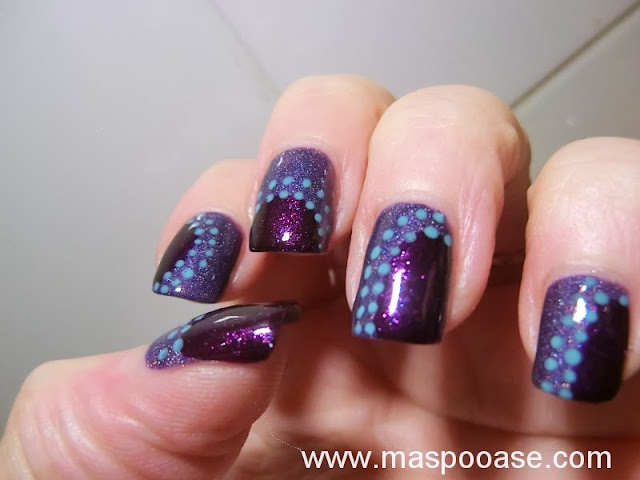
The dots on my other hand (which I did first) were larger, and I don't think they look as good, so I do recommend using a smaller dotter, or a toothpick, if you're going to have a go at this look:
I did then make an effort to capture the holo of Lady of the Lake, and lovely glittery depth of the juicy blackberry colour of Smashed.  I didn't like Smashed as a full nail colour, it's a jelly-like finish, and as such I couldn't get it as opaque as I liked, but I love it layered like this.

Here's the close up:
Purple-nailart
Pretty hey?  Even still I'm frustrated at not being able to capture the sparkliness, but it's close!

Here's the super-closeup:
purple-and-green-nail-art
Hooray!  At last I showed the holo!  I know that Adina, who produces A-England polish, does so with alot of care and attention, and I really wanted to show its true beauty.  Admirably for the creator of a thriving company, she is still taking a hands-on approach with both her customer service and product feedback, and it really shows.

I bought Lady of the Lake from the A-England website LINK which currently only ships to the UK due to Royal Mail postage restrictions, but if you're international you can still order HERE to get your lovely A-England.

As much as I'll miss summer and its long lazy days, I'm happy to see Autumn arrive.  It's my favourite season, with its vibrant colours and crisp mornings.  I'm chosing to ignore the thought of dull rainy days for now!

Are you an Autumn lover like me?

Thanks for reading, and until next time...

MASPOOASE x x x
~Wendy~

Saturday, 13 April 2013

Nail Art Gradient Inspired By Actual Art

Hey there again!

I'm back again, with a post I'm really excited about.  Now it's no secret that I despise sponging, it's just so messy.  But every now and then a flash of inspiration hits me and I can't resist. 

I have a friend on Twitter, Adam McLevey, who's an artist.  He's currently mid-way through a series called The Persona Project (link here) where he paints his character Steve in a variety of disguises. 

I love seeing the different canvasses come along each day, and of course, me being me, sometimes I think, ooh I could do that on my nails!  He recently painted a Persona canvas based on the film Hellboy, and the background of it 'pinged' at me. 

So here's what I came up with, and I kinda love it:
Now, it has to be said, this is loads zingier colour-wise in real life.  I've tried to correct it, but I just couldn't get it to look exact with my camera.

I've taken a picture on my phone, which is a bit closer to the real colours (but blurrier):
My cuticle clean up isn't brilliant, but I'm not too bothered about that, it will wash off eventually.

And here's a slice of the picture that started it.  I wasn't too sure about how much I could show, either for copyright, or without offending the artist, so I played it safe (hopefully) and just used a bit which shows the gradient I'm going on about, from a screenshot of his webpage:
As you see, the 'warm' side is much more orangey than my nailart - if I did this again I would use a different colour, but I'm pleased with how the green and the yellow came out.

Here's the polishes I used:
Collection 2000 Hot Looks in 64 Hidden
Collection 2000 Hot Looks in 45 Lemon Soda
Boots Natural Collection in Antique Coral
OPI Red Lights Ahead... Where?
Elf mini polish in Black (not pictured)

Oh, OK, one last pic of my masterpiece haha:
I think this came out really well, and I'm dying to publish this so you can all see it!

Incidentally, the Persona canvases would make a brilliant gift for the guy (or girl) who's got everything, and most of the Persona's include worldwide shipping, so bear it in mind next time you've got a present to buy for that difficult one.  Alot of these canvasses are only £20 - bargain!

He also paints commissions if you've got any art you'd like to have done.  Incidentally, I'm not being paid in any way, money or goods for this post, I just think his art is fab.  You can visit his Persona shop (here)

So what do you think?  Are you a fan of gradients, or do you usually avoid them like me?

Until next time...

MASPOOASE x x x
~Wendy~

Friday, 15 March 2013

Pretty Jelly Fairy Ring Review and St Patricks Day Nailart

Hi there everyone,
 
It's the weekend at last.  Here I am again with a polish review and some nail art for you.  Today I'm going to show you Pretty Jelly's Fairy Ring.
 
I've already reviewed some of the other Pretty Jelly holo polishes in the past, Diamond S-teal-er , Grape Escape and Bullet Rouge and I've enjoyed them.  When I saw this mossy green, I couldn't resist!
 
Pictured below is two coats, using Sally Hansen Miracle Cure as basecoat, and no topcoat.  Application was well behaved and lovely, and as a result I didn't require any clean up before taking these pictures.
 
In the shade, it's a pretty and soft mossy green:
Pretty-Jelly-Fairy-Ring-Swatch
There are some greens that don't do my skintone any favours, even though I still wear them of course!  This is not one of those, I found it very flattering.
 
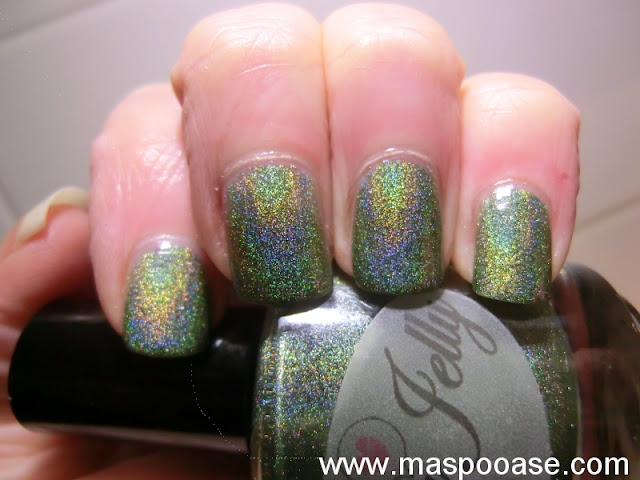
BUT... it's only in the light that this polish comes into it's own, check out this baby:
Pretty-Jelly-Fairy-Ring-Review
And because I can, here's another picture:
Pretty Jelly Fairy Ring Review
Check out that holo!  Awesome!  You can see the holo quite nicely in lower light in real life, I just couldn't get my camera to pick it up.
 
As you probably know, it's St Patricks day this weekend, and as I'm already wearing green on my nails I thought I'd spice things up with a bit of Ireland-inspired nail art:
Saint Patricks Day Nail Art
That fab green glitter I used to do the dots with is China Glaze Running in Circles. It's pretty much Ruby Pumps, only green.
 
I used Barry M Spring green to draw a line down the left hand side of my nail, I didn't bother with striping tape.  Then I used this Color Club gold glitter striper to draw a line next to that.
St Patricks Day Nail Art
Then I added the dots with a dotting tool and my fingers were done

I wanted to do an accent nail on my thumb, so I decided to paint the Irish flag.  Again I didn't use striping tape, but for this one I kind of wish I had as my lines weren't perfect:
The green is Barry M's Spring Green again, and the orange is Max Factor's Bright Orange.  Despite saying I don't like this orange, I do find I go back to it alot for nail art, so it can't be all bad.

Everything got a coat of Seche Vite at the end.  As a little extra positive, the holo wasn't completely killed by top coat, which made me happy.

You can buy these polishes by going to the Liquid Jelly Etsy shop HERE the full size bottles like the one I got are $10.

The polishes are 3-free and cruelty free, so you can shop with a clear conscience.
 
So what do you think?  Do you own any of these polishes?  Would be interested to hear what you think!
 
Until next time...
 
MASPOOASE x x x
~Wendy~

Tuesday, 5 February 2013

Valentines Nail Art - Ideas for short nails

Hi there,

Here I am again, have had a day off work today for a dentists appointment, so managed to get some cheeky mid-week nailart in.  I can't wait until summer when I get enough light at night to let me post more than just at the weekends!

My index nail finally gave up the ghost, it got a big dent in the weak bit, so I've had to file all the other nails down to match.  In a way it's a relief, because I was fed up of babying it along, and now it can grow back nice and strong again.

Also, it's given me a chance to show you that nail art isn't only for long nails! 

I specifically haven't included any stamping here, because I think there'll probably be alot of that around at the moment.  I actually saw some stamping sets in Claires Accessories today, so if you don't want to buy from the internet, then you can pop to Claire's to pick one up.  There was only a choice of 3 plates, but knowing Claire's, they'll improve that if they sell enough kits.  I think they were £9.00 (or maybe £12).  I don't see them on their website yet.

I've tried to do a few different designs, to hopefully get your creative juices going, I know what it's like when you just have a bleugh day, you look at your polishes and no mojo... 

I start with a semi-fail.  I found a new shop in carlisle called Fun-2-Do, which has all craft stuff in it.  They do have a website, HERE but not every item in the shop is on the site.  So anyway, I was in there, and I saw some table confetti, it was little red hearts and they looked like they'd be good for nail art.  I've also think I've seen them on Amazon HERE but I can't be definite they're exactly the same ones.

So I used them in my nail art and....Easy-Valentines-Nail-Art
Oh no! They bleeeeedddd.... This is not good, I have a BIG bag of these!  So I had to come up with something.  The red I used is China Glaze Ruby Pumps, how pretty is it?!  Two coats here.  It reminds me so much of juicy strawberry jam.  The pink is OPI Mod About You.  You're going to see alot of that pink in this post, as it's my number one light pink.  On my thumb I taped off to do the lines, but on the rest of the fingers I decided that was too much hassle, and just freehanded.  A top coat of seche which was intended to make it look prettier haha.

I did do another look, that I decided not to go with, but I managed to topcoat it without bleeding it:
Easy Valentines Nail Art
For that look I used Color Club polishes Antiquated and Hot Like Lava from their Foiled Metallics collection.

What I decided to do was to try to take the colour off them with polish remover.  Initially I put some in a freezer bag with some polish remover.  The idea was to swish them about a bit, rinse them off, et voila!  Nice clean non-bleedy hearts.  It didn't quite work out, the bag leaked, I lost a load while I was rinsing them, and all in all it was more hassle than it was worth. 

It was much easier to give them a rub with a cotton pad dipped in polish remover one by one.  Yes it seems like it might take longer, but actually it's not too bad.

So now I have silver hearts instead of red.  So I have to come up with a new colour scheme.  This is what I went with:
Valentines Nailart OPI Mod About You
I messed up a bit, as I made the index finger stripe too thin, but hey, we're just experimenting here!  The polishes I used were OPI Mod About You (I told you that you'd see it alot) for the light pink, and the darker pink is Nails Inc's Bruton Street.  Both have lovely formulas and are topped off with Seche.  I could have done with another coat of Seche really, because by the end of the day I'd lost a few hearts.

So these looks I actually did last weekend, and today I did another one.  Well, it's two into one really, because there's step one, which is one look, and step two which is different....  I'll just get on with it shall I...

So, because I didn't get my tooth mended at the dentist (had to make another appointment, as it was apparently just a check up appointment that time, sigh), I thought I would go shopping to cheer myself up.  And SOMEHOW found my way into Fun-2-Do again.  I found some more hearts, and thought I would take a chance.  These were the ones I got, they cost me £1.50:
Now, I couldn't find these on their website, or anywhere else for that matter, but as soon as I got home I tested them, and HOORAY they don't bleed!  Typically of me though, I decided not to use the red ones today haha.  I went for the gold ones, and a Butter London polish called Fiddlesticks that I bought before Christmas and havent used yet.

I thought I'd keep it clean and simple:
This does have a coat of Seche over it, as it dries to a matt-ish sheen.  It's got a very similar glitter feel to ruby pumps, only much more magenta.  Think raspberry jam instead of strawberry.  Also here you can see how short my index nail is now.

Here's another pic as I loved this look so much:
Butter_London_Nail_Art
This look worked really well in low light, as the hearts picked up any bit of light and flashed brightly every time I moved my hands.

Then of course, I got bored of being understated and stylish.

So I made another look with it:
Easy_Valentines_Nailart
To do this, all I did was used a ring reinforcer to mask off the top of my nail, I got mine from Amazon link HERE but you can buy them from lots of places.  I then used my Color Club pink striper, also from Amazon, to draw some stripes on the ends of my fingers.  I started with the middle stripe and worked my way out to try to get them even.  I messed up one stripe on my little finger, but I think this look turned out be pretty, and perfectly demonstrates that short nails don't have to be boring.

And I STILL wasn't finished!  I had one more idea.  I got my trusty Mod About You out, and Nails Inc's Devonshire Row.  The two went so well together, but what to do?  Then I realised I hadn't done any dotty looks yet, so I got out my dotter and away I went.

This is what I ended up with:
Dotty Nail Art
Now the heart on my middle finger didn't come out exactly how I wanted, but you can still tell what it is, so that's ok.   I topped it off with a coat of Seche.  As you can probably tell I was starting to lose the light by this time.  Probably a better represtentation of the colours is in this picture:
Valentines_Nail_art
So there you see, on short nails and still pretty.  I actually really like these two colours together, and they are going on my 'do this again' list.

And that's it!  Which is your favourite?  I think mine is the Butter London stripy one, but the dots come a close second. 

Have you got any nailart planned for Valentines?  Hopefully if you've been stuck for ideas I've given you a bit of inspiration.  Please feel free to recreate any of these looks if you like them, and if you do, please give me a shout, I'd love to see!

Until next time...

MASPOOASE x x x
~Wendy~