Tuesday 31 December 2013

Top Ten Nail Art 2013

And so we say goodbye to 2013.  It's been a pretty boring year for me, and looking back at last years New Year blog post, I see the year before was too.  Hmm should probably do something about that.

I managed to keep off the ciggies for another year though, which is a success.  On New Years' Day, I will be two years quit.  £2,800 saved.  WHERE'S THAT MONEY??  Haha, I must have spent it on something I suppose!  Books and CD's, probably.

So how did I do on my resolutions?
 
Decide what I want to do with my life, and do something about it. - Nope, didn't do that
 
Do something with my hair and eyebrows. - Hair yes, eyebrows nope

Get more organised. - Definitely didn't do that one
 
Start a creative thoughts, dreams and blog idea notebook. - Nope
 
Carry on the healthy eating. - Yes for most of the year, failed in Sept/Oct.  Weight back on.
 
So, in all, not very well.  I'll carry them forward and use them as this years resolutions.
 
Aaaannywayyy.... let's get on with the run down of my favourites of the nailart I've done this year.  I'll put them in order of date, and then none will get jealous haha.
 
Oh, just as a sidenote, there were two I couldn't choose between, so there are actually 11 here....
 
First we have a stamping design using Essie's Borrowed and Blue over Pretty Jelly's Grape escape:
You can see the full post (here) I was really surprised at how well the Essie stamped

Next we have another Pretty Jelly polish used as a base, Diamond S-teal-er, with a dotting tool used to create the daisies:
I love Pretty Jelly holos.  Link to the full post is (here).  In the sunshine this one's a real bobby dazzler.  Too much daytime TV Wendy?

Next up we have a sponged gradient inspired by a friends art:
I was so much in love with this when I did it, I can't even begin to tell you.  Link to the full post is (here)

Now, we're getting into spring, and a flowery look happened that I loved:
The link to this post, which includes a tutorial, can be found (here)
 
Next, another outing for Grape Escape, been rocking those Pretty Jellys this year!  This time I teamed it with Estee Lauders Pure Colour Smashed, which I didn't like on its own, but has been fab for doing nailart with:
The link for this one can be found (here) I think its bold simplicity is part of the reason I liked it so much
 
Next up, more holos!  A stamped/freehand combo:
Gotta love that rainbow nails look!  Link to the post is (here)

Now for another one.  This one completely freehand:

The post for this one also included a tutorial, and can be found (here)

Getting in to the summer now, and this one is probably my favourite of the year.  Inspired by a beautiful chair by Joris Laarman:
grey nailart
The organic look really appeals to me, and the colour came out just how I wanted.  There's a picture of the chair that inspired it on the original blog post (here)

Next up, one that other people seemed to like more than I did.  I've included it just because it got so many positive comments:

The link to this post can be found (here) along with a mini tutorial

Next up, probably my second favourite of the year.  A freehand/nail sticker combo for Alice in Wonderland:

Link to the full post is (here) and that's not the Cheshire Cats body, he's mid-disappearance on a branch hee hee.

And last but not least, more flowers. Bright and cheery:

The link for that post is (here)
 
And there we have it!  My 2013 in nails.

I hope you've enjoyed my stroll through nostalgia land, and thank you for joining my nailscapades in 2013.

I wish you all the best for 2014, lets make every day colourful!

Until next year,

MASPOOASE x x x
~Wendy~

Monday 30 December 2013

Christmas Nailart - Artsy Wednesday

Finally!  Better late than never, here I am with my Artsy Wednesday post, which should have gone up on Christmas Day.  I actually did have these nails done on the big day, but I feel like I haven't had a moment to myself to put them on the blog.  I kind of lost my nail mojo for a while there, but thankfully it's coming back now. 

I've had a lovely Christmas, FAR too much indulgence, but will be back on the wagon in the new year (that's the plan anyway).  I actually didn't get much in the way of nail presents, just four No.7's in a gift box, and some manicure items from my mum, but that just gives me all the more reason to buy my own hee hee.

I've been nursing a split on my middle finger.  It went above the nail line and I've been babying it along until it grew out enough to cut off without including my actual finger in the operation, so you will see a lump there where I've been gluing it.  It's come off now, and that nail is super short, so it'll be a left hander for the new years nails.  Which means stamping probably.

The best glue I've found so far for nail splits is Loctite Superglue Power Flex Control. Here's the Amazon LINK to the one I have.  The lid doesn't get stuck on, polish remover doesn't take it off too easily, and it's lasted a good 3 or four days on me before I have to reglue.  Plus, as I keep it in my handbag, it's a hard tube so it doesn't get squished.  You have to squeeze the grey handles at the side to get the glue out, and it comes out nice and slowly.  I like alot.

So, for my Christmas nails, I fancied something glittery.  I own quite a few glitter polishes, but hardly wear them as I hate the removal.  But for Christmas, I don't mind a bit of extra work.  I eventually decided on a cloud manicure of festive red, gold and green.  As chance would have it, I own all three colours in China Glaze glitter polishes.  So I went with those.  Here's what I made:
I started with a base of the green glitter Running In Circles.  Just one coat needed, but I did touch up a few slightly bare areas at the end, so I should probably have done two coats.

Then I did the cloud detail in red, which is of course, Ruby Pumps.  This is a really easy technique, just three swipes of the brush, straight out of the bottle at different heights.  Being over the green darkened it a bit, bit it was still bright enough to look like red, so that was okay.

Then, over that, I used I'm not Lion, which is a holographic gold, which I love.  Same technique, three swipes.

Here's the bottle shot:
On top of that, I used Glisten & Glow HK Girl topcoat, which has had some brilliant reviews, but I haven't used enough yet to form my own opinion on.  It certainly get marks for wear though, because after three days I had almost no chipping, which is a first for me.  It could be just because it was on top of glitters?  More on that as I find out myself.

I took a few more pics of the mani, so I may as well show them to you.  Here's the first.  Bauble-tastic:
And here's the other.  Traditional close up bottle shot.  You can see the lump on the left of my middle nail quite clearly there, down by the red section:
And that's my lot!  Christmas nails, done.  Have a ganders (goose pun intended) at what the other beauties in the Artsy Wednesday Club have come up with:

Catrine at Unnaked Nails (link)
Michelle at Labmuffin (link)
Maria at Maria's Nail Polish Blog (link)
Melanie at Nail and Polish (link)
Ameerah at Valiantly Varnished (link)
Anna & Haylee at Makeup and Masala (link)
Rosemarie at Every Little Polish (link)
Anna at Makeup N More (link)

So what did you have on your nails this year? 

Until next time...

MASPOOASE x x x
~Wendy~

Wednesday 11 December 2013

Artsy Wednesday - Geometric Nail Art

Another Wednesday, another nailart! This weeks theme is geometric, and I'm keeping it simple.  I shopped like a BOSS last weekend and got all my Christmas shopping done, how cool is that?  Now I have to wrap it all and get it sent off, which is probably more effort than buying it.  I'm not complaining though, I'll pour myself a G&T and put some music on, and it'll be soon done and dusted.

I feel like I don't have five minutes to myself recently, so I just rustled these up in a jiffy.  The base is Maybelline Express Finish in Silver Speed, which is my go-to silver.  This is two coats and it really is nice and fast drying.

I had better show you a picture!  Here you go:
I created black triangles at my cuticles with my new Barry M Nailart Pen, which for some reason seemed to be in the mood to turn itself into a crackle effect polish.  Not liking that.  I don't know if it's because I hadn't waited for the base coat to fully dry, but it's something I'll have to watch to see if it does it alot.

Here's a pic in more natural light (that lifelong winter lighting problem):
Then I used my Color Club Artclub red striper to draw a line under the black block.  I have to say that the quality of the Color Club stripers are fab, I got mine in a set from TK Maxx (of course) but I've seen them on Amazon for around a fiver including delivery (link)

I was going to do more to it, but I actually like the simplicity of this.  It was fast and easy, and it reminds me of the 80's styles, which is all the more reason for me to like it. 

I have a split on the edge of the nail on my ring finger (bah) which means I'll have to go back down to shorties soon, but I've had a super-long run without any breakages at all so I can't complain.  Actually it's my own fault, as I had a week off the perfect formula strengthener, and now the split.  I got a bit too lax, oh well.

One more pic.  This one under the kitchen light.  It really shows that crackling I was telling you about earlier:
I've actually done my first Christmas nailart design of the year too, I'll pop the photos up for you soon to have a gander at.

But until then, why not take a look at the geometric designs that the other lovely Artsy Wednesday ladies have come up with?

Catrine at Unnaked Nails (link)
Michelle at Labmuffin (link)
Maria at Maria's Nail Polish Blog (link)
Melanie at Nail and Polish (link)
Ameerah at Valiantly Varnished (link)
Anna & Haylee at Makeup and Masala (link)
Rosemarie at Every Little Polish (link)
Anna at Makeup N More (link)

Thanks for reading, and I hope you liked it!

Until next time...

MASPOOASE x x x
~Wendy~

Wednesday 27 November 2013

Artsy Wednesday - Polka Dots with Barry M Nail Art Pen Review

Really?  Last minute rush again, me?  I'm so glad this weeks challenge is polka dots, as they're quick and easy.  Also I've been itching to give my new Barry M nailart pens a go, and let you know what I think.  I looked up the definition of polka dot on Google, and it said 'a regular pattern of round dots, usually on fabric'.  Which actually changed my idea of what to do, as my orginal pattern wasn't going to be at all regular.  Good old Google.

I got these nailart pens last weekend when I was *supposed* to be Christmas shopping.  I ended up bringing more home for myself than I did for friends and family, oops!  Happily my TK Maxx are getting their polish stocks back up for the festivities, but nothing really shouted 'buy me' this time.  I'm happy to see that they're starting to sell individual polishes in there too, because all too often I'll have to buy a set of three just to get one colour I want.  There were L'Oreal polishes in Poundland though, and I picked a couple of those up. 

I did make a start though.  One person has a present haha.

So, back to the nails.  I started with a base of Nails Inc's Bruton Street.  I like this colour, it's a pretty neutral dusky pink that's most definitely safe for work, while managing to be at least a bit interesting.

Also flattering to my skintone and with great opacity, I've only used one coat here.  It's an all round winner for me.  I did somehow manage to apply it a bit unevenly on the end of my ring finger, but that's my fault for rushing, not the polish formulation.

So here's a picture of what I did:
I was really impressed with the Barry M Nail Art Pens.  The polish flowed neatly out of them, and they were incredibly precise.  As you can see, I managed to do teeny weeny dots, and it took no time at all.

Here's a pic of the nibs, they're not like traditional felt tips, they're sort of a hard plastic, but lovely and smooth to use:
The one thing I did notice is that when I tried to do stripes with them, my initial line went slightly thinner as it dried, and sometimes I had to do over it twice to get the thickness I wanted.  That didn't bother me too much though, and as you can see it worked brilliantly for dots.

Here's what the full pens look like:
The nailart pens also came in pink and silver, but I didn't buy those.  They were £4.99 each in Superdrug, and at the moment they are having a 3-for-2 offer, so you could pick up 3 at a good price if you're quick.

One last picture of the nails:
So, there we go, I was really pleased with the quality of the Barry M Nailart Pens, and would definitely recommend them. They're quick, easy, and mess free.

Don't forget to check out what the rest of this weeks dotty ladies have to offer:

Catrine at Unnaked Nails (link)
Michelle at Labmuffin (link)
Maria at Maria's Nail Polish Blog (link)
Melanie at Nail and Polish (link)
Ameerah at Valiantly Varnished (link)
Anna & Haylee at Makeup and Masala (link)
Rosemarie at Every Little Polish (link)
Anna at Makeup N More (link)

So, have you tried the Barry M pens?  Did you like them as much as me?  Are you a fan of dotty nails?

Until next time...

MASPOOASE x x x
~Wendy~

Wednesday 13 November 2013

Artsy Wednesday - White Nailart

Artsy Wednesday once more!  These days whizz around I can tell you.  This weeks offering is the product of one of those happy occasions where you just throw something together out of neccessity and it actually comes out okay.  Nice one!

As quite often happens with me, it was after 9pm on Tuesday night when I started thinking about doing these nails.  As I work all day through the week, I have to prepare my posts beforehand, so this really is the last chance saloon.  I have of course been trying to think up designs for a couple of days, but it turns out that white is quite difficult to think of designs for.

I went through all the thoughts of glitter accent nails, or crystals/glequins, but nothing really made me think, ooh yes I'd like to try that.  So I just went upstairs to my polishes, grabbed the obvious white, OPI's Alpine Snow, and thought, what colour do I really like with white?  And as it happens only one colour came to mind, and that's orange.  Now, I have done an orange and white manicure on the blog before, (here's the link) but that was stamping, and that means waiting for the base to dry, and no time for that today, not even with Seche!

So here's what I came up with:
One of the brightest oranges I own is Essie's Orange It's Obvious, which I swatched and reviewed in full (here) so I thought I'd go with that.  A good nailart technique to use if you're in a rush is dotting, because you don't have to wait for the base colour to dry fully before you get on with the art.  I decided to make random flowers instead of plain dots, just because I wouldn't have to take so much care (and therefore time) over it, and actually, I like the results!

 Here's another pic with the bottle getting a look-in:
As you can see, the Essie dries a shade or so darker on the nail than it shows in the bottle.  I used one quite thin coat, and then one thickish one because I was in a rush (as I think I've mentioned haha).

And I might as well put in the last picture, seeing as I took the time to edit it:
Back to indoor photos now, as there's no light left in the sky when I get home from work.  But to be honest, I didn't really take that much advantage of it even when there was.  So many more fun things to do when the sun's out, like sunbathing and reading a book in the garden.  I actually enjoy my polishes more in the winter, when I'm indoors and sitting still long enough to let them dry properly.

Why not take a look at what whiteys the rest of the Artsy Wednesday crew have come up with:

Catrine at Unnaked Nails (link)
Michelle at Labmuffin (link)
Maria at Maria's Nail Polish Blog (link)
Melanie at Nail and Polish (link)
Emily at An Accent Nail (link)
Ameerah at Valiantly Varnished (link)
Anna & Haylee at Makeup and Masala (link)
Rosemarie at Every Little Polish (link)
Anna at Makeup N More (link)

All in all, I like this, and I think I'll definitely have a go at it in some other colours. What's your go-to "in a rush" nailart technique?

Until next time...

MASPOOASE x x x
~Wendy~

Sunday 10 November 2013

M&S Limited Collection Textured Polish Pink Mix Swatch and Review

I love a bargain, me. LOVE. So, while having a browse in Marks & Spencer last weekend, this lil pretty caught my eye. I've stayed away from textured polishes this far. The only ones that have caught my eye have been the Liquid Sand ones, but they cost too much really to justify as a 'novelty' polish purchase, so I haven't bothered. And all the swatches of the Barry M ones I've seen have been a bit meh.
 
But at £4, this one called to me from the shelf... "Buy me, buy me, you know you want to.... I don't cost much and look at how prettyyyyy I am" then somehow jumped into my hand, and magically towed me to the cash desk. That's my story and I'm sticking to it.
 
But sadly then all week the weather has been rainy and grey, and no good for showing the new addition to my polish family off to her full potential. Saturday I was rough as anything due to slight over indulgence on Friday night, so no polishing happening there. But today, the swatching gods got their act together, I felt OK, the sun came out, and I was able to take some pics to show to you. Slightly too many if truth be told, but I couldn't pick, so you get the lot.
 
So without further ado here's the first pic. Now in winter jumpers, yay! M&S-Limited-Collection-Textured-polish-swatch
Sparklicious!  This fuschia-y shade is one of my favourites, which is lucky because as far as I could see, it seemed to be the only colour it came in haha.  It's called Pink Mix and it's a jellyish watery berry base with fuschia and electric blue micro glitter mixed in.  There's also something holo-y in there, but I couldn't figure out what.  One coat was passable, but I got full coverage in two coats.  This is obviously shown with no top coat, and dry time was initially fast, but stayed denty for about 7 or 8 minutes.  I found that once you can't smell them any more, they're dry.
 
Here's a pic I took earlier in the day when the sunlight was a bit whiter:
Marks-and-Spencer-textured-polish-swatch
This is a truer representation of the colour, and the blue has come out to play.  It dries ever so slightly lighter on the nail than it shows in the the bottle, but not much.  If you like it in the bottle, I think you'll be pretty pleased with it on your nails.  I know this sounds weird, but it can't be said of all polishes.
 
Application was ok.  I didn't need to do any clean up, and I didn't have the 'not going to the edges' problem you sometimes get when applying glittery polishes.  The brush dropped the polish pretty much where I wanted it to without flooding or blobbing.
 
Speaking of the brush, here's a pic of it:
It looks a bit stubby there, but actually the lid's quite long and it was good to use.  Sometimes the lid of a polish can be a distraction while you're using it, but not the case here.  You can see the brush itself is slightly splayed, and that made it work well with the glittery formula.
 
Here's the Extreme Close Up.  Matchy matchy with my phone cover:
M&S-polish-Pink-Mix-review
Bright enough for you?  It comes into its own much more in real life.  I wouldn't call it a full on blingy sparkle, but a more grown up twinkle. 
 
As its selling point is as a textured polish, I guess I should talk about that a bit.  I think that pic shows the texture well.  It's not gritty to the touch, just slightly bumpy, so it won't pick up hairs or accidentally scratch you.  Think teeny tiny fairy woodchip wallpaper.
 
Packaging wise, it wins points also:
M&S-textured-pink-mix-textured-polish-review
Yep, holographic deers.  I don't care what's in the box, I'm having it!  I think it looks like it cost more than it did, and the packaging also makes it easier to wrap.  A definite win/win gift-wise.
 
Let's have one more swatch, just because I took the pic and we may as well:
Marks-textured-polish-review
You can see on my middle finger, I have a little bit of wear.  I'd put the polish on in the morning, and this is mid afternoon.  Although admittedly I didn't wait very long before I starting doing things, wear time is going to be interesting with not having a top coat.  Actually in real life you can't see that wear at all, but it is there (obvs).
 
Surprisingly, removal wasn't too bad.  I use Cutex Ultra Cleansing remover which contains acetone, and gets rid of regular polish in one or two sweeps.  This one required a little bit of rubbing, but I wouldn't put it in the 'painful' category along with my other glitters.  Also I wasn't covered in glitter after I removed it, like some polishes.  It put me more in mind of removing a foil finish polish.
 
So, I think you can tell, I like this one.  I think I'll get a fair few uses out of it, and it's not too seasonal to have to just stick to wearing it in the winter.  So far I haven't found a polish from the M&S Limited Collection colours that I haven't liked, and I've got 6 or more now, so thumbs up M&S!  If you want to buy online, here's the (link) which shows me it also comes in a blue version, which they didn't have in my store.
 
Do you own this one?  What do you think?
 
Until next time...
 
MASPOOASE x x x
~Wendy~

Wednesday 30 October 2013

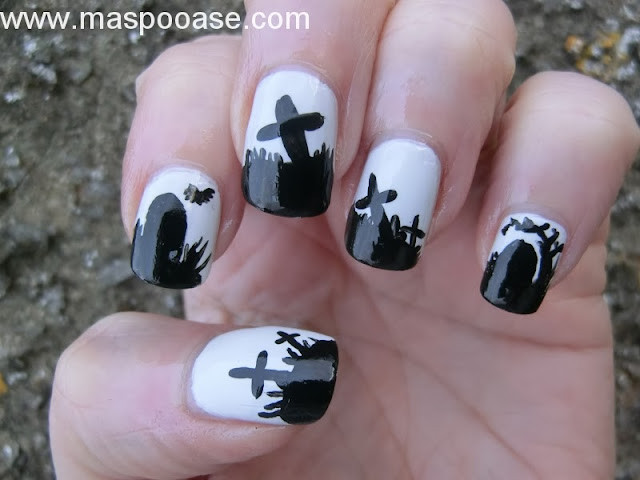
Artsy Wednesday - Halloween - Graveyard Nailart

Boo!

Yay for Halloween!  My absolute favourite celebration.  I love all this spookiness, and the fun that comes with it.  It's impossible to think of it without having a bit of a smile to yourself.  And so many nailart ideas to play with of course.  These days it's hard to come up with anything that hasn't been done before, and last year I stressed myself out trying to do so.  I did come up with my favourite nailart ever last year though, and will post a picture further down this post.  If you can't wait, the link is (here)

So anyway, as I was saying, this year I decided I'd pick a tutorial and give it a try.  I'm terrible when it comes to looking at other peoples stuff, and only usually look at things that pop up in my Twitter feed or YouTube subscriptions, so it was nice to make an effort to go out and see what everyone's got on their nails this season.

Alot of it was too cutesy for me, because as far as I'm concerned, it should at least be a bit spooky!  So I decided after looking at hours of tutorials, to give this VIDEO a try by Gorgeous Nails. 

And here's the result:
Halloween-nailart
Now, typically for me, there are some elements of this that I'm not 100% happy with.  I wish I hadn't made the two crosses on the middle nails lean the same way, and I would have been a bit happier with the bat on my index finger if I'd worked on it a bit more.  However, the tree on my little finger is only there because I made a massive blob on my nail accidentally, and that came out alot better than I would have thought, so a good save there for me.

I did this look by painting all my fingers with OPI's My Boyfriend Scales Walls, then using black acrylic paint and my spotter brush to draw in the details.

Here's another pic:
Graveyard-Nailart
In real life this actually looks pretty good, and I'm thinking some kind of gradient behind it might make it really special.  Very tempted to give it another go for the big day.  Everything of course was topped off with a coat of Seche.

I've booked November 1st off as a holiday from work this year (yay!) so I can have a drink, a bit of a one-girl celebration with a bottle of red wine and some spooky movies.  And lots of popcorn of course!  My favourite is Metcalfes Skinny Sweet & Salt (link) which seems to be relatively guilt free and oh so yummy.  Looking forward to it already!  Not sure which films to watch yet though.

Here's one last pic of this years halloween manicure, in close-up:
Spooky-Nailart
And, as promised, here's a pic of last years nailart, inspired by the Blair Witch Project:
Blair-Witch-Project-Nail-Art
Interestingly and co-incidentally, my nails look to be almost exactly the same shape and length as they were last year!  That's pretty weird considering they've been all sorts of lengths and shapes this year.  This is probably my favourite nailart ever.  Spooky-wooky. 

Anyway, make sure you mosey on over and check out the scaaarrrryyyyyy offerings from the rest of the crew:

Catrine at Unnaked Nails (link)
Michelle at Labmuffin (link)
Maria at Maria's Nail Polish Blog (link)
Melanie at Nail and Polish (link)
Emily at An Accent Nail (link)
Ameerah at Valiantly Varnished (link)
Anna & Haylee at Makeup and Masala (link)
Rosemarie at Every Little Polish (link)
Anna at Makeup N More (link)

I'd love to know what your favourite halloween nail look is! 

Until next time...

MASPOOASE x x x
~Wendy~

Monday 21 October 2013

Alice in Wonderland freehand Nailart

I've got some mojo back, yay!  This is the manicure I wanted to do for the Artsy Wednesday Disney week, but I just couldn't make it work.  I absolutely love the book Alice in Wonderland, and I've wanted to put a representation of it on my nails for a long time.

My favourite character in the book is the Cheshire Cat, so he's the centrepiece of my creation.  One of my favourite quotes from the book is:

Alice "Would you tell me, please, which way I ought to go from here?"
"That depends a good deal on where you want to get to," said the Cat.
"I don't much care where –" said Alice.
"Then it doesn't matter which way you go," said the Cat.
"– so long as I get somewhere," Alice added as an explanation.
"Oh, you're sure to do that," said the Cat, "if you only walk long enough."

Simple yet clever.  A sign of great writing, and the book's like that all the way through.

So without further ado, here's what I came up with:
I painted the Cheshire Cat mid-disappear.  I'm not completely heartless though, so gave him a nice branch to sit on.

The playing card characters are actually stickers, which I got from Amazon, here's the (link), and here's what you get:
Some of these are a bit too cutesy for me, and I probably won't use them, but for £3.25 with free shipping, I don't mind that too much.  They are quite thick, and as you can see I had a little bit of wrinkling, but in real life you can hardly tell.

So here's another pic, and then I'll go through what I did:
So, I started off with kitty cat.  I painted my nail with Nails Inc Albert Place, which is one of my go-to light blues.  I then put a coat of Seche on it to dry it quickly. Then I used a silver Sally Hansen nailart pen to sketch out the design.  I like this because it doesn't matter too much if it's not exactly perfect, as you hardly see it at the end. 

Then I drew in the branch with a brown Precision striper, and the leaves with a Color Club green striper.

Then I used my spotter brush and black acrylic paint to place out the mouth and eyes.  Once that was dry I filled in the eyes with green acrylic paint, and made the teeth with white acrylic paint.  Then I filled in his pupils and nmade a little highlight in his eyes, again with acrylic paint.  I then went over the whole thing with a coat of Seche, being VERY careful not to drag the design after all that painting!

The green nails (representing the Queen of Hearts croquet lawn) are one thick coat of Barry M Gelly in Key Lime, and the white nail (as a nod to the White Rabbit) is OPI's My Boyfriend Scales Walls.

A coat of Seche then went over everything to dry it in a reasonable time, and smooth out the stickers.

Here's a close up of my Cheshire Cat nail:
You can just about see the silver pen I used to sketch out the design under his right eye.  In real life it kind of makes it look 3-D, which is pretty cool.

And here's the tools of the trade:
If you haven't read the book, I wholeheartedly recommend that you give it a go, it's a real delight.  And if you do, please let me know what you think of it!

Until next time...

MASPOOASE x x x
~Wendy~

Wednesday 16 October 2013

Artsy Wednesday Nailart - Crystals

Hi All!

Here I am again with this weeks Artsy Wednesday.  The last Artsy Wednesday was Disney, and I had quite a good idea for it, but every way I tried to do it, it just came out in a mess.  Eventually I got that stressed out with it that I decided not to put anything at all up.  I think sometimes you have to know when you're beat haha.

This week is quite a straightforward theme of crystals.  I am a total magpie, so I have plenty of pretty shiny things to put on my nails.  The challenge for me was to try to come up with something a little bit original, and hopefully I've managed that.

Here's what I came up with:
The base polish is the lovely A-England Tristam.  Here it looks like it has a silver sparkle in it, but in real life that's a very subtle holo.  This is one coat, and it had enough coverage.  If I intended this mani to last I would still do two coats though, just for the extra wear.

I then stuck some crystal stars straight onto the wet polish.  I got these ones from ebay, in a wheel with different sizes and shapes in it.

Here's another picture:
My nails are far too long at the moment.  I keep waiting for one to break so I've got a reason to cut them down, but they seem to want to stay long right now!  I will have to cut them soon though, because once they get to a certain length typing gets uncomfortable.

I'm sure now that the weather's turned cold they'll start to dry out a bit.  I love this autumny weather, my woolly jumpers are already out, and I've broken out the hot chocolate too, yum!  Hopefully I'll get a lovely crisp day soon to take a walk and get some lovely photos to share with you.

I hope you like my blingy offering!  Don't forget to check out what the other lovelies came up with:

Catrine at Unnaked Nails (link)
Michelle at Labmuffin (link)
Maria at Maria's Nail Polish Blog (link)
Melanie at Nail and Polish (link)
Emily at An Accent Nail (link)
Ameerah at Valiantly Varnished (link)
Anna & Haylee at Makeup and Masala (link)
Rosemarie at Every Little Polish (link)
Anna at Makeup N More (link)

Until next time...

MASPOOASE x x x
~Wendy~