Hi there lads and ladies!
I hope you're having a great weekend? Mines gone really well, only a teeny tiny bit of shopping, despite it being payday, so I'm back on track with my low-buy. Which is a good thing.
Todays nailart idea came a little bit out of the blue. I was just sitting here wondering what to put on my nails (as you do), and I decided I was in a neon mood today. You'd think that I would have thought this while the suns shining, but oh no, not me, I had the idea in a torrential storm.
So anyway, I do have a few neons, but they're all sheer and need undies, which gets on my nerves. I only have a couple which can hold their own. This is one of them, Pixi No.14.
In real life this is so much brighter. Almost hurt to look at it, bright. This is only one coat, which is why there is VNL, but in 2 it's opaque. However I knew I'd be going over it anyway so didn't bother.
I took a make up sponge and dabbed a gradient with OPI Alpine Snow on the tips of my nails. I despise sponging as it's so messy, but I couldn't get around it with this idea I had:
And then, the tip of my nail wasn't coming out white enough, so I went over it again just using Alpine Snow with the brush from the bottle to get it properly white. This shows the most on my little finger.
So, once I was satisfied I stamped over the white, using the same Pixi polish, with Gals stamping plate GA14. How weird that they're both number 14? I never realised until now, it must have been meant to be.
So after a coat of Seche, and some clean up, this is how they turned out:
They actually came out nicer than I thought they would. I thought they were going to look really messy, but they don't look too bad.
But then, I still wasn't satisfied! I've rekindled my love for matte top coats at the moment (expect to see more soon) and so I decided to give this one the un-shining treatment. Here's how it looks:
Yep, that's better! And because the only camera in the world that seems to be able to pick up colours properly is my rubbish resolution phone camera, here's what it sees:
Bright eh?
So, I'm liking this alot, just what I was in the mood for. I love it when that happens.
What's on your nails today? Do you know of any opaque neons I need?
Until next time...
MASPOOASE x x x
~Wendy~
Sunday 28 July 2013
Wednesday 24 July 2013
Artsy Wednesday: Designer-inspired - Joris Laarman
I hope you're doing great today? I'm so excited to bring you todays nails.
The weather's finally broken, and after 3 weeks of non stop dry and sunny weather, we've had storms for the last few days. I don't mind that though, I think that one of the good things about living in the UK is that the weather seldom stays stable long enough to get bored of it. What on earth would we make small talk about otherwise?
This weeks Artsy Wednesday theme is "designer inspired". Of course it's not that long since I did my Louis Vuitton nails (link) so if I was really lazy, I could always repost them! But I'm not really lazy (most of the time), so I came up with something else.
Rather than going down the fashion designer route, I took my inspiration from other quarters. As well as nail art design, I also love interior design, particularly anything that's beautiful to look at as well as functional. Form and function together really floats my boat :-)
There is a dutch design house started by a man called Joris Laarman who are really creating some inspirational and innovative designs. One of my favourite creations is their furniture range called "Bone".
Here's the nail design I did based around one of their chairs:
I'm really happy with this design. It came out even better than I planned. The base polish is OPI Skull and Glossbones, and then I mixed up black and white acrylic paints until I came up with a grey I was happy with. In real life Skull and Glossbones is a taupe/grey and that really makes a difference.
Then I used my new BFF bargain nailart brush, the Daler Rowney spotter 10/0 brush from my blog post at the weekend (link) to paint on the design.
Here's a screenshot from the Joris Laarman website (link) to show you what I'm talking about:
How beautiful is this? It's so elegant whilst managing to be Art Nouveaux yet modern. I love it.
I picked small sections of the picture of the chair, and painted those on my nails. Here's another pic:
I like that this design is abstract. It's attracted alot of positive comments, and people have seen many different things in it, from trees to veins haha.
I even managed to do my other hand, although not quite so nicely of course:
I've definitely found this an addictive design. I can't stop looking at it! I love that it reminds me of that beautiful, beautiful, chair, without actually being a chair on my nails.
I'll be so sad when it chips and I have to take it off, but I suppose that just makes room for more designs :-)
The other girls in the Artsy Wednesday group will have done their nails too! Here's their links:
Catrine at Unnaked Nails (link)
Michelle at Labmuffin (link)
Jessica at Beauty Gnome (link)
Emily at An Accent Nail (link)
Ameerah at Valiantly Varnished (link)
Anna & Haylee at Makeup and Masala (link)
Rosemarie at Every Little Polish (link)
What do you think? Do you like abstract designs?
Until next time...
MASPOOASE x x x
~Wendy~
The weather's finally broken, and after 3 weeks of non stop dry and sunny weather, we've had storms for the last few days. I don't mind that though, I think that one of the good things about living in the UK is that the weather seldom stays stable long enough to get bored of it. What on earth would we make small talk about otherwise?
This weeks Artsy Wednesday theme is "designer inspired". Of course it's not that long since I did my Louis Vuitton nails (link) so if I was really lazy, I could always repost them! But I'm not really lazy (most of the time), so I came up with something else.
Rather than going down the fashion designer route, I took my inspiration from other quarters. As well as nail art design, I also love interior design, particularly anything that's beautiful to look at as well as functional. Form and function together really floats my boat :-)
There is a dutch design house started by a man called Joris Laarman who are really creating some inspirational and innovative designs. One of my favourite creations is their furniture range called "Bone".
Here's the nail design I did based around one of their chairs:
I'm really happy with this design. It came out even better than I planned. The base polish is OPI Skull and Glossbones, and then I mixed up black and white acrylic paints until I came up with a grey I was happy with. In real life Skull and Glossbones is a taupe/grey and that really makes a difference.
Then I used my new BFF bargain nailart brush, the Daler Rowney spotter 10/0 brush from my blog post at the weekend (link) to paint on the design.
Here's a screenshot from the Joris Laarman website (link) to show you what I'm talking about:
How beautiful is this? It's so elegant whilst managing to be Art Nouveaux yet modern. I love it.
I picked small sections of the picture of the chair, and painted those on my nails. Here's another pic:

I like that this design is abstract. It's attracted alot of positive comments, and people have seen many different things in it, from trees to veins haha.
I even managed to do my other hand, although not quite so nicely of course:
I've definitely found this an addictive design. I can't stop looking at it! I love that it reminds me of that beautiful, beautiful, chair, without actually being a chair on my nails.
I'll be so sad when it chips and I have to take it off, but I suppose that just makes room for more designs :-)
The other girls in the Artsy Wednesday group will have done their nails too! Here's their links:
Catrine at Unnaked Nails (link)
Michelle at Labmuffin (link)
Maria at Maria's Nail Polish Blog (link)
Melanie at Nail and Polish (link)Jessica at Beauty Gnome (link)
Emily at An Accent Nail (link)
Ameerah at Valiantly Varnished (link)
Anna & Haylee at Makeup and Masala (link)
Rosemarie at Every Little Polish (link)
What do you think? Do you like abstract designs?
Until next time...
MASPOOASE x x x
~Wendy~
Labels:
abstract,
artsy wednesday,
grey,
joris laarman,
nail art,
Nailart,
OPI,
skull and glossbones
Saturday 20 July 2013
Daler Rowney 10/0 Spotter Brush - nail art brush review
Hows your weekend going? Mine's going great so far. Have been shopping today, broke my low-buy though as I got a couple of t-shirts, a pair of trainers, 3 nail polishes and some art stuff. But hey, first time this month since payday, so that's not too bad. I'm definitely not going to beat myself up over it anyway.
I was a bit stuck for a blog post to do for you today. I have a manicure on which I'm in LOVE with, but I can't show to you, as it's for Artsy Wednesday. I did it this morning, and there's no way it's coming off yet. So I couldn't swatch, although I do have some polishes to show you at some point, and I haven't bought any makeup worth telling you about lately, so I had to have a bit of a think.
And then I had a bit of a brainwave. The nailart brushes I've been using up to now are o...k.... but nothing special, just cheapy sets off Amazon, and I just use the smallest one, but they all seem to get stiff and rubbish really quick, even though I do try to clean them thoroughly after each use. Plus I've had some manicures wrecked by stray hairs, which is so frustrating.
So last weekend, I was watching YouTube as you do, and someone was doing some awesome nailart (I wish I could remember who to give them a shout out, my poor old memory is getting on a bit haha) and they mentioned the brush they were using. Well, it looked way better than any of mine, so I looked it up on Amazon. It was a Daler Rowney 10/0 Spotter Brush. To my amazement it only cost £2.99 with free delivery, so I snapped it up! This is what I got:
As you can see, it's got a really small pointed end. Although it looks as it it would be quite stiff, it's actually quite soft.
Here's a close up of the brush end itself:
Today I got to use it for the first time, and I love it! I was working with acrylic paint, so I haven't used it with polish yet, but it's a definite winner as far as I'm concerned. I had better, smoother coverage of paint than I've had with any of my other brushes, and it made so much difference to the quality of my nailart. I wish I'd had this brush at Christmas for my 12 Days of Christmas challenge. Oh well, I've got it now, and that's the main thing.
I blobbed some acrylic paint out and randomly drew some lines and dots so you can get an idea of how it performs:
As you can see, you can make MINUTE dots, like, so small you can hardly see them. The swirly thing is just random, showing you spirals and fans.
Yep, I like it. And if you're in the market for a nailart brush, you could do much worse that this one. Believe me, I know this to be true haha.
Now all I need to do is find a striper that's as nice! Any suggestions?
Until next time...
MASPOOASE x x x
~Wendy~
Labels:
brush,
daler rowney,
Nailart,
nailart brush,
spotter brush,
tools
Wednesday 17 July 2013
Decleor Prolagene Gel Review
I hope I find you well. Today I bring you a review of a beauty product which I've been using for years and years, and I keep saying to myself "I must review this on my blog", and then end up not doing it because a new pretty thing comes along to talk about.
Well, because I'm on a 'low-buy' at the moment, and trying to save my pennies, there have been no shiny new things to talk about lately. So, happily, I'm finally getting round to writing about products I already own which I think you should hear about, be it good or bad.
Whilst it's harder to whip up woo-hoo enthusiasm for products you've been using for a while, you also bring the benefit of long term use, so swings and roundabouts. We'll start with the pack shot:
Prolagene Gel is not just an emergency skin ‘fix’; it also works in perfect harmony with the Sculpt range to tone and firm the entire body.
Suitable for all skin types.
=====================================================================
All sounds great right? I have to say, I only usually use it on my face and neck (don't want to waste it), but I do also use it on any sunburn I might have, as it is very soothing.
Here's what it looks like out of the tube:
As you can see it's a light blue gel, with quite a thin consistency, which has a very light herbal fragrance which soon dissipates. It sinks in really quickly and only leaves a very slight tackyness behind.
I use it on cleansed and toned skin before my moisturiser, so the moisturiser gets rid of the last little bit of tackyness that's left.
Here's the ingredients:
I see parabens, which get bad press, I believe in this instance they are being used as preservative.
I must say, when I first got this, it came in a QVC Todays Special Value set, and I didn't really know what to do with it. I just rubbed it into my arms and legs, and it was one of those things that just sat in a drawer.
Then at some point, I was complaining that I used up my Decleor face oils too fast because the three drops they recommend don't cover my whole face, and someone told me that they mixed theirs in with their Prolagene, and oh my goodness, what a revelation!
I really like the combination of gel and oil. It seems to firm and plump at the same time. At the moment, I'm resorting to patting the final smidgens out of the oil bottles I've got, and stalking Ebay for a super cheap oil deal, because as I mentioned, I'm supposed to be saving up. But I can't live without my gel/oil.... it's my everyday wrinkle decreaser, and it means that I don't waste my expensive oil by using too much, so double win :-)
Now, I don't think I saw a totally immediate benefit from the gel, thinking back, but I can definitely tell if I've run out because my skin starts to misbehave after a week or so, with breakouts and uneven skintone, and extra laughter lines. So I do my best to make sure I don't run out.
There are only a few items in my beauty regime that I don't like getting low on, and this is one of them. I'm not sure how much benefit you'd see if you already have quite young firm skin, but certainly my 41 year old skin appreciates it! I haven't used it on stretch marks or scars, so I can't say whether it helps for those. I do think it makes redness from spots disappear faster though, although I've never done a test when I had two red spots to just use it on one. I might do that in the future. If I do, I'll edit this post :-)
It says on Decleors website that their products aren't tested on animals, and you can buy it on Amazon for £30.50 (here) or of course, you may pick up a bargain on Ebay. Make sure it's a reputable seller though, as there are some fakes about!
So, a big thumbs up from me, if you've been wondering about whether to buy this or not, I'd say go for it!
Until next time...
MASPOOASE x x x
~Wendy~
Well, because I'm on a 'low-buy' at the moment, and trying to save my pennies, there have been no shiny new things to talk about lately. So, happily, I'm finally getting round to writing about products I already own which I think you should hear about, be it good or bad.
Whilst it's harder to whip up woo-hoo enthusiasm for products you've been using for a while, you also bring the benefit of long term use, so swings and roundabouts. We'll start with the pack shot:
It has the regular bright yellow Decleor packaging, which I like, as it makes it easy to find in my drawer. It's a big tube, 150ml, and Decleor say:
=====================================================================
Prolagene Gel
A multi-tasking gel to rescue damaged skin by toning, firming, repairing and revitalising
A complete body treatment to smooth skin imperfections – both natural and accidental – and an iconic hero in the Decleor range.
Prolagene Gel supplies the deep tissue with the active ingredients necessary for the reconstruction of its natural collagen. Prolagene Gel has a visibly firming effect that builds up with regular use to smooth skin imperfections. Acting on the whole of the skin’s structure it helps speed up cell renewal to improve the look of stretch marks and scarring in addition to loose skin.
Prolagene Gel contains an amino acid called Proline L., which is similar to plant collagen and helps re-build the skin’s supporting fibres. The formulation also includes Osmanthus Absolute for its potent healing action. Toning as well as firming the gel leaves an invisible supportive and protective film making it perfect to use during and after weight loss, particularly during pregnancy, for smoother and firmer skin.
This exclusive DECLÉOR formula:
- Helps revitalise the support structure of the skin.
- Helps accelerate the skin’s renewal process.
- Helps diminish unsightly marks. Applied on the affected parts of the body, this gel leaves a supportive and protective film on the skin. Day after day, your skin renews itself with increased tone and firmness.
Suitable for all skin types.
=====================================================================
All sounds great right? I have to say, I only usually use it on my face and neck (don't want to waste it), but I do also use it on any sunburn I might have, as it is very soothing.
Here's what it looks like out of the tube:
As you can see it's a light blue gel, with quite a thin consistency, which has a very light herbal fragrance which soon dissipates. It sinks in really quickly and only leaves a very slight tackyness behind.
I use it on cleansed and toned skin before my moisturiser, so the moisturiser gets rid of the last little bit of tackyness that's left.
Here's the ingredients:
I see parabens, which get bad press, I believe in this instance they are being used as preservative.
I must say, when I first got this, it came in a QVC Todays Special Value set, and I didn't really know what to do with it. I just rubbed it into my arms and legs, and it was one of those things that just sat in a drawer.
Then at some point, I was complaining that I used up my Decleor face oils too fast because the three drops they recommend don't cover my whole face, and someone told me that they mixed theirs in with their Prolagene, and oh my goodness, what a revelation!
I really like the combination of gel and oil. It seems to firm and plump at the same time. At the moment, I'm resorting to patting the final smidgens out of the oil bottles I've got, and stalking Ebay for a super cheap oil deal, because as I mentioned, I'm supposed to be saving up. But I can't live without my gel/oil.... it's my everyday wrinkle decreaser, and it means that I don't waste my expensive oil by using too much, so double win :-)
Now, I don't think I saw a totally immediate benefit from the gel, thinking back, but I can definitely tell if I've run out because my skin starts to misbehave after a week or so, with breakouts and uneven skintone, and extra laughter lines. So I do my best to make sure I don't run out.
There are only a few items in my beauty regime that I don't like getting low on, and this is one of them. I'm not sure how much benefit you'd see if you already have quite young firm skin, but certainly my 41 year old skin appreciates it! I haven't used it on stretch marks or scars, so I can't say whether it helps for those. I do think it makes redness from spots disappear faster though, although I've never done a test when I had two red spots to just use it on one. I might do that in the future. If I do, I'll edit this post :-)
It says on Decleors website that their products aren't tested on animals, and you can buy it on Amazon for £30.50 (here) or of course, you may pick up a bargain on Ebay. Make sure it's a reputable seller though, as there are some fakes about!
So, a big thumbs up from me, if you've been wondering about whether to buy this or not, I'd say go for it!
Until next time...
MASPOOASE x x x
~Wendy~
Sunday 14 July 2013
Blogging - Where's My Mojo?
This was originally part of another blog post, but it got so long and rambly, I think it distracted away from the beauty review it was in, so I've given it a little home of its own.
I must say that my blog mojo's been on a low ebb recently. Luckily I've got lots of lovely blogging friends, some who are going through a similar thing, and I've been able to talk it through with them. Thank you all :-)
It's been going through my mind, "What's unique about my blog? Nothing. So many beauty blogs out there, all talking about similar things, many are much more popular than mine, so they're obviously doing it better." and it's kind of put me off. I don't want to think that I'm just another voice in the "buy this" choir. That's partly the reason that I spin off in my blog sometimes onto other things, like books, or recent events, or even just random ramblings. It makes my blog more 'mine'.
And personally, I prefer blog posts about peoples lives, and their trials, tribulations, and thoughts, much more than I want to see *another* Rimmel Apocalips review. Obviously I'm not in the majority here, because those kind of posts seem to be super-popular and their authors have mega page views, and that's great. Everyone has their place, and mine's obviously not up there with the blogging elite. I saw a blog post the other day that was just 10 photographs in a row and no words at all. I was like, what? That's a blog post?
Maybe I should sack the beauty reviews and just become a lifestyle blogger? I don't know, just thinking aloud. I like reviewing things though... and obviously I like nail art too, I spend enough time doing it... but weirdly I don't post all the designs that I do, because I think, that's been done before, people might think I'm copying, or, my cuticles are bad... or, I've chipped it before I've taken photos.... and so on and so on...
Somehow these things don't seem to bother other people. I've seen some awful manis on really popular blogs, and there have been such lovely comments. There's obviously something about this blogging malarkey that's out of my comprehension. Some people could probably just post photos of a turd from different angles, and get great comments about their diet.
Aaaandd that makes me sound bitter. And I'm genuinely not. If people can make a living out of their blog, or even just have a super successful one, I'm happy for them. To get there they will have put alot of hard work in. Hard work that I don't have either the time or inclination to feed into my own blog. They are there, looking for every way to reach out to new people, members of all the networks, taking the time to comment in all the popular forums, getting their name known. Not for me. I. Just. C. B. A.
So, I can't complain. And I'm not. Just venting I guess. And talking through my mojo loss with you. Every time I've thought of getting my laptop out to blog, these things have all been going though my head, and I've ended up going off to do other things. If it hadn't been for Artsy Wednesday, and not wanting to let the other girls down, my blog would have hit the rocks lately I think.
What am I doing back here then? Well, when I'm not blogging, I'm thinking about blogging. It's not that I don't like blogging any more, because I do. I have a beauty review almost ready to go, and I'll probably post that today too, while I'm feeling the vibe. It's just that life gets in the way. I've had alot on my plate lately, and although alot of it's still there, I'm feeling alot stronger than I was. If you can win the battles in your head, you're much more likely to win them out there in the world. Well, that's what I think anyway.
As long as I can manage to stay true to my original idea for my blog, which was to share my thoughts on things with all of you, then I'll class it as a success no matter how many followers, or pageviews, or lack of, I have.
And so far, I've managed it. I have been swayed when I've read a popular blog, to mimic its style, or be inspired by its posts, but at the end of the day, then it wouldn't be my blog anymore. And for me, that's the best thing about my blog, that it's mine. It reflects me and my life. And even though my life may be similar to some peoples, it will never be the same, because mine has me in it.
So as I sit out here in the garden, cursing next door for strimming while I'm trying to think, what are my plans for my blog? Hard to say really. I have so many interests. Like, SO MANY, it's hard to just stick with the nails and beauty. I don't want to have two or three different blogs for different things, but that seems to be the done thing. I find it hard enough to keep up with this one.
It's tough finding time to actually do the things when you're working full time, never mind writing about them too. That's another reason I take my hat off to the bloggers who manage to work or study full time, or juggle a blog with a family, and still manage to post every day. Granted, some of their posts aren't very long, and I'd feel like I was short changing people if I put out posts like that, but they they are the normal ones, but I'm the exception rather than the rule, with my ramblings.
So if you're not really feeling your blog right now, take heart in the fact that you're not alone in feeling like that. I personally feel that it's better to put your blog on a 'go-slow' post wise, rather than just churn out any old tat. I've only been posting once a week, sometimes not even that, and I haven't seen a massive reduction in my pageviews (no, I don't understand it either). According to Blogger I get roughly 150 pageviews a day, although I have no idea how many of those are real pageviews, and probably wouldn't want to know either haha.
I think it's just a muddy patch of blogging ground that we all have to trudge through from time to time, in order to get to where we want our blog to be. Having talked this through here with you, I think I've come to realise that I want my blog to be a vibrant, fun, and creative place where like minded people (that's you) come to be inspired, and hopefully have a fun read. This might mean mixing it up with a few other topics...
But don't worry, there'll still be loads of nails :-)
Until next time...
MASPOOASE x x x
~Wendy~
Wednesday 10 July 2013
Artsy Wednesday - 2 colours
Hi there guys and girls,
Here I am, back with another installment of Artsy Wednesday. This weeks theme means that we can only use 2 colours. I was pretty excited about that, because while it's quite restricting, it's also very liberating, as they can of course be ANY two colours!
At first I wanted to do black and white, as it's supposed to be uber-trendy this season. Then I had a bit of a think. OK, so the magazines are telling me it's trendy, but apart from a few aztec leggings, I haven't really seen many people actually wearing it. So is it just a trend they tried to make that didn't catch on? Or maybe I'm not mixing in fashionable enough circles, which is always a possibility haha.
So then I toned it down a bit, and did yellow and navy. And while it wasn't a total disasticure, it wasn't really neat enough, so I dismissed that one too. I'll post a pic at the end of the post to show you.
So then I tried copper and blue. Which was nice, but I wanted to stamp with it, and the copper wasn't opaque enough. So FINALLY that brought me round to what I finally came up with. Pink and grey. Why didn't I think of that straight off the bat? It's one of my favourite colour combos. *hits self on head*
I'm still having to use my weaker hand to paint with at the mo, as the left hand little fingernail that I was patching up finally grew out past my nail line, so I ripped it off. I'm no good at getting my patches smooth, so it was making any polish job look a bit poor. And since I don't want to subject you to the odd length nails I'm sporting on that hand at the moment, it's a weak hand mani or nothing!
Therefore I knew it couldn't be anything too complicated, so I brought out my tools. This is what I came up with:
These are both Nails Inc polishes. The pink is Marble Arch, and the grey is The Southbank. The formula on both of these polishes is excellent, and they could both be one coaters if your nails aren't too ridgey.
I painted my nails with alternating colours, and then applied a coat of Seche Vite. This is a tip I picked up from Sammy at the Nailasaurus (link to post) in her tutorial. Then once that was dry I stuck a paper filing hole reinforcer to the top of my nail and then some striping tape stretching between the reinforcer and the free edge of my nail. Then I painted over the top with the opposite colour, then peeled off the reinforcer and striping tape immediately after.
Once I had done this with all my nails, I then did my dots with a smallish dotting tool.
These are the tools I used:
The striping tape is actually gridding tape from Ryman the Stationers (link) I have both the 1.5mm and the 3mm versions, but on this occasion I used the 3mm, which is a bit wider than regular striping tape, and I like it because I don't find it curls as badly as usual striping tape. The reinforcers were just cheap ones from Wilkinson. The dotting tool is a Cheeky one I got from a set from Amazon (link) £1.63 for 5 with free shipping, how do they do those prices? So nothing too expensive there (apart from the polishes of course) if you want to create this look on a budget.
I'm on a low-buy myself at the moment, because my cars tax, MOT (two new tyres, could have been worse) and insurance have all come along at once, sigh...
Here's a pic of the nailart in the sunshine:
I really like how this came out. Marble Arch is a softer version of Devonshire Row, one of my favourite Nails Inc polishes. It's got a colour block look to it without being too plain. Here's the gratuitous bottle shot:
It manages to be quite striking without being too in your face. Unlike my original attempt, which I mentioned at the start of the post:
I painted my nails light yellow, and then used a Sally Hansen nailart pen to draw the design. The idea isn't too bad, but my lines are the little bit too wobbly for my liking. It maybe would have been easier with a striper.
Once again I'm grateful to Artsy Wednesday for making me get off my bum and do some blogging. I haven't had any inspiration for a week or so, and this has woken my brain up again.
Don't forget to check out what the other lovely Artsy Wednesday girls have to offer this week, it's always fascinating so see how different our designs come out even when the theme is the same:
Catrine at Unnaked Nails (link)
Michelle at Labmuffin (link)
Jessica at Beauty Gnome (link)
Emily at An Accent Nail (link)
Ameerah at Valiantly Varnished (link)
And a big welcome to our newest additions *waves*
Anna & Haylee at Makeup and Masala (link)
Rosemarie at Every Little Polish (link)
Do you have a favourite two colour look? I'd love to see it!
Until next time...
MASPOOASE x x x
~Wendy~
Here I am, back with another installment of Artsy Wednesday. This weeks theme means that we can only use 2 colours. I was pretty excited about that, because while it's quite restricting, it's also very liberating, as they can of course be ANY two colours!
At first I wanted to do black and white, as it's supposed to be uber-trendy this season. Then I had a bit of a think. OK, so the magazines are telling me it's trendy, but apart from a few aztec leggings, I haven't really seen many people actually wearing it. So is it just a trend they tried to make that didn't catch on? Or maybe I'm not mixing in fashionable enough circles, which is always a possibility haha.
So then I toned it down a bit, and did yellow and navy. And while it wasn't a total disasticure, it wasn't really neat enough, so I dismissed that one too. I'll post a pic at the end of the post to show you.
So then I tried copper and blue. Which was nice, but I wanted to stamp with it, and the copper wasn't opaque enough. So FINALLY that brought me round to what I finally came up with. Pink and grey. Why didn't I think of that straight off the bat? It's one of my favourite colour combos. *hits self on head*
I'm still having to use my weaker hand to paint with at the mo, as the left hand little fingernail that I was patching up finally grew out past my nail line, so I ripped it off. I'm no good at getting my patches smooth, so it was making any polish job look a bit poor. And since I don't want to subject you to the odd length nails I'm sporting on that hand at the moment, it's a weak hand mani or nothing!
Therefore I knew it couldn't be anything too complicated, so I brought out my tools. This is what I came up with:
These are both Nails Inc polishes. The pink is Marble Arch, and the grey is The Southbank. The formula on both of these polishes is excellent, and they could both be one coaters if your nails aren't too ridgey.
I painted my nails with alternating colours, and then applied a coat of Seche Vite. This is a tip I picked up from Sammy at the Nailasaurus (link to post) in her tutorial. Then once that was dry I stuck a paper filing hole reinforcer to the top of my nail and then some striping tape stretching between the reinforcer and the free edge of my nail. Then I painted over the top with the opposite colour, then peeled off the reinforcer and striping tape immediately after.
Once I had done this with all my nails, I then did my dots with a smallish dotting tool.
These are the tools I used:
The striping tape is actually gridding tape from Ryman the Stationers (link) I have both the 1.5mm and the 3mm versions, but on this occasion I used the 3mm, which is a bit wider than regular striping tape, and I like it because I don't find it curls as badly as usual striping tape. The reinforcers were just cheap ones from Wilkinson. The dotting tool is a Cheeky one I got from a set from Amazon (link) £1.63 for 5 with free shipping, how do they do those prices? So nothing too expensive there (apart from the polishes of course) if you want to create this look on a budget.
I'm on a low-buy myself at the moment, because my cars tax, MOT (two new tyres, could have been worse) and insurance have all come along at once, sigh...
Here's a pic of the nailart in the sunshine:
I really like how this came out. Marble Arch is a softer version of Devonshire Row, one of my favourite Nails Inc polishes. It's got a colour block look to it without being too plain. Here's the gratuitous bottle shot:
It manages to be quite striking without being too in your face. Unlike my original attempt, which I mentioned at the start of the post:
I painted my nails light yellow, and then used a Sally Hansen nailart pen to draw the design. The idea isn't too bad, but my lines are the little bit too wobbly for my liking. It maybe would have been easier with a striper.
Once again I'm grateful to Artsy Wednesday for making me get off my bum and do some blogging. I haven't had any inspiration for a week or so, and this has woken my brain up again.
Don't forget to check out what the other lovely Artsy Wednesday girls have to offer this week, it's always fascinating so see how different our designs come out even when the theme is the same:
Catrine at Unnaked Nails (link)
Michelle at Labmuffin (link)
Maria at Maria's Nail Polish Blog (link)
Melanie at Nail and Polish (link)Jessica at Beauty Gnome (link)
Emily at An Accent Nail (link)
Ameerah at Valiantly Varnished (link)
And a big welcome to our newest additions *waves*
Anna & Haylee at Makeup and Masala (link)
Rosemarie at Every Little Polish (link)
Do you have a favourite two colour look? I'd love to see it!
Until next time...
MASPOOASE x x x
~Wendy~
Labels:
artsy wednesday,
dotticure,
dotting,
Marble Arch,
Nailart,
nails inc,
the southbank
Monday 1 July 2013
My Glitter Polish Collection
Hi there,
Hope you're all well today, Monday's over with for another week at least. My weekend went pretty well, despite not actually having achieved much, I chilled out, and that's always a good thing.
Now, as you know, my hands are all dermatitis-y and ugly, and I have a broken nail which I've got patched up, so I was having a think about some posts I could do which didn't involve you all seeing my ugly fingers. Then I remembered I've been meaning to do a post on my glitter polishes ever since I saw Maybelater's post (link) on her glitter collection.
Well, you don't need to see my fingers for that! So I got my glitters out, and despite saying I don't like glitters due to the awful removal process, I found I own 50 glitter polishes.
I have tried the PVA glue basecoat thing, but I found it just as hard to remove with or without it, so I don't really wear my glitters much, apart from on special occasions. I also bought the Andrea Fulerton peel off polish, as I thought that might be a way to do it, but it didn't peel off, so another fail there.
Am so disappointed it's not sunny today, to show these off to their full potential, but I've taken one picture in natural light, and one picture in artificial light for each group of six, so there's alot of pictures! I hope it doesn't take too long to load up because of this. Only one way to find out.
Each polish is one coat with no topcoat. If I've swatched it properly elsewhere in my blog, or used it in a design, I will attach the link at the side.
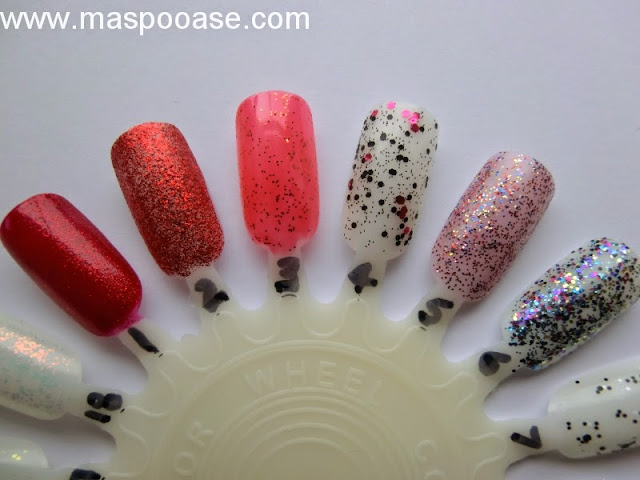
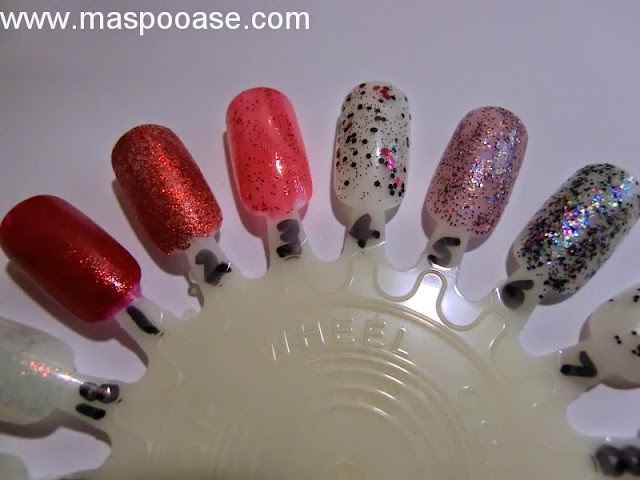
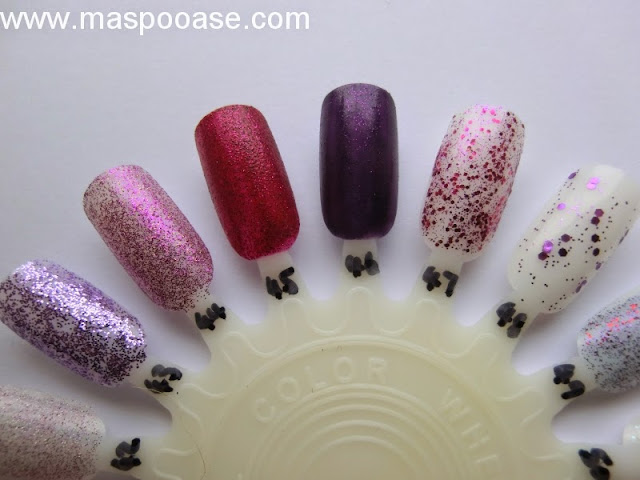
So here we have our first group:
1) Ruby Pumps by China Glaze (used here)
2) Red Glitter by Barry M (who are as imaginative about names as me haha)
3) #104 by Glitz/Tuesdays Girl
4) Ruby Glitter by Barry M
5) Spangle by Active Cosmetics
6) Amethyst Glitter by Barry M
Daylight:
Artificial light:
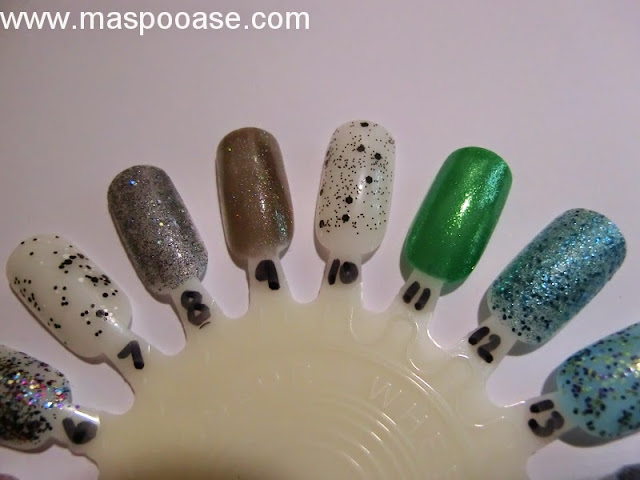
7) Confetti by L'Oreal
8) Glitz Gal Gem Crush by Sally Hansen
9) Thunder & Lightening by Models Own
10) Black Polka Dot by Nubar (I was disappointed that this was hex & not circle glitter)
11) Running in Circles by China Glaze (the green version of Ruby Slippers)
12) Fitzroy Square by Nails Inc (Swatched here)
Daylight:
Artificial Light:
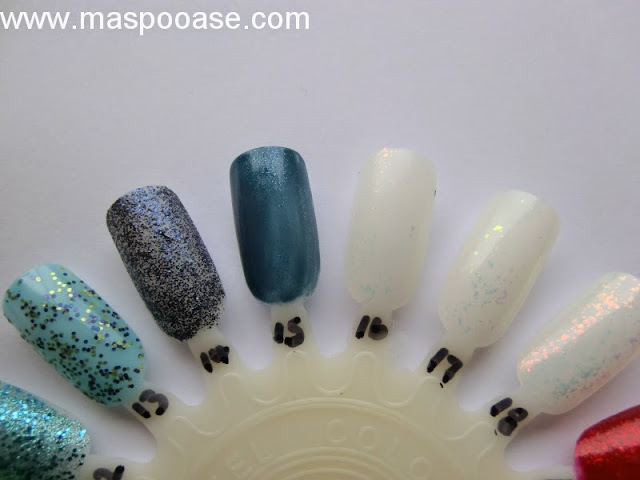
13) Pudding Lane Sprinkle by Nails Inc (the blue glitter on mine has started to bleed)
14) Sloane Gardens by Nails Inc
15) Navy Glint by Seventeen
16) Fairy Dust by Elf (doesn't show well, better shot of the flakies later on)
17) Sequin Effect by Nail Pop
18) Hidden Treasure by Sally Hansen
Daylight:
Artificial light:
19) Shepherds Market by Nails Inc (Swatched here)
20) Holo Bar Glitter by Claire's (Swatched here)
21) Silver Plated by Avon Colortrend
22) White Polka Dot by Nubar (again hexes) (Swatched here)
23) Electric Lane by Nails Inc (my fave!) (Swatched here)
24) Pastel Glitter by Claire's (I wish Claire's named their polishes)
Daylight:
Artificial light:
25) Blue Glitter by Claire's
26) Grammercy Glitz by NYC
27) Kingham Street by Nails Inc (Fine Sprinkles collection)
28) Devonshire Place by Nails Inc (Fine Sprinkles collection)
29) Warwick Street by Nails Inc (another one I love) (Swatched here)
30) Market Place by Nails Inc (Fine Sprinkles collection)
Daylight:
39) Shelton Street by Nails Inc
40) I Herd That by China Glaze
41) Rainbow Apparition by Bourjois 1 Seconde
42) Purple Glitter by Claire's
Daylight:
Artificial light:
43) Park Lane by Nails Inc (Swatched here)
44) Buckingham Street by Nails Inc (Swatched here)
45) Fiddlesticks by Butter London (used here)
46) Bow Street by Nails Inc
47) Princes Arcade by Nails Inc
48) Fuchsia Dazzle by Avon Colortrend
Daylight:
Artificial light:
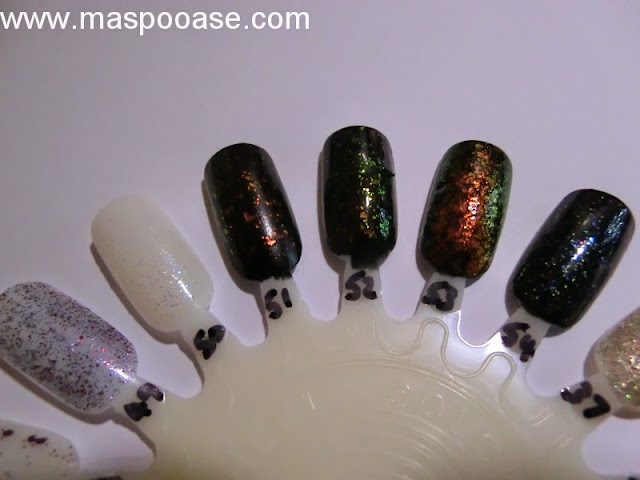
49) Razmatazz by Leighton Denny
50) Cascade by Leighton Denny
51) Fairy Dust by Elf over black (the flakies return!)
52) Sequin Effect by Nail Pop over black
53) Hidden Treasure by Sally Hansen Over black (swoon-tastic but takes forever to dry)
54) Cascade by Leighton Denny over black
Daylight:
Artificial light:
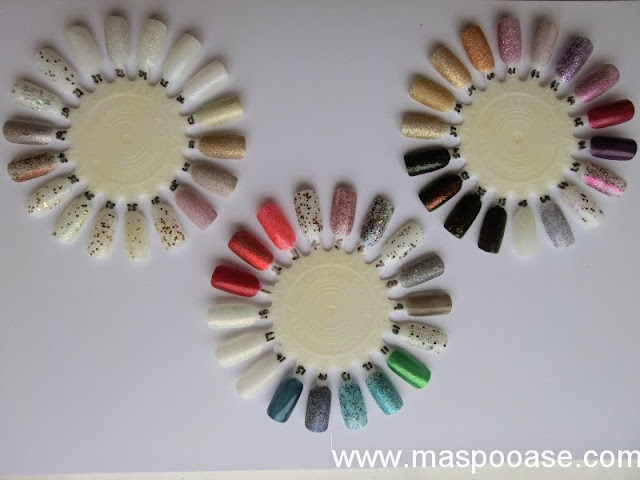
And here they are all together:
So there we have it, all my glitters. Some I love, and some I'm a bit 'meh' about. I'm surprised I don't like the fine sprinkles more than I do, considering I love Warwick Street so much. And pretty much all of the China Glazes have been full of win.
I have to be honest, I thought this blog post would be a breeze, but it's actually been a bit of a pain to do. I hope you think it was worthwhile!
Until next time...
MASPOOASE x x x
~Wendy~
Hope you're all well today, Monday's over with for another week at least. My weekend went pretty well, despite not actually having achieved much, I chilled out, and that's always a good thing.
Now, as you know, my hands are all dermatitis-y and ugly, and I have a broken nail which I've got patched up, so I was having a think about some posts I could do which didn't involve you all seeing my ugly fingers. Then I remembered I've been meaning to do a post on my glitter polishes ever since I saw Maybelater's post (link) on her glitter collection.
Well, you don't need to see my fingers for that! So I got my glitters out, and despite saying I don't like glitters due to the awful removal process, I found I own 50 glitter polishes.
I have tried the PVA glue basecoat thing, but I found it just as hard to remove with or without it, so I don't really wear my glitters much, apart from on special occasions. I also bought the Andrea Fulerton peel off polish, as I thought that might be a way to do it, but it didn't peel off, so another fail there.
Am so disappointed it's not sunny today, to show these off to their full potential, but I've taken one picture in natural light, and one picture in artificial light for each group of six, so there's alot of pictures! I hope it doesn't take too long to load up because of this. Only one way to find out.
Each polish is one coat with no topcoat. If I've swatched it properly elsewhere in my blog, or used it in a design, I will attach the link at the side.
So here we have our first group:
1) Ruby Pumps by China Glaze (used here)
2) Red Glitter by Barry M (who are as imaginative about names as me haha)
3) #104 by Glitz/Tuesdays Girl
4) Ruby Glitter by Barry M
5) Spangle by Active Cosmetics
6) Amethyst Glitter by Barry M
Daylight:
Artificial light:
7) Confetti by L'Oreal
8) Glitz Gal Gem Crush by Sally Hansen
9) Thunder & Lightening by Models Own
10) Black Polka Dot by Nubar (I was disappointed that this was hex & not circle glitter)
11) Running in Circles by China Glaze (the green version of Ruby Slippers)
12) Fitzroy Square by Nails Inc (Swatched here)
Daylight:
Artificial Light:
13) Pudding Lane Sprinkle by Nails Inc (the blue glitter on mine has started to bleed)
14) Sloane Gardens by Nails Inc
15) Navy Glint by Seventeen
16) Fairy Dust by Elf (doesn't show well, better shot of the flakies later on)
17) Sequin Effect by Nail Pop
18) Hidden Treasure by Sally Hansen
Daylight:
Artificial light:
19) Shepherds Market by Nails Inc (Swatched here)
20) Holo Bar Glitter by Claire's (Swatched here)
21) Silver Plated by Avon Colortrend
22) White Polka Dot by Nubar (again hexes) (Swatched here)
23) Electric Lane by Nails Inc (my fave!) (Swatched here)
24) Pastel Glitter by Claire's (I wish Claire's named their polishes)
Daylight:
Artificial light:
25) Blue Glitter by Claire's
26) Grammercy Glitz by NYC
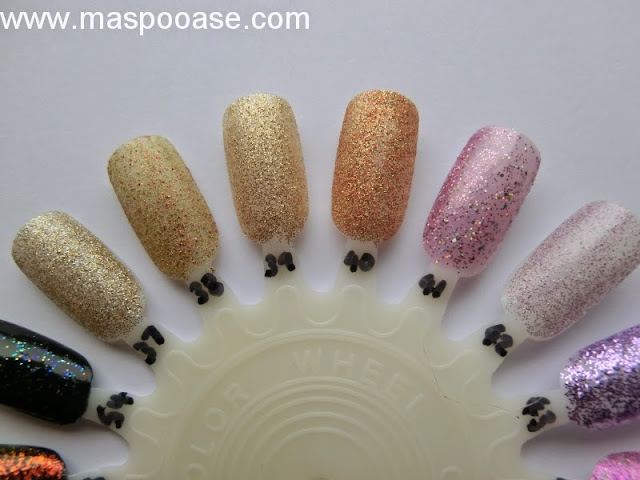
27) Kingham Street by Nails Inc (Fine Sprinkles collection)
28) Devonshire Place by Nails Inc (Fine Sprinkles collection)
29) Warwick Street by Nails Inc (another one I love) (Swatched here)
30) Market Place by Nails Inc (Fine Sprinkles collection)
Daylight:
Artificial light (bit blurred, sorry):
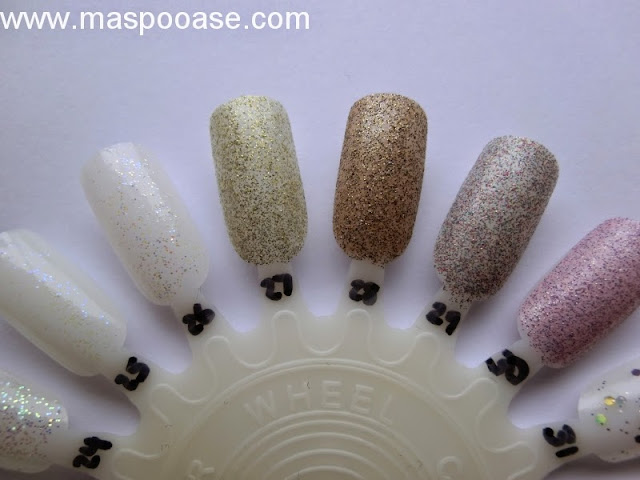
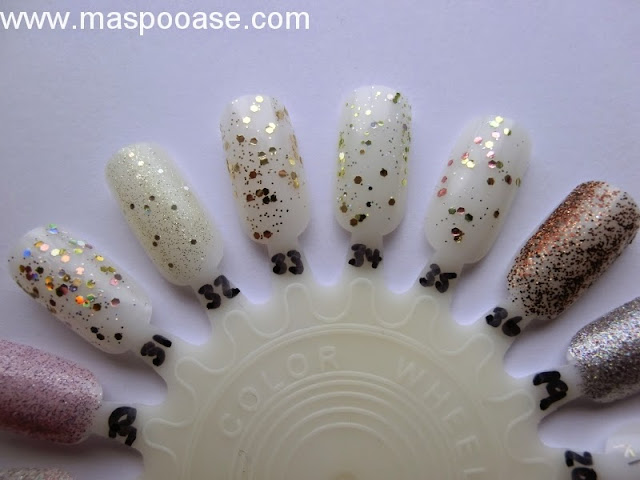
31) Antique Chic by Posh Polish (love this holo glitter)
32) Golden Goddess by Elf
33) Gold Flecked by Avon Colortrend
34) Yellow Topaz Glitter by Barry M
35) Peach & Green pastel by Claire's (this is curling up in the bottle)
36) North Row by Nails Inc (Swatched here)
Daylight:
Artificial light:
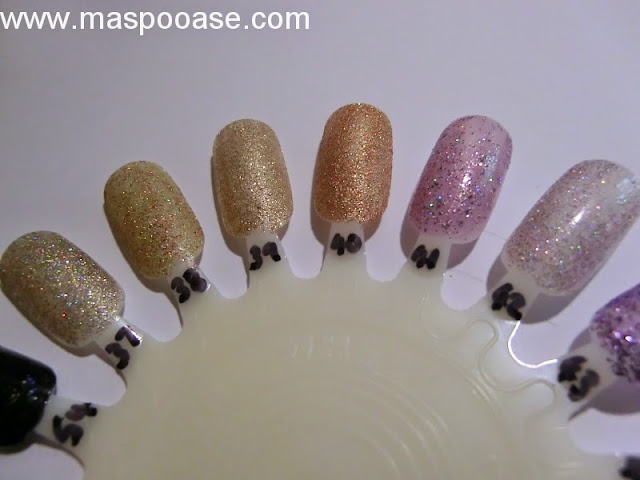
37) I'm Not Lion by China Glaze (Swatched here)
38) Bedford Square by Nails Inc (Swatched here)39) Shelton Street by Nails Inc
40) I Herd That by China Glaze
41) Rainbow Apparition by Bourjois 1 Seconde
42) Purple Glitter by Claire's
Daylight:
Artificial light:
43) Park Lane by Nails Inc (Swatched here)
44) Buckingham Street by Nails Inc (Swatched here)
45) Fiddlesticks by Butter London (used here)
46) Bow Street by Nails Inc
47) Princes Arcade by Nails Inc
48) Fuchsia Dazzle by Avon Colortrend
Daylight:
Artificial light:
49) Razmatazz by Leighton Denny
50) Cascade by Leighton Denny
51) Fairy Dust by Elf over black (the flakies return!)
52) Sequin Effect by Nail Pop over black
53) Hidden Treasure by Sally Hansen Over black (swoon-tastic but takes forever to dry)
54) Cascade by Leighton Denny over black
Daylight:
Artificial light:
And here they are all together:
So there we have it, all my glitters. Some I love, and some I'm a bit 'meh' about. I'm surprised I don't like the fine sprinkles more than I do, considering I love Warwick Street so much. And pretty much all of the China Glazes have been full of win.
I have to be honest, I thought this blog post would be a breeze, but it's actually been a bit of a pain to do. I hope you think it was worthwhile!
Until next time...
MASPOOASE x x x
~Wendy~
Subscribe to:
Posts (Atom)


.jpg)


