Saturday 31 August 2013

A-England Lady of the Lake swatch and Autumnal nailart

Autumn is coming! Yay!  And with that comes the darker colours, which I don't wear haha...

However having said that, I do go slightly darker, and incorporate those vampy colours in my nailart rather than painting them as full nails.

So for my first "less than summery" mani of the season, I decided to use A-Englands Lady of the Lake.  It is from their Mythicals Collection, and of course because I live in the lovely Lake District, how could I resist?  I'm surprised I haven't reviewed this before now, as I've had it quite some time, and I have worn it a few times too, strange...

Well never mind, here it is now.  No sunshine, and I did struggle with shadows in my photos today, but that can't be helped.  Here it is outside:
Aengland-lady-of-the-lake-swatch
The formula was ok, a bit thicker than I'm used to, but it lay down to a nice smooth finish.  Because of this, the coats I used were quite thick, so dry time was just medium.  It felt like it would be quite a fast drying polish if I thinned it a bit, but I wasn't in any rush, so I just waited for it to dry.  The brush was co-operative, quite soft, but just right for the formula of the polish.  I didn't need to clean up round my cuticles and as you can see the cuticle line is quite nice and even.

The silver sparkles you see here in the daylight are actually small holographic particles, but out of direct sun they're quite hard to see.  I find this with alot of scattered holos, and it's the reason I usually prefer linear holos for that 'bam' of holo goodness.  However, scattered holos do have their place, and are much more appropriate for places like work, where you can still angle your nails and enjoy them without them being too much in peoples faces.  Also they can be seen as a bit more grown up, but hey, you're as young as you feel that's what I say.  There shouldn't be age restrictions on what polish you can wear no-sirree!

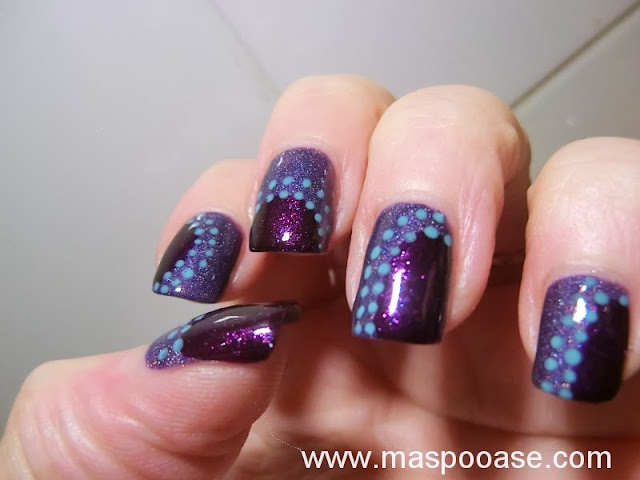
So here it is under the kitchen lights, captured as best I could:
A-england lady of the lake swatch
So then I had to decide what nailart to put over this lovely purple.  There was only one colour that came to mind, which I have used it before in THIS post, and that was Estee Lauders Pure Colour polish in Smashed.

So now I had my combo, what design to do?  Well, I was at a bit of a loss.  So I had a google about and I found one that was perfect on Polish You Pretty and I had to give it a try.  Here's the LINK to their tutorial, totally different colours than mine, but I followed the tut pretty much brush for brush.

I used the polish straight from the brush in the bottle to apply half moons of Smashed on my nails:
two-colour-nail-art
And then on their tutorial, they use a contrasting colour to make dots.  Well, I wasn't sure what colour to use, and while I was deciding, my lovely childhood bestie got in touch.  Her favourite colour is turquoise, and that also goes well with purple, so there we go, decision made!

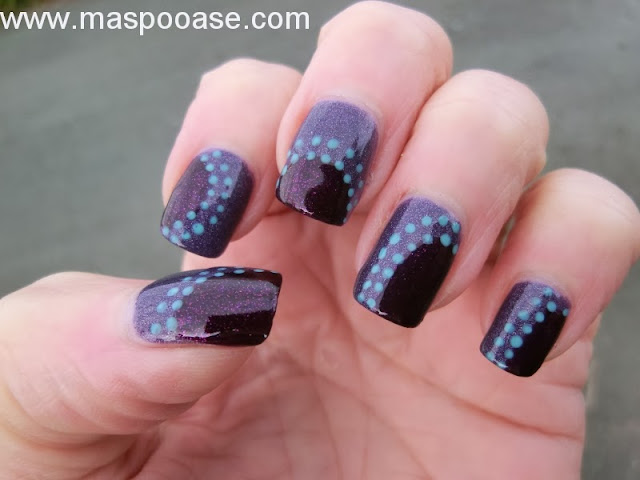
So, as per the tutorial, I dotted around where the two colours meet, and this is what I got:
purple-and-turquoise-nail-art
The turquoise I used is Maybelline Express Finish in Turquoise Lagoon.  I've used it in the past on my sunflower nailart tutorial HERE as a base, but not as an accent until now.  I topped it all off with a coat of Seche.

Here's another pic:
purple-and-green-nailart
The dots on my other hand (which I did first) were larger, and I don't think they look as good, so I do recommend using a smaller dotter, or a toothpick, if you're going to have a go at this look:
I did then make an effort to capture the holo of Lady of the Lake, and lovely glittery depth of the juicy blackberry colour of Smashed.  I didn't like Smashed as a full nail colour, it's a jelly-like finish, and as such I couldn't get it as opaque as I liked, but I love it layered like this.

Here's the close up:
Purple-nailart
Pretty hey?  Even still I'm frustrated at not being able to capture the sparkliness, but it's close!

Here's the super-closeup:
purple-and-green-nail-art
Hooray!  At last I showed the holo!  I know that Adina, who produces A-England polish, does so with alot of care and attention, and I really wanted to show its true beauty.  Admirably for the creator of a thriving company, she is still taking a hands-on approach with both her customer service and product feedback, and it really shows.

I bought Lady of the Lake from the A-England website LINK which currently only ships to the UK due to Royal Mail postage restrictions, but if you're international you can still order HERE to get your lovely A-England.

As much as I'll miss summer and its long lazy days, I'm happy to see Autumn arrive.  It's my favourite season, with its vibrant colours and crisp mornings.  I'm chosing to ignore the thought of dull rainy days for now!

Are you an Autumn lover like me?

Thanks for reading, and until next time...

MASPOOASE x x x
~Wendy~

Wednesday 21 August 2013

Artsy Wednesday - Inspired by Animation

Just a really quick one from me this week, I couldn't think of anything at all to match with this weeks theme, as I don't really watch many animated programmes at all.  However, I didn't want to let the side down, so I came up with a mani anyway.

I used two new polishes that I bought at the weekend, both from Superdrug, from a section called 'B'.

They were on 1/3rd off, and I think I paid less than £3 for each.  They are both from the B. Quick range.  A cream peach called damsel, and a pretty foil peach called precious.

Here's how it looks:
 I changed the look around for the other hand:
I only used one coat with each, which is always a winner.  The brush was the wide type and a little bit too stiff for my liking, but not desperately bad.

And, because we're talking about peach, obviously my choice of animation has to be James and the Giant Peach!
I'm sure the other girls will have been more inspired, why not take a look:

Catrine at Unnaked Nails (link)
Michelle at Labmuffin (link)
Maria at Maria's Nail Polish Blog (link)
Melanie at Nail and Polish (link)
Jessica at Beauty Gnome (link)
Emily at An Accent Nail (link)
Ameerah at Valiantly Varnished (link)
Anna & Haylee at Makeup and Masala (link)
Rosemarie at Every Little Polish (link)
Anna at Makeup N More (link)

Until next time...

MASPOOASE x x x
~Wendy~

Saturday 17 August 2013

Pretty Jelly Dream Cloud and Tetris Nail Decals reviewed

It's the weekend, yay!  I hope yours is going well.  I'm really enjoying doing not much this weekend.  Am back at home now, after having been out house/pet sitting for the best part of the last two weeks.  I never appreciate how useful it is having all my stuff around me until it's not there.  I did take nail polishes with me, but I was that busy with the animals that I never got a chance to use them.

It's blowing a gale and pouring with rain outside, so I can finally get around to trying out the Tetris decals that arrived last week.  My friend Adam McLevey showed me these, and my inner geek jumped up and down, clapping her hands.  He's actually a very talented artist, so if you're looking for a present for someone who's got everything, or you're into art yourself, it's worth taking a look  - click HERE to visit his website

So I racked my brains to think of a good base colour to use with these.  Of course, Tetris got popular by being played on the Gameboy.  I never had a Gameboy, I had an Atari Lynx, so I spent my time smashing up buildings in Rampage.  Before that, I had loads of those little hand held games that were as cheap as chips and only played one game each.  My favourite was one where you had to kill bats coming out of Draculas castle.  I played that for hours and hours and hours...

Anyway, I digress slightly.  The point I was trying to make was that I wanted to represent the grey that was the background to those handheld games.  Also if you rubbed the screen (which you weren't supposed to do) you got a rainbow effect.  So thinking about all these things, in my usual meandering way, brought me round to the decision to use Pretty Jelly Dream Cloud.  Pretty Jelly are an indie polish brand, and I love their polishes.  You can buy from Mei Mei's Signatures with international shipping, click HERE for her website

I've had it a while and can't remember exactly what I paid, but am pretty sure I paid around a tenner.  I was surprised when I went back to check that I haven't reviewed it yet, because I've worn it quite a few times.

So here we have it in just normal daylight.  No sun today:
You can see that holo desperate to show itself on my little finger, but mostly indoors it's this pewter grey, which slightly gives me pink finger syndrome, but not too badly.

This is two coats, which I put on yesterday, and because I was typing all day, got a little bit chipped.  Therefore, due to the lovely self levelling formula, I was able to just touch up the tips without anyone being able to tell too much.  No topcoat here.  One coat is too sheer to wear by itself without nail line, but two coats is fine.  Dry time was on a par with all the other Pretty Jellies I own, which is pretty fast.  Also three-free and cruelty free *happy face*

Here's what the brush looks like:
The brush was just right for the formulation of the polish, and as you can see it gave me no problems with untidiness at the cuticle area, no clean-up required. 

Initially I was slightly disappointed, as Dream Cloud was described as a slate grey.  To me that means a big dollop of blue in the colour, and I kind of struggle to see blue in this.  Once I'd got past that though, it's just the right tone for me, as I don't like vampy darks very much, and this has a lovely silver shimmer in it that makes it eminently wearable.  I even wore it for work, and my boss didn't mind, so it passes my SFW test with flying colours.

Having told you all these things about Dream Cloud, I haven't shown you its party peice yet!  As there's no sun today, we go back to the trusty kitchen under cupboard lights.  I've ordered a light box for art, so will be interested to see if it works well as my winter lighting for my blog posts.  If you've been following me for a while, you'll remember I did a whole post on struggling to find good winter blog lighting HERE

So here we have it:
Hello holo!  I love holos, especially linear ones, and this ticks all my boxes. 

So now I have a lovely base, let's get on to these nail decals.  I bought mine from Amazon UK, LINK here and I paid £3.00 including shipping, which isn't bad at all.  Here's what I got:
They're all on one sheet, and you have to cut each one out to use them.  They are FIDDLY!  I used nail scissors and they worked fine for that.  Then I filled a saucer with water, and popped my cut out decals on the surface.  Of course they sank, but that was ok.  Then after 30 seconds, I fished them out one by one with tweezers and placed them on my nail.

Here's the first one:
They can be slid around at first, so it's easiest just to place it on and then slide it about until it's in the position you want.  They're actually surprisingly strong considering they're so thin.  I couldn't see the clear backing over my polish at all, was very impressed with that.

So them I got round to doing all my other nails.  It was quite similar to playing tetris actually, deciding where to put all the pieces:
There's a coat of Seche Vite on here and as you can see, it didn't kill the holo effect, so that's good. 

Here it is back in daylight:
Overall, I'm happy with these.  I've always been a bit sceptical about decals, as I'm a bit of a perfectionist (oh, really?), and I didn't see how you wouldn't be able to see the clear backing.  But you 100% can't see it with these.  I'm definitely going to try some others.  Do you have any recommendations?

Until next time...

MASPOOASE x x x
~Wendy~

Wednesday 7 August 2013

Easy Nail Art with no tools - Artsy Wednesday: Blue

Artsy Wednesday again already!  This weeks theme is the colour blue.  I decided to go for something super easy which needs no special tools whatsoever.  As I mentioned last time, matte topcoat is my new favourite thing, so I decided to incorporate that too.

I started with Model's Own True Blue.  It was a nice formula, opaque in two coats, but I did find the brush quite awkward to paint neatly at my cuticles with.  Here it is by itself:
Models Own True Blue Swatch
Darker or vibrant colours don't usually do my skintone any favours, but I think I can almost get away with this one.

And then I decided I'd like to see it mattified, so I added a coat of Rimmel Matte Topcoat:
This topcoat doesn't give a completely matte finish, more of an eggshell finish, but I like it.  It does make the colour appear paler.

So, onto the nail art!  I've never done a matte/shiny look before, so that's what I decided to do:
All I did was use Seche Vite, with the brush straight from the bottle, and made random blobs over the mattified nails.  It makes them look like they're splashed with water, even though they're completely dry.  I really like it.

Here's another pic, this time outside:
Someone told me the colour reminded them of the TARDIS from Doctor Who, and now I like it even more!

What do you think?  Have you tried matte/shiny yet?

Lots more blue looks to see from the rest of the gang:

Catrine at Unnaked Nails (link)
Michelle at Labmuffin (link)
Maria at Maria's Nail Polish Blog (link)
Melanie at Nail and Polish (link)
Jessica at Beauty Gnome (link)
Emily at An Accent Nail (link)
Ameerah at Valiantly Varnished (link)
Anna & Haylee at Makeup and Masala (link)
Rosemarie at Every Little Polish (link)

Until next time...

MASPOOASE x x x
~Wendy~