Happy Saturday!
I hope you're having a great day. Mine's gone pretty well so far, I haven't been up to much, mostly painting my nails and drinking tea, which suits me fine! I do have some housework to be getting on with, which is why I'm sitting here blogging haha.
Today I bring you the third installment of my Pretty Jelly reviews. I bought 4, and have already reviewed Bullet Rouge HERE and Grape Escape HERE
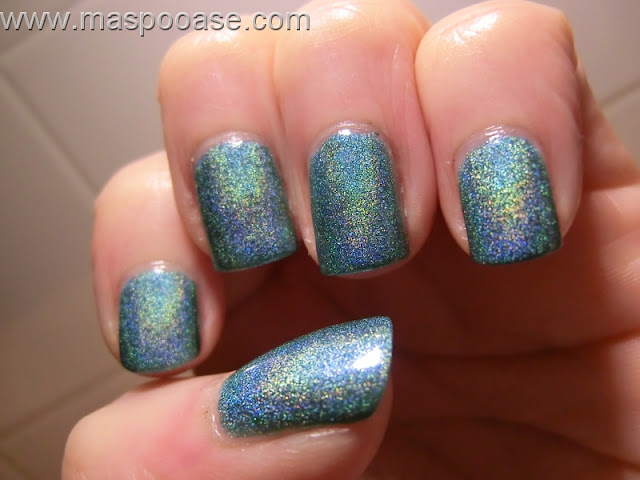
This one's called Diamond S-teal-er, which you would think makes it teal. To my eyes it's more like an icy mid-blue, not really enough green tone in it (in my opinion) for teal, but that doesn't make it any less pretty. And of course it's holographic anyway so who cares!
The holo is there, but it doesn't jump off the page with this one, although of course because I want to swatch a holo, it's grey and drizzly today, so that doesn't help. Here's how it looks:
I still have a bit of glitter left in my cuticles from wearing Nails Inc's fine sprinkles, but oh well.
This is two coats, with just regular basecoat and no topcoat. The formula on this one seemed a tad more gloopy than on the others I've tried. Don't get me wrong, it wasn't too awkward, but it didn't quite seem to glide the same. Dry time seemed a bit slower too, I wonder if I need to thin it a little bit? I think the lump on my middle finger is a bit of leftover glitter, I obviously wasn't very rigorous with my last removal! It had the same lovely high end finish as the others I've tried.
Here's a pic under the kitchen light to show the lovely holo:
I told you it was there! Lovely holo rainbow.
I already knew when I started painting my nails what nail art I was going to do on this, as I woke up with it in my head (sad I know). As Spring is on its way, I thought I would cheer it along with some flowers.
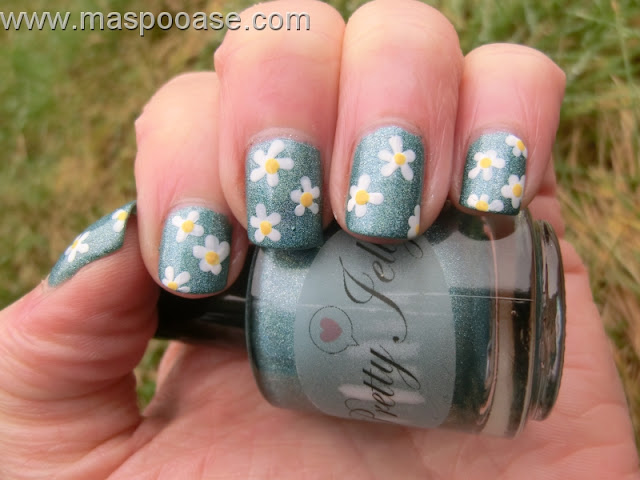
Daisies are a double win, because they're one of my favourite flowers, and also they're mega easy to do with a dotting tool. All you need to do is start from the outside of a petal and drag to the centre, repeat four or five times, then do a dot in the middle. If you can make a dot, you can do these flowers.
So here's what I ended up with:
I used OPI Alpine Snow for the petals and Collection 2000 Hot Looks in Lemon Soda for the centres. I didn't topcoat it because I didn't want to kill the holo. I took two pics I couldn't decide between, so I'm showing them both to you.:
And here's what it looks like with its holo kick:
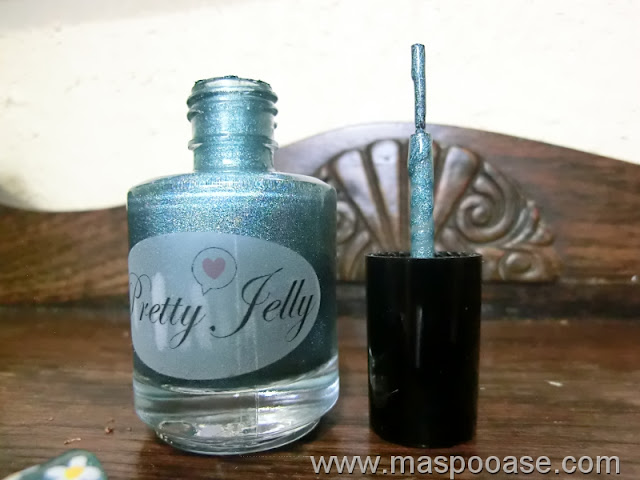
So pretty! And because I've been a bit lax at remembering to do it lately, here's what the brush looks like:
You can buy the Pretty Jelly polishes from the Etsy shop HERE and I paid $10, which equates to around £6.50. Obviously alot of shipping on the top of that though because it came all the way from America.
The polishes are 3-free and cruelty free so happy days.
Unfortunately for me there are now some new, different, gorgeous, holo's in her shop, and I want them all!
What do you think?
Until next time...
MASPOOASE x x x
~Wendy~
Monday, 1 December 2014
Orange and White nail art
Hi there!
Hope you're having a great start to your weekend. Today should have been my first lie in for 12 days, so typically I woke up at 6.20am and couldn't get back to sleep! I lay there with my eyes open for about half an hour, and eventually gave up and decided to get up. And of course I've spent those extra hours productively, by painting my nails.
Ever since I did the L'Oreal Masquintense review (link here) I haven't been able to get the orange and white packaging out of my head. So I've known what colours todays manicure was going to be all week. I wasn't sure whether to do dots, stripes, or stamping though. As my last couple of nail art posts have been stripes, and I wasn't really feeling dots today, I decided to go with stamping. I picked a swirly image from Cheeky plate B, which I bought from Amazon, here's the link if you want to buy it, it's priced at £6.99. The images stamp well, and it's good that there are 42 images on the plate, but I'm not sure I'd use all of them. However I'm using one today!
For my white base, I wasn't sure whether to use OPI's Alpine Snow, or OPI's My Boyfriend Scales Walls. I did a comparison on the two here but in the end I decided to go for My Boyfriend Scales Walls due to its better formula. This means that I'll probably end up never using Alpine Snow as a base coat again, but it does come in handy for dotting etc.
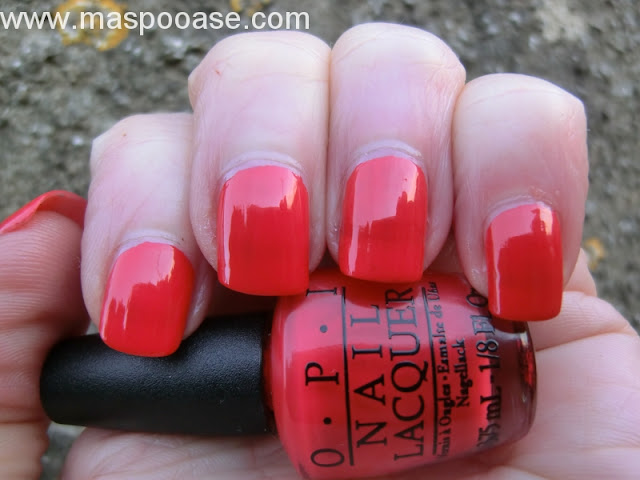
Then I got out my oranges to see which ones stamped best. In the end it was a toss up between two. Essies Orange It's Obvious, which you can see here and Color Clubs Wham Pow. The Color Club is more neon though, so it won.
And here's what I ended up with:
It's not perfect, but I like it! It's actually more neon than it shows in this pic, but still wearable. Nice and jolly, which is always a good thing.
Here's another pic, closer up this time:
As you can see, I smudged the middle finger, and took a chunk out of my base coat at the cuticle on the same finger. I also missed a spot on my little finger, but, hey, you get the idea! I'll stop picking holes in my manicure now haha.
And here's how it looks to the outside world, seeing as I obviously don't go around holding a bottle of polish in my hand all the time (actually, I'm not sure that's really true...):
I like it because to me it looks like water marbling, without any of the mess. I love how marbling looks, but I just can't bring myself to dunk my whole finger in a sheet of suspended polish and then spend time cleaning it back off again.
I like this stamping design more than I thought I would. I have a feeling you'll be seeing it a few times this summer, in different colours, and maybe gradients too. Hopefully a bit more tidily done than this one!
Until next time...
MASPOOASE x x x
~Wendy~
Labels:
Color Club,
fauxnad,
konad,
My boyfriend scales walls,
nail art,
Nailart,
OPI,
orange,
stamping,
Wham Pow,
white
OPI The Top 10 mini collection review - first 5
Hi there!
Hope you're well today. Snow is forecast here AGAIN! Spring is playing hide and seek with us at the moment.
I picked these pretties up at TK Maxx a few weeks ago, and have had them in my 'to swatch' pile since. Here's how they look in the box:
Apologies for the slightly rubbish picture. I didn't find out until it was too late that it was impossible to get the polishes out without wrecking the box. I believe these to be the 'light' half of the OPI Top Ten collection (Amazon LINK here) but I didn't see the other darker half in TX Maxx.
Without further ado, let's get on with it. The first in the box is Alpine Snow:
I actually already own the full size of Alpine Snow, and I did a comparison post with My Boyfriend Scales Walls (HERE) which is one of my most popular posts. The first coat is patchy, but the second coat evens it out, so this is two coats. It's also pretty fast drying. I was pleased to find that the brush in the polish was still a pretty decent size, even though it's a mini polish.
Next up we have Bubble Bath:
I also own the full size polish of this one (why did I buy this set haha), and I already knew I didn't like it so much, too sheer for me. This is two coats. Of course it would be good for a french manicure, which is probably why it was formulated in the first place. I noticed that the mini bottles are comfortable to pose with.
Next is Tickle My France-y:
This was also quite disappointingly sheer. At two coats I still had alot of VNL. However I do like the colour, so I went with another coat, so this is 3 coats in this picture. It is a very pretty nude.
Second to last we have Kiss Me On My Tulips:
This is a bright pink that does nothing for my skintone, but no fault of the polish for that. It reminds me a bit of Orly's Basket Case. Perhaps I'll do a comparison on the two at some point. At one coat it still had VNL, but this is two, and as you can see, hardly any VNL left. Dry time was med/fast.
And last but not least we have Red Lights Ahead... Where?
This is two coats. Too sheer for me. It was relatively fast drying though. Lifes too short for undies on a polish when I have other reds that don't need it. Not too impressed with this one.
Here's a picture of the brush, which was pretty consistently good across all the polishes:
So there we have it. That's the whole (half of the) set reviewed. I paid £19.99 at TK Maxx and to be honest, if you're like me and don't like to see your nail line through your polish, I wouldn't recommend this set. Oh well, live and learn! One of these days I'll actually have that blog sale I keep wondering about having, and most of these will probably be in it. I'm sure there's somebody out there who has the patience to apply more coats than I do. I can't comment on wear time, as I haven't liked any of them enough to wear for any length of time.
They were all very shiny though, no topcoat in any of these pictures, and pretty fast drying, so it wasn't all bad. Now I know the brushes are OK, I would buy more OPI minis, but I would check out the reviews first to make sure they're opaque enough.
What do you think? Yay or nay? Is VNL a big no-no for you too or don't you mind it?
Until next time...
MASPOOASE x x x
~Wendy~
Labels:
Alpine Snow,
Bubble Bath,
Francy,
Kiss me on my tulips,
mini,
OPI,
red lights ahead where,
review,
Swatch,
swatches,
Tickle My France-y
Sci Fi Nail Art
Hi everyone!
Hope you're enjoying your Saturday, and are keeping nice and warm? The roads all around my house have been closed today because of the snow, so I've been stranded in! So instead of going out doing shopping and visiting the Post Office as I'd planned, I've been confined to the house. That doesn't mean it's been a wasted day though, I've painted a picture, and have been doing some nail art too, so it's all good.
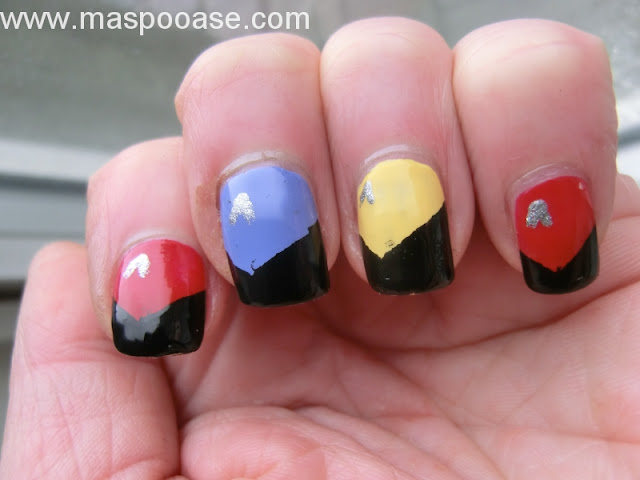
Not long ago, I saw this post from Work, Play, Polish (link) about Star Trek uniform nailart, and I couldn't get it out of my head. I asked her if it was ok to have a go myself, and she kindly said yes it was fine. Actually what I ended up with wasn't exactly the same as hers, and not as neat or nice, but I'm still pretty pleased with it. Please excuse my middle finger cuticle, I nibbled at it in a fit of gin inspired (ginspired?) madness, I've tried to blur it with my photo software so you don't have to look at it.
So here's the manicure:
After applying my basecoat, I applied Maybelline Express Finish in Cherry, which I blogged about (here) just one coat needed. The blue is Nails Inc's Ebury Bridge, which you can see more of (here) and the yellow is Collection 2000's Lemon Soda.
Then I marked off the bottom section of my nails using gridding tape, which I prefer to striping tape even though it's more expensive because it's less curly, and painted the bottom of my nails using the black from the Simple Pleasures scented halloween set which I reviewed last year (link)
Finally I used Rimmels silver polish Your Majesty and a dotting tool to make the badges and I was done. I think they came out OK.
So this got me thinking of other sci-fi nail art looks. I've already done one on the daleks (link) which looked like this:
The base for this manicure is Jessica's holo polish Disco Diva, and this mani looked awesome in the sun.
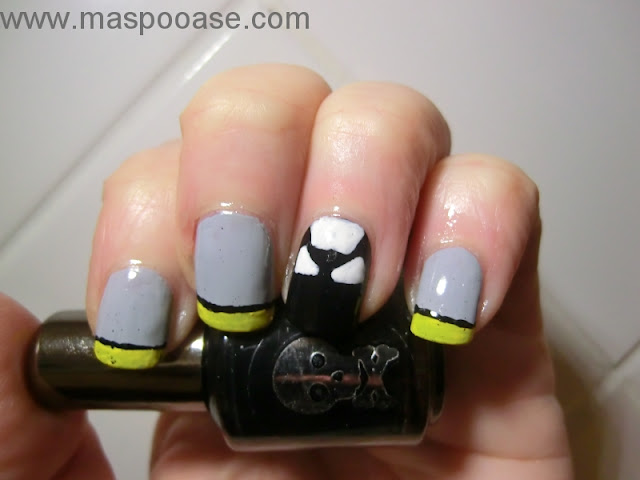
So, back to today. I decided I wanted to do some batman nails, so off to the internet I went. I found two sources of inspiration. This post from appletosh (link) and this youtube video by pixiepolish (link)
It didn't come out brilliantly, but it was a bit of an experiment. In her video pixiepolish paints using acrylic paint and a cocktail stick. I've never done this before, I usually use small brushes, but she made it look pretty easy so I thought I'd have a go. As usual with YouTube, it looked easy only because she's reeeeaaaally good at it haha.
So here's what I ended up with:
As you can see, my thumb is lumpy bumpy, even with a thick coat of Seche on, and my Seche picked up some of the black paint when it smudged the thumb and dotted it all over my manicure. I've had better nailart attempts haha.
However, strangely, I'm still quite pleased with it! I think the ring finger came out really well, this is the second attempt at that, the first one was so rubbish I actually took it off and started again. On the tutorial I saw, they painted his face on the bottom half of the nail, but I preferred it without.
If you ignore the thumb, it looks pretty good:
This is one manicure I'd like to try again, and get neater, because I think it's pretty ace. Batman is too cool.
So there we go, three different ideas you can try. Which is your favourite?
Until next time...
MASPOOASE x x x
~Wendy~
Artsy Wednesday - Pastels
Hi everyone, hope you're having a good week?
I'm on my holidays in Torquay, having a lovely time. The weather could be better, but that's the risk you take when holidaying in the UK.
Silly me forgot to bring my laptop, so I'm going to attempt to make this post purely with my iphone 3gs. Don't expect too much! I won't be able to resize or colour correct, so sorry about that. The theme this time is pastels, which is great for me, as they're my favourite!
Here's what i came up with:
I used M&S Limited Collection in Pale Lavender, then i masked off the top half and painted the end of my nail in OPI Mod About You.
I then used a Color Club striper to paint the white stripes, and then removed the tape. A coat of Seche Vite, and voila, funky french!
I hope you like what I came up with, don't forget to check out what the other Artsy Wednesday girls did -
Catrine - Unnaked Nails
www.unnakednails.com
Michelle - Lab Muffin
www.labmuffin.com
Alanna - Pretty Purple Polish
www.prettypurplepolish.com
Maria - Maria's Nail Polish Blog
http://mariasnailpolishblog.blogspot.co.uk/?m=1
Melanie - Nail and Polish
http://nailandpolish.blogspot.co.uk/?m=1
Jessica - Beauty Gnome
http://beautygnome.blogspot.co.uk/?m=1
Emily - An Accent Nail
http://anaccentnail.blogspot.co.uk/?m=1
Ameerah - Valiantly Varnished
http://www.valiantlyvarnished.com/?m=1
Until next time...
MASPOOASE x x x
~Wendy~
2True Fast Dry Polish Shade 11 Swatches
Hi again!
Hope you're well today.
Here we have a surprise buy for me, a super-cheap £1.99 nude polish! Now I'm not a big fan of nude polishes, despite loving my pastels, but this one caught my eye because I'm looking for an antique cream for a nail art look I've got in my head.
I thought this might be the one I'm looking for. Unfortunately it wasn't, (not cream coloured enough) but I like it all the same:
It was streaky in one coat, and opaque in two, which is what's shown here. The formula was a tiny bit runny, but nothing too awkward, and perhaps half a shade darker once on and dry than in the bottle. It reminded me very much of the 'camel coats' we all used to wear, way back when...
It also reminded me very much of a bottle of concealer, and once I'd got that in my head I felt weird painting it on my nails haha! Here's another pic:
And finally, here's a pic of the brush, partly because there's a flash on the packaging that says 'new flat brush' so I thought you might like to see it, and partly because I always want to show brushes on my polish review posts. I'll include front view & side view to show that it is, indeed, flat:
And actually, the brush was the only thing that slightly let this polish down, the shape was actually fine, I did my little finger in more or less one stroke and pressed flat it went into a more slightly rounded shape, but it was just that little bit too stiff bristled to be perfect. However, bear in mind I'm comparing it with Nails Inc and Jessica polishes that cost more than a tenner each. No complaints on glossiness or coverage though!
Also not only are they £1.99 each, they're 3 for £5 in Superdrug, which is where I got mine, so they really are a bargain! Thoroughly recommended.
Until next time...
MASPOOASE X X X
~Wendy~
Mid Browns - Nails Inc Ganton Street Vs Jessica Guilty Pleasures
I have decided that fate doesn't want me to blog about nail polish at the moment.
Because of my pesky ongoing achilles tendon problems, I have to have physiotherapy on a Thursday afternoon.
Because I don't have enough annual leave left for my hospital appointments, I'm having to work on Saturday morning instead to make my hours up. This is so INCONVENIENT! Guys and girls who regularly work at the weekends, you have my undying admiration. I just feel like theres no time to do anything.
Also, because I'm working on the Saturday, I can't have my usual swatch-a-thon on Friday night.... so all in all it's a right royal pain in the behind.
Well, here's two fingers up to fate, because I've managed to do it anyway! You may know that I'm craving a dark brown nail polish right now, but with the aforementioned problems I've had to resort to just mooning over web swatches and wishing for things to get back to normal.
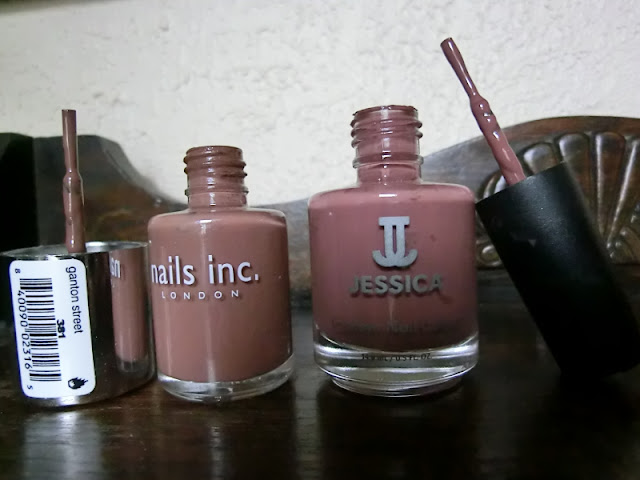
I decided to look through my polishes to check what browns I actually do have, in case I already had one (I didn't but you never know until you look!), but I did find two mid brown polishes which were virtually identical, and similarly priced, so I thought you might be interested in seeing a comparison. They are, as the post title suggests, Nails Inc Ganton Street and Jessica's Guilty Pleasures. For a change I will start with the brush & bottle shot:
There you see, pretty similar, right? The Jessica is a tad warmer, but very similar all the same. Apologies about the dark corner on the picture, with Autumn setting in it's getting harder and harder to find bright places to put things...
So onto the swatches, I found the best place to show the difference was under the trusty LED craft light. All pics are two coats with no topcoat. Nails Inc on left 2 fingers:
Then, amazingly, the sun came out for a moment:
Then it went back in. So here's a pic in shaded light:
Application wise, there's hardly anything to pick between them either. If you've used Nails Inc before, this is their usual creme formula, which I like as it's got good coverage and is pretty quick drying. The Jessica was a teeny tiny bit more sheer on first coat, but by coat two they looked the same coverage-wise. I preferred the Nails Inc brush, because the Jessica one was a tad softer so therefore not quite as easy to work with, but I really am splitting hairs (LOL) here.
Out of the two, it was the Nails Inc I chose to put on afterwards, it's a Malteser brown, and somehow for a darker colour it seems quite work appropriate, which is good. Unless of course, you do what I did and put nail art all over it haha. It didn't exactly work, but I liked the colour scheme:
The Jessica has 14.8ml in and the Nails Inc has 10ml in. Nails Inc polishes cost £11 and Jessica Polishes cost around a tenner, but I have seen both cheaper on Ebay. So mil for mil the Jessica is probably better value, but if you're willing to spend more than £10 on a polish that doesn't really matter so much to you.
So there you go! Formulation and application are both pretty much the same so it just comes down to the tint you like the best. Hopefully this will prove helpful to someone!
Until next time.....
MASPOOASE x x x
~Wendy~
Sally Hansen Nail Art Pens Review
Hi again!
Hope you're having a great weekend
So, this story starts with me in my beloved TK Maxx.... just browsing around in the nail section, as you do, when I came across a Sally Hansen Nail Art Pen in gold. It was only £2.99, so I thought I'd give it a go, and as it happened I really liked it!
I had a look on Amazon UK to see if there were any more colours made, and there were, so I got a few more. There were none with free shipping, so all in all I paid about a fiver each for the others. Here's what I've ended up with:
As you see, as usual I went a bit mad haha! Obviously at some point in Rite Aid in the USA these have been half price and in a gift pack. Good job I wasn't buying them as a present. I bought the silver one from a different seller and the packaging on that one was all neat and tidy and nice. I didn't get a black or a white because they were alot more expensive or in 2-packs. Who needs 2?
These are:
08 Gold
05 Blue
07 Silver
04 Hot Pink
10 Purple Violet
06 Red
I thought the best way to show you the coverage and finish was to paint two nails in a dark colour and two nails in a light colour, so I used my new OPI My Boyfriend Scales Walls (2 coats) for the light, and my Collection 2000 All That Jazz (one coat) for the dark. I used the same colours on the other hand only the opposite fingers, and I really liked the look, I'm going to try it as a proper mani at some stage. But for today, they are just canvasses:
My Boyfriend Scales Walls was OK to apply, but because of the hype surrounding it I was expecting more - I know, never happy. It was how I was expecting Alpine Snow to be, not bad application but took longer than I thought to dry.
So first off I did some (very wiggly) stripes, thick and thin, with all the colours, on both the light and the dark. The sheerest was the red, which reminded me very much of tomato soup, and the most opaque was either the pink or the blue:
The white polish canvas wasn't quite dry, if you look carefully in the thick silver stripe you can see where it dug in a bit. As you can see, the gold is more of a copper really, but pretty anyway.
And heres some nail art to show you what you can do with them:
Once it was dry I topped it off with a coat of Seche Vite, and that's how it's shown here. I wasn't very pleased with the cocktail glass on the index finger (yes, that's what it is!) but the rest came out ok. My favourite is the stars and dots.
And in the best 'showing the brush' tradition, here's what the nibs look like:
They feel a bit like a felt pen to use, and theres a ball bearing inside that rattles when you shake it up and down to mix up the lacquer inside. You press the nibs in if you want to work more polish down onto the nib, but so far I haven't needed to do that, except for the first use.
All in all, I like them. They're definitely great for doing tiny dots with no fussing and worth owning just for that alone. They didn't have very good reviews on Amazon, and if I'd read those before I got I the first one I wouldn't have bought them, so I'm glad it happened the way it did. I just have to hope that a black and a white one are on special offer at some point!
I hope this helps someone who's been considering them, or just been interesting for you generally, am planning some cuticle and nail care product reviews soon, and will have some Essie swatching to do if I ever get a day when I'm off when there's some good light! All to look forward to :-)
Until next time....
MASPOOASE x x x
~Wendy~
Labels:
Collection 2000,
hearts,
My boyfriend scales walls,
nail art,
Nail Art Pen,
OPI,
paw prints,
Sally Hansen,
stars
Subscribe to:
Comments (Atom)










.jpg)
